|
|||||||


| Sponsored Links (Register now to hide all advertisements) |
|
|
 |

|
Thread Tools | Display Modes |
 12-02-2024, 06:54 AM
|
#1 |
|
Senior Member

Join Date: Jul 2013
Location: Las Vegas, NV
Posts: 128
|
How would I go about testing this fuel gauge for 1936[ATTACH]Fuel Gauge 2.jpg[/ATTACH]
|

|

|
|
12-02-2024, 07:57 AM
|
#2 |
|
Senior Member

Join Date: Jul 2010
Location: 36 miles north of Albany NY
Posts: 3,323
|
I think you can use a 1-1/2 volt battery to see if the needle moves., if you have an aftermarket sender in the tank you’ll never get an accurate reading on your gauge.
|
|
|
|
| Sponsored Links (Register now to hide all advertisements) |
|
|
|
12-02-2024, 08:09 AM
|
#3 |
|
Senior Member

Join Date: Sep 2014
Location: Mid-Coast Maine
Posts: 3,346
|
The electric fuel gauge has a coil that heats up with amperage from the tank sender which also has variable output controlled by arm position which heats a bi-metal strip sending amps to the gauge.
From https://forums.aaca.org/topic/238627...-gauge-repair/ "19tom40 Posted June 30, 2014 A good original type sending unit should read near 0 ohms at all positions of the arm. An ohm meter will read the resistance of the coil wound around the bi-metal strip and the resistance of the contact points. The coil only has a few windings and will have very little resistance. The dash unit has no control over the amount that the needle moves, this is done by the sending unit. As the amount of fuel shown by the dash gauge is just an approximate value, the full current test is accurate in determining if the gauge is functional. Here is a photo of the inside of an original type fuel sending unit. The gap in the contact points is controlled by the position of the float arm. If you do not have an original type available to you, remove the tank unit and connect it to the gauge with a jumper wire. Measure the depth of the tank and bend the arm on the sending unit to travel that distance. I like to have about 1.5" straight section near the part that moves the resister slider and then a 90 degree bend that is adjusted for the depth of the tank. Check to see that it reads full near the top and empty near the bottom. I don't have a photo of one at this time. 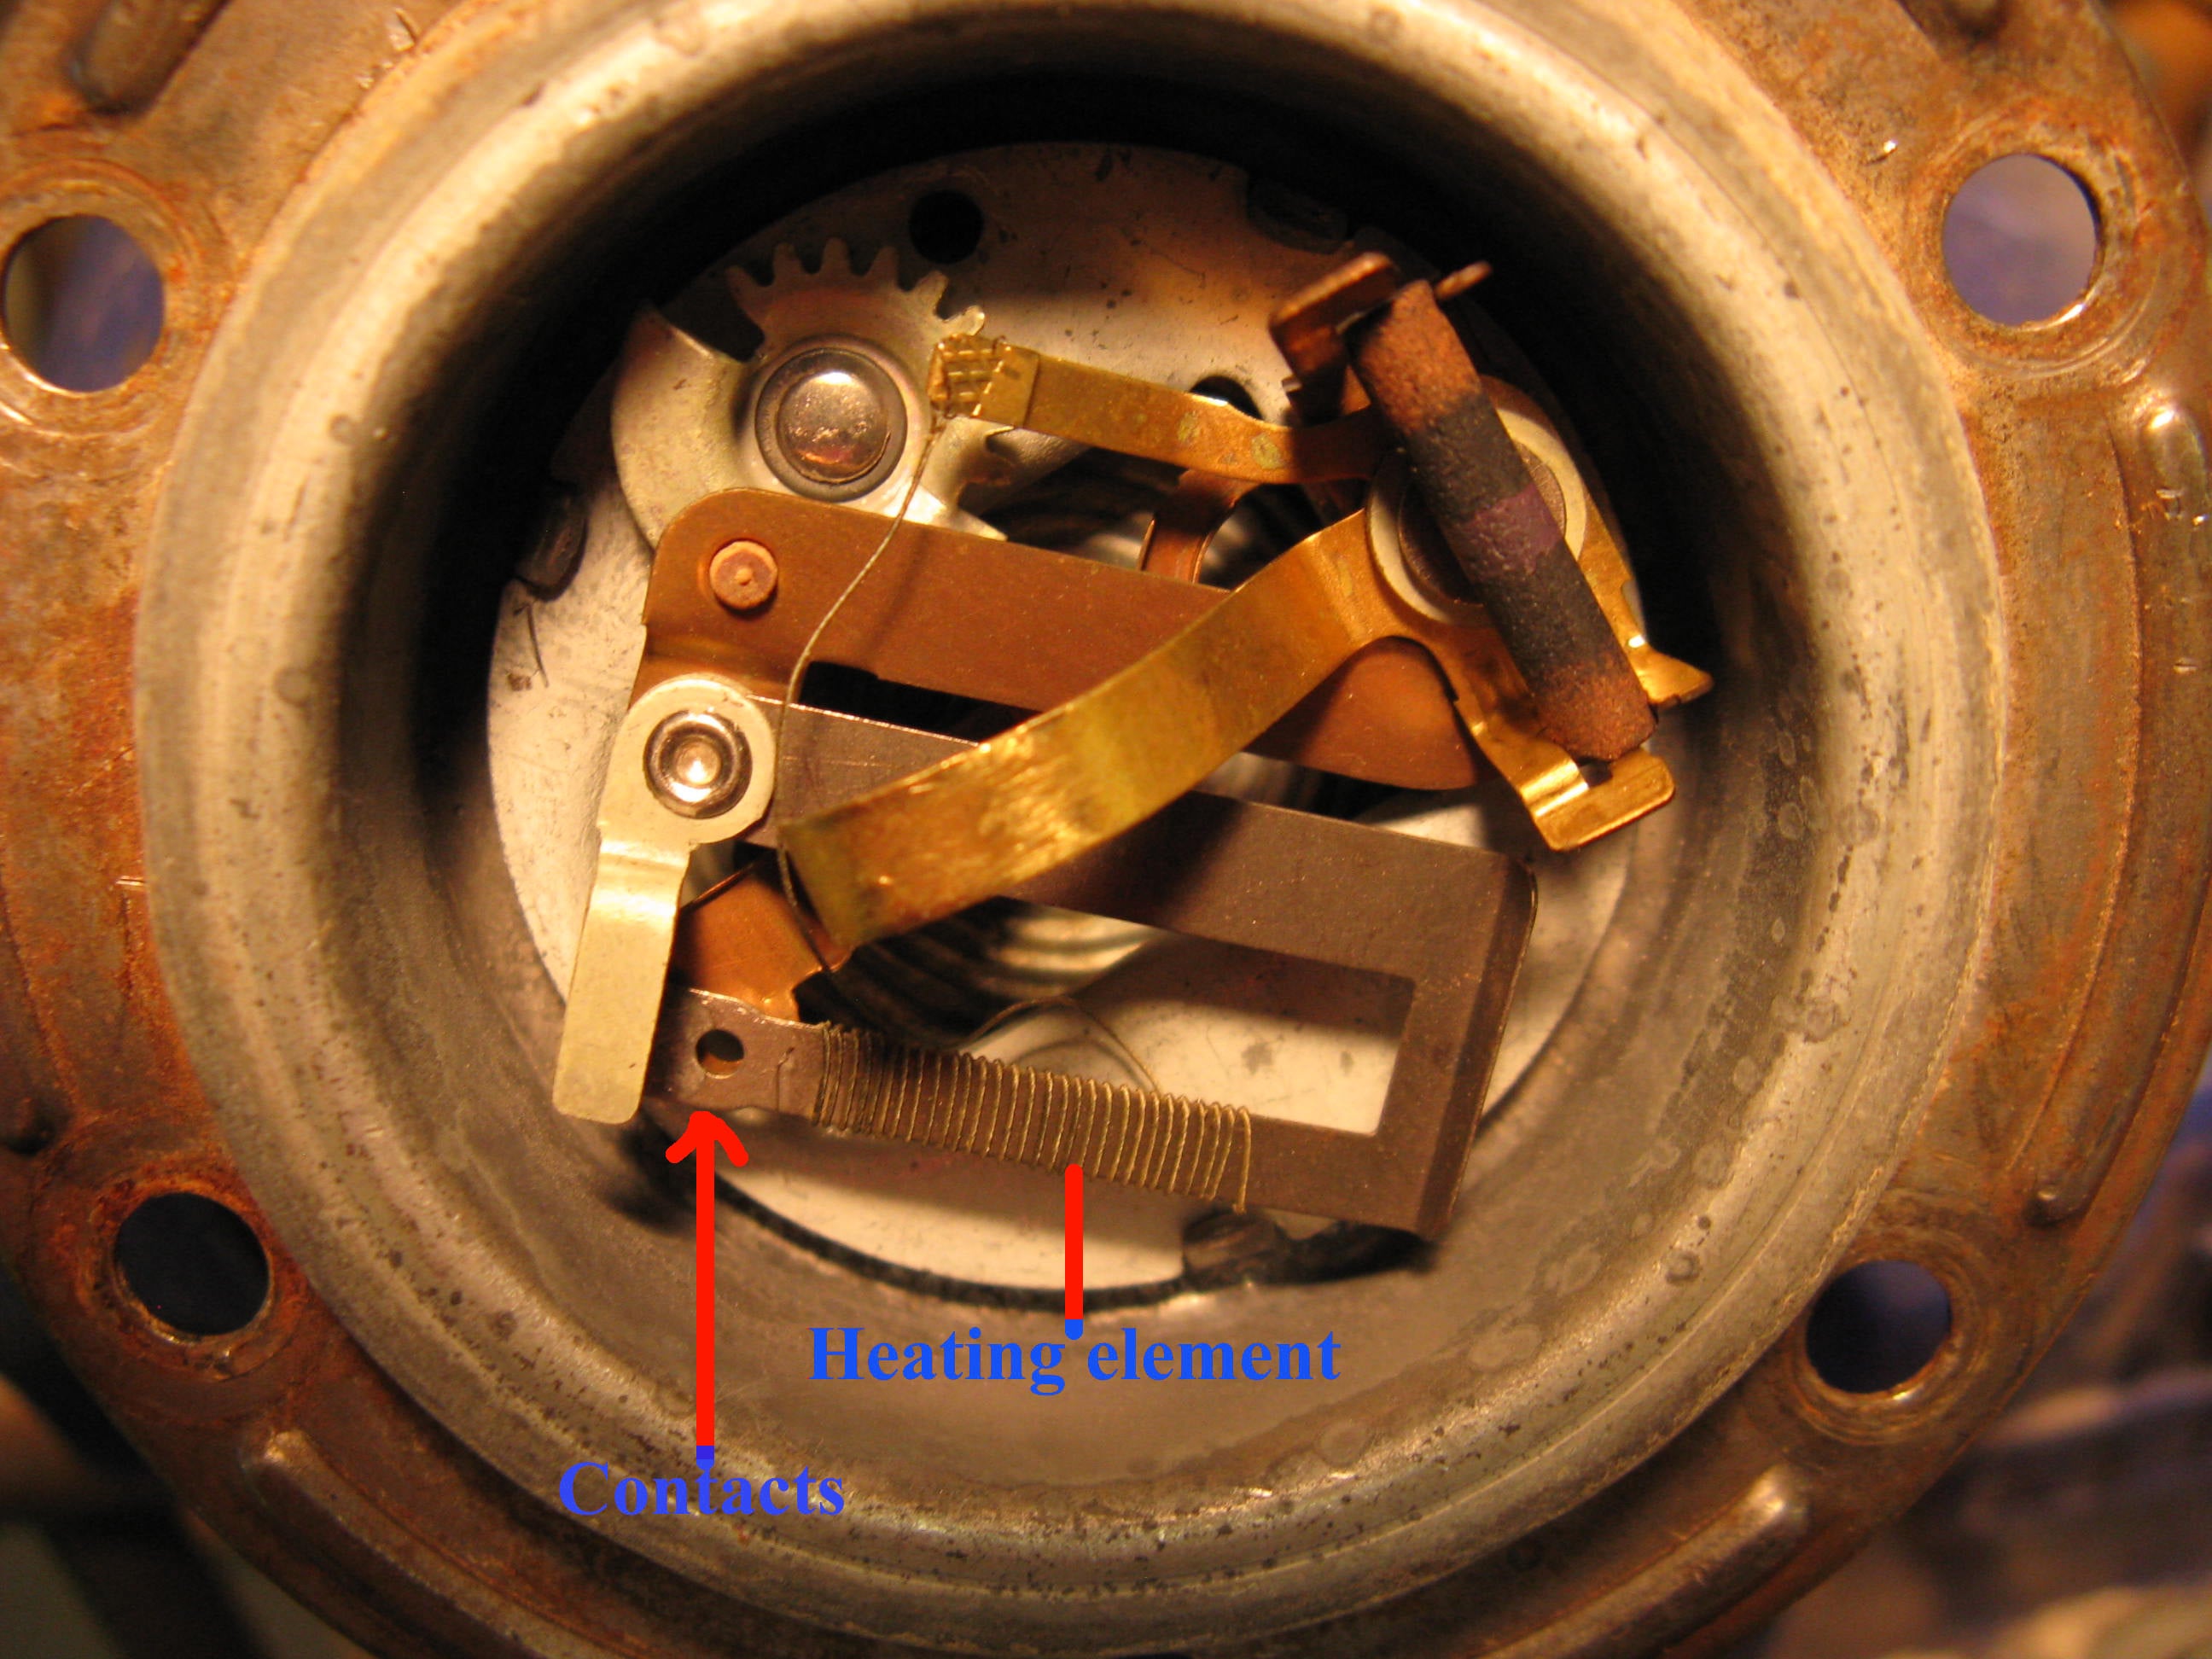 " "Koates may chip in here. Glenn
__________________
Archives of historical but relevant older articles: ------------- Hover mouse over the links below and click! ~~~~~~~~~~~~~~~~~--------------- Rumble Seats Notes Techno Source for the 1932 thru 1953 Flathead Ford |
|
|
|
|
12-02-2024, 08:39 AM
|
#4 |
|
Senior Member
Join Date: Sep 2014
Location: Mid-Coast Maine
Posts: 3,346
|
If it was me, I'd put a AA battery temporarily across the two gauge posts. If the needle moves, it is good.
Glenn
__________________
Archives of historical but relevant older articles: ------------- Hover mouse over the links below and click! ~~~~~~~~~~~~~~~~~--------------- Rumble Seats Notes Techno Source for the 1932 thru 1953 Flathead Ford |
|
|
|
|
12-02-2024, 01:10 PM
|
#5 |
|
Senior Member
Join Date: May 2010
Location: Cuba, NY
Posts: 329
|
I have used a 6v lamp battery to test them. But, be careful not to keep the circuit on too long or the heating element will burn out. When in the car, the heatinng element is not on constantly, but continually is going on and off. terry
|
|
|
|
|
12-03-2024, 06:55 AM
|
#6 |
|
Senior Member
Join Date: Jul 2013
Location: Las Vegas, NV
Posts: 128
|
Sponsored Links (Register now to hide all advertisements)
|
|
|
|
|
12-07-2024, 12:28 PM
|
#7 |
|
Senior Member

Join Date: Oct 2013
Location: Glens Falls NY
Posts: 1,403
|
If you get the system working but your dash gauge is working but inaccurate, there is a way to adjust the dash gauge to accurately show the tanks contents. It involves adding measured amounts of gas to the tank. Then dropping the dash gauge itself down "live" to access its interior and adjust it's settings. I've done all my dash gauges in that manner. I may have posted the instructions here long ago or you can PM me.
|
|
|
|
|
01-18-2026, 11:06 AM
|
#8 |
|
Junior Member
Join Date: May 2024
Location: Kingston
Posts: 11
|
Dr Brown
Could you send me your testing instructions for gas gauge. I set up test bench with nos gauge and a used float all King Sealy, I believe. Using a 12 v battery, switch and single voltage reducer12 to 6v, checking voltage, gauge started smoking.gauge was at full swing. Everything was grounded, can’t see my problem. Regards Skyking |
|
|
|
|
01-18-2026, 11:51 AM
|
#9 | |
|
Senior Member
Join Date: Sep 2014
Location: Mid-Coast Maine
Posts: 3,346
|
Quote:
__________________
Archives of historical but relevant older articles: ------------- Hover mouse over the links below and click! ~~~~~~~~~~~~~~~~~--------------- Rumble Seats Notes Techno Source for the 1932 thru 1953 Flathead Ford |
|
|
|
|

|
01-18-2026, 01:53 PM
|
#10 |
|
Senior Member
Join Date: Dec 2024
Location: central coast california
Posts: 593
|
FYI...
i discovered that the some of the dashboard gauge wiring on my '41 involved conductive plates. my research showed, and empirical evidence also showed, that wires with sufficient gauge to effectively dissipate heat (i.e. thick enough) and with the flexibility (thin enough) to do the job don't exist. in that if they are not thick enough heat will melt the insulation, and if not thin and flexible enough it's next to impossible to manipulate them into position. so much so that Ford decided that plates were necessary to do the job. in particular between the fuel gauge and the oil pressure gauge. |

|
|
|
01-18-2026, 02:54 PM
|
#11 | |
|
Senior Member
Join Date: Sep 2014
Location: Mid-Coast Maine
Posts: 3,346
|
Quote:
https://www.acerracing.com/collections/superworm-wire :-) For larger gauges, use welding cable which is also very flexible using multi strands and slippery inner casing.
__________________
Archives of historical but relevant older articles: ------------- Hover mouse over the links below and click! ~~~~~~~~~~~~~~~~~--------------- Rumble Seats Notes Techno Source for the 1932 thru 1953 Flathead Ford |
|
|
|
|
|
01-18-2026, 04:12 PM
|
#12 | |
|
Senior Member

Join Date: Jul 2011
Location: SF Bay Area
Posts: 7,634
|
Quote:
__________________
Alan |
|
|
|
|
|
01-19-2026, 07:08 AM
|
#13 |
|
Senior Member

Join Date: May 2010
Location: Rockwall TX
Posts: 6,018
|
What glennpm said in post #4. I have worked on these gauges for yrs and use a 9V smoke detector batt with alligator clips attached to wires .That hold them secure to the batt terminals.I just touch those wire momentarily to the gauge lugs.If needle moves the gauge is good - to me.I reverse polarity if no movement .If still no movement I open up the gauge and do surgery.Most times that heating element wire is severed.Sometimes I am able to do a repair and sometimes not.
|
|
|
|
|
«
Previous Thread
|
Next Thread
»
 Linear Mode

|
|

| Sponsored Links (Register now to hide all advertisements) |
|
|
All times are GMT -5. The time now is 08:34 AM.