|
|||||||


| Sponsored Links (Register now to hide all advertisements) |
|
|
 |

|
Thread Tools | Display Modes |
 09-10-2018, 06:35 PM
|
#1 |
|
Member
Join Date: Sep 2018
Location: Clayton, Michigan
Posts: 48
|
I recently acuired my dad's T-bird and I'm just starting to undo the carnage. I have rebuilt the teapot on it and changed the plugs and wiing. I have to replace the vacuum lines to the distributor. There was a solid piece of brake line running to the distributor from the intake vacuum port. That makes it almost impossible to move the distributor. Anyone using flexible tubing instead?
|

|

|
|
09-10-2018, 06:41 PM
|
#2 |
|
Member
Join Date: Sep 2018
Location: Clayton, Michigan
Posts: 48
|
|
|
|
|
| Sponsored Links (Register now to hide all advertisements) |
|
|
|
09-10-2018, 07:07 PM
|
#3 |
|
Senior Member

Join Date: Aug 2012
Location: Abq, NM
Posts: 3,607
|
Steel line is original. There should be two of them, with special fittings on the ends.
When the distributor is installed in the correct position it doesn't need to move much to set the timing. The steel lines are reproduced, part # 12370-BL A sturdy fuel rated hose could be used if you have correct fittings for attaching it at the ends. Last edited by dmsfrr; 09-10-2018 at 07:19 PM. |
|
|
|
|
09-10-2018, 07:17 PM
|
#4 |
|
Member
Join Date: Sep 2018
Location: Clayton, Michigan
Posts: 48
|
The one to the carb side has already been replaced with a flexible one. The manifold vacuum line has to be in place to adjust the timing, correct?
|
|
|
|
|
09-10-2018, 07:24 PM
|
#5 |
|
Senior Member

Join Date: May 2010
Location: Midland Park, NJ
Posts: 3,982
|
The second line runs from the advance unit to a fitting in the back of the carb, not the manifold. Usually when adjusting the distributor, the lines are disconnected and plugged. When the timing is set, the lines are bent to reconnect them.
__________________
48 Ford Conv 56 Tbird 54 Ford Victoria |
|
|
|
|
09-10-2018, 07:25 PM
|
#6 | |
|
Senior Member
Join Date: Aug 2012
Location: Abq, NM
Posts: 3,607
|
Sponsored Links (Register now to hide all advertisements)
Quote:
The '55 Shop Manual I have with instructions for a similar distributor, but with one vacuum line, says to disconnect and plug the line. If the dual vacuum canister isn't fully functional the timing won't advance properly, if at all, and the engine can be damaged. see this link... https://www.ctci.org/gilsgarage/Crac...stManifold.php . Last edited by dmsfrr; 09-13-2018 at 03:21 PM. |
|
|
|
|

|
09-10-2018, 08:01 PM
|
#7 |
|
Senior Member

Join Date: Jun 2010
Location: Detroit suburb, MI
Posts: 3,706
|
When you set the timing the vacuum lines (both) need to be disconnected at the distributor and then plug the ends. If you have to turn the distributor a little bit to set the timing, then you have to bend the line slightly to reinstall them.
Sal |
|
|
|
|
09-13-2018, 02:12 PM
|
#8 |
|
Member
Join Date: Sep 2018
Location: Clayton, Michigan
Posts: 48
|
Thanks.
|
|
|
|
|
09-16-2018, 10:02 AM
|
#9 |
|
Member
Join Date: Sep 2018
Location: Clayton, Michigan
Posts: 48
|
 Anyone know what the port is at the bottom of the intake just to the left of the mounting bolt? Last edited by Yotehunter66; 09-16-2018 at 10:12 AM. |
|
|
|
|
09-16-2018, 10:19 AM
|
#10 |
|
Senior Member

Join Date: Aug 2018
Location: N.E.Ohio
Posts: 116
|
Most choke heaters have 2 tubes, one is manifold heat and the other is sort of a vent.
I believe that is the vent tube. When it's running, see if you have vacuum there. I don't think the choke vent has vacuum. |
|
|
|
|
09-16-2018, 11:28 AM
|
#11 |
|
BANNED
Join Date: Jul 2010
Location: Balto.Md
Posts: 382
|
That is the original location for the heat riser tube that goes to the choke.
The existing line you have for the choke which goes over the valve cover and to an orifice on the exhaust manifold is not the original path. It will work properly in the modified fashion that way but it tells me that you possibly have a non original right side exhaust manifold or one that has been modified. There would have been a brass 90* elbow connected to the shown intake manifold orifice and then a short tube with a coupling at the carb side run to the carb choke. Oldmics |
|
|
|
|
09-16-2018, 11:38 AM
|
#12 |
|
Member
Join Date: Sep 2018
Location: Clayton, Michigan
Posts: 48
|
Any harm in it being open?
|
|
|
|
|
09-16-2018, 11:50 AM
|
#13 | |
|
Senior Member

Join Date: Aug 2012
Location: IN A 'GALAXIE' FAR FAR AWAY
Posts: 6,475
|
Quote:
__________________
***** - WHY IS IT ...  - -... that everything you buy in the grocery store is either wrapped in or contained in plastic but the government doesn't want you to carry it out in a plastic bag? WONDERING IN W(BY GOD)V ...
 DIAGNOSED CDO - (OCD In Correct Alphabetical Order) |
|
|
|
|
|
09-16-2018, 12:16 PM
|
#14 | |
|
BANNED
Join Date: Jul 2010
Location: Balto.Md
Posts: 382
|
Quote:
I don't really see any harm with it open. The heat that will escape from the opening could lead to a slightly higher air temperature underhood and the paint will always be burnt off around the orifice. Could block it off with a metal plug if your concerned. Oldmics |
|
|
|
|
|
09-16-2018, 12:27 PM
|
#15 | |
|
Senior Member
Join Date: Aug 2012
Location: Abq, NM
Posts: 3,607
|
Quote:
If it's open it's not a problem unless the tube is rusted thru inside the exh crossover. Exhaust will leak out both ends and it would be better if they are plugged. Last edited by dmsfrr; 10-23-2018 at 11:07 AM. |
|
|
|
|
|
09-16-2018, 12:43 PM
|
#16 |
|
Senior Member
Join Date: Jun 2010
Location: Detroit suburb, MI
Posts: 3,706
|
Yotehunter66,
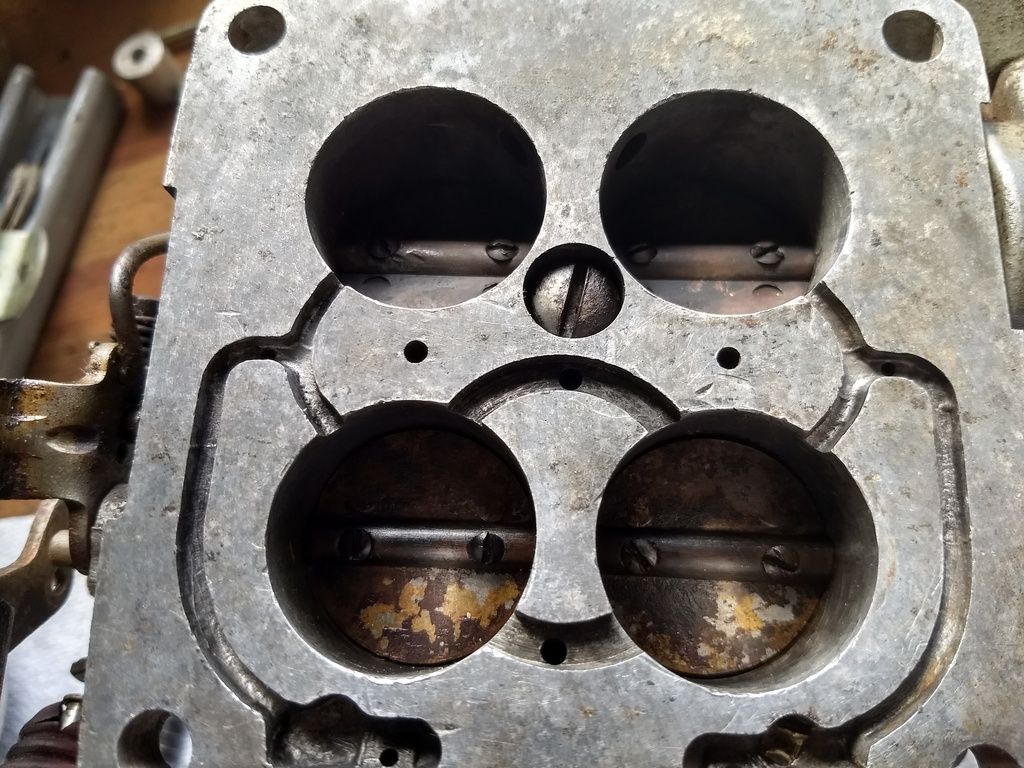
Hope you did a good job on the Teapot carb you rebuilt. Looks pretty dirty, unless you rebuilt it a long time ago. Might need a new secondary diaphragm too. Looks like the frayed edge of it sticking out. Sal |
|
|
|
|
09-16-2018, 01:06 PM
|
#17 |
|
Member
Join Date: Sep 2018
Location: Clayton, Michigan
Posts: 48
|
It's been cleaned and rebuilt. Doesn't mean it's right though. I put a kit in it about a month ago.I don't recall changing any secondary diaphragm. There is a lot to do on it. It was my dad's project put due to his age and health he hasn't been able to work on it over the last ten years or so.
|
|
|
|
|
09-16-2018, 01:33 PM
|
#18 |
|
Member
Join Date: Sep 2018
Location: Clayton, Michigan
Posts: 48
|

|
|
|
|
|
09-16-2018, 01:36 PM
|
#19 |
|
Member
Join Date: Sep 2018
Location: Clayton, Michigan
Posts: 48
|
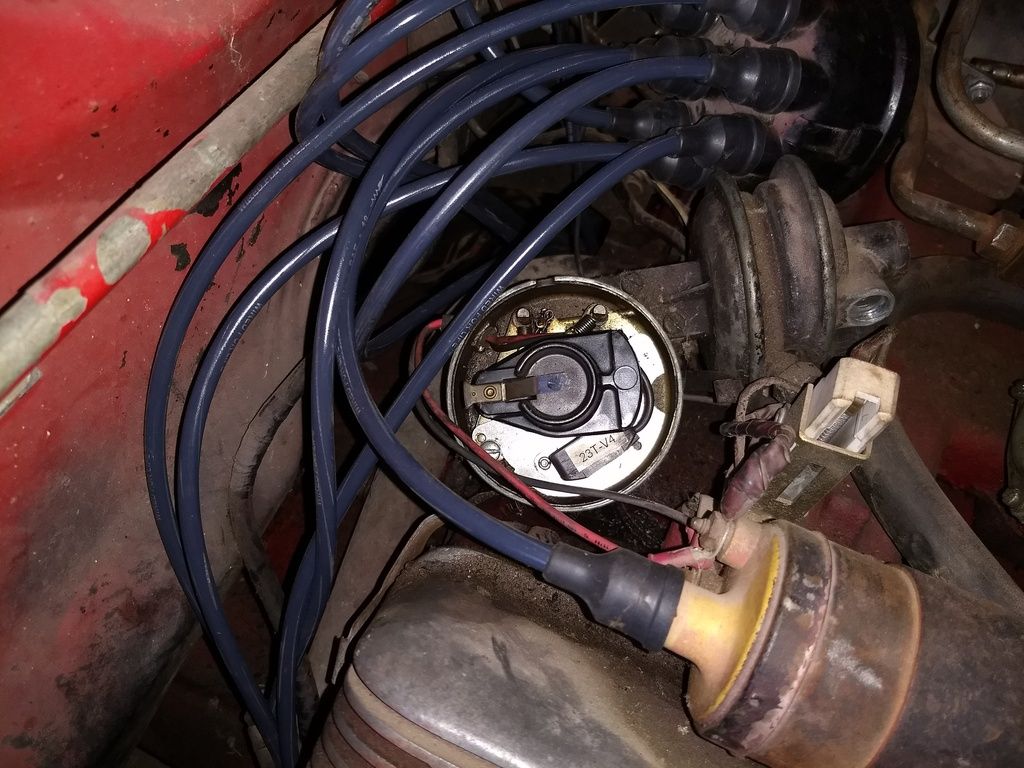
Electronic ignition is in it now. Is there a set gap between the pick up and the plastic piece that goes over the distributor cam lobes?

|
|
|
|
|
09-16-2018, 03:38 PM
|
#20 |
|
Senior Member

Join Date: May 2010
Location: Palmer, Alaska
Posts: 1,575
|
If I remember correctly, there should be a set gap. It should have been specified in the kit for the Electronic ign. system. do not use a regular feeler gauge when setting the gap between the pick-up coil and the reluctor. There are special brass feeler gauges for this purpose. They can be bought at most tool dealers, or parts stores.
|
|
|
|
|
09-16-2018, 03:53 PM
|
#21 |
|
Member
Join Date: Sep 2018
Location: Clayton, Michigan
Posts: 48
|
Yeah I read that somewhere. I need to figure out who made this one.
|
|
|
|
|
09-16-2018, 05:19 PM
|
#22 |
|
Senior Member

Join Date: May 2010
Location: NorCal
Posts: 2,617
|
Set the gap at .030" Should be close
|
|
|
|
| Sponsored Links (Register now to hide all advertisements) |
|
|
|
09-16-2018, 06:06 PM
|
#23 |
|
Member
Join Date: Sep 2018
Location: Clayton, Michigan
Posts: 48
|
Who's the teapot guru on here if I need to get it rebuilt?
|
|
|
|
|
09-16-2018, 08:36 PM
|
#24 |
|
BANNED
Join Date: Jul 2010
Location: Balto.Md
Posts: 382
|
Sal"s the man for teapots. Contact scacala thru a P.M. and as a plus he"s in your neck of the woods !
Oldmics |
|
|
|
|
09-16-2018, 10:01 PM
|
#25 | |
|
Senior Member
Join Date: Jun 2010
Location: Detroit suburb, MI
Posts: 3,706
|
Quote:
I can hep you with whatever you need for your teapot carb. I've been doing them for a long time. Sal Cicala [email protected] (586) 612-1650. |
|
|
|
|
|
09-17-2018, 07:39 AM
|
#26 |
|
Member
Join Date: Sep 2018
Location: Clayton, Michigan
Posts: 48
|
Sponsored Links (Register now to hide all advertisements)
|
|
|
|
|
09-17-2018, 11:29 AM
|
#27 |
|
Member
Join Date: Sep 2018
Location: Clayton, Michigan
Posts: 48
|
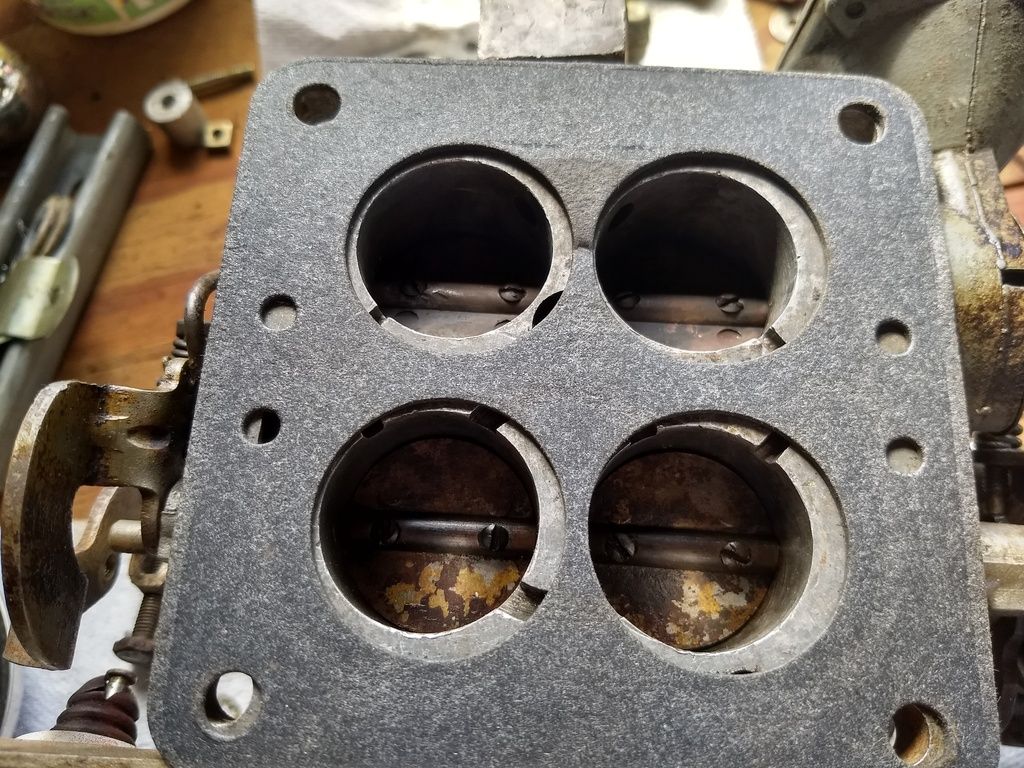
I pulled the carb back off and noticed that the gasket lines up with with one of the small holes over one of the vacuum passages. The gasket came with the kit but is it the right one?
|
|
|
|
|
09-17-2018, 12:08 PM
|
#28 |
|
Senior Member
Join Date: Jun 2010
Location: Detroit suburb, MI
Posts: 3,706
|
Yes, that gasket will work OK. To make the kits universal, they put in larger bore holes so it would also work on the '56 Lincoln teapot which had larger throttle bores.
I got your email and replied just now. Sal |
|
|
|
|
09-23-2018, 12:44 PM
|
#29 |
|
Member
Join Date: Sep 2018
Location: Clayton, Michigan
Posts: 48
|
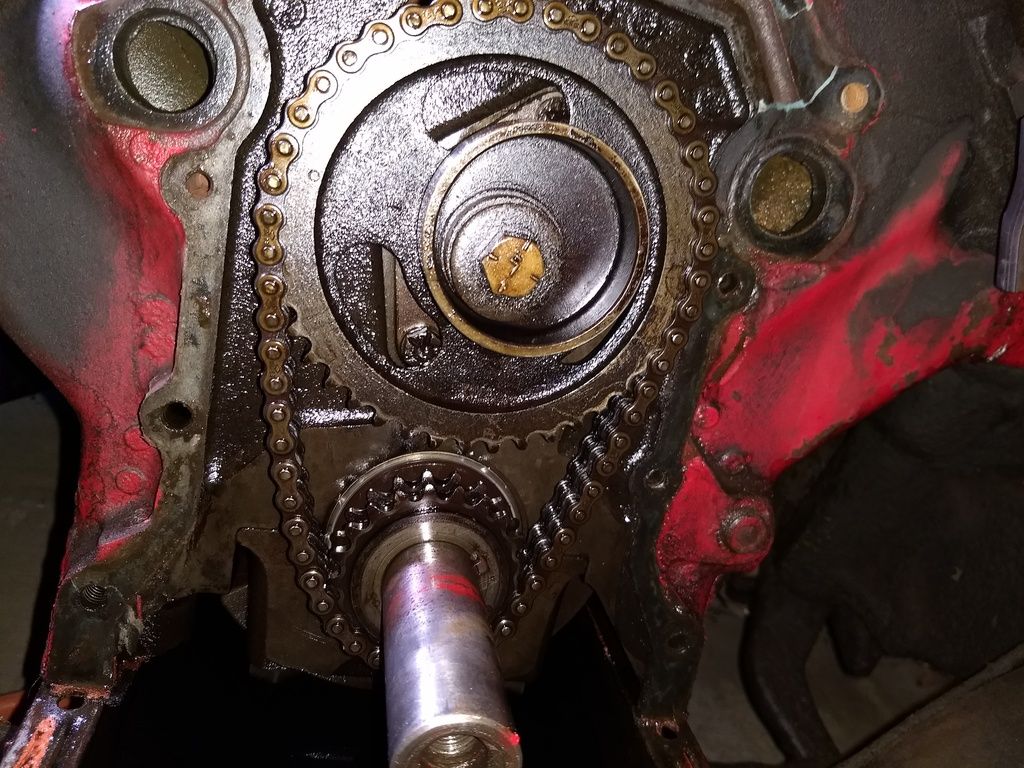
Getting ready to pull the timing cover off to check the alignment. I've read about the 12 links between the marks. Anything else I should look for. Chain is new but my dad thinks he timed it like any normal engine. Twelve pins I should say. Not links.
|
|
|
|
|
09-23-2018, 01:30 PM
|
#30 | |
|
Senior Member
Join Date: Aug 2012
Location: Abq, NM
Posts: 3,607
|
Quote:
And if you accidentally think this timing chain position has anything to do with cyl #1 being at TDC Don't let it confuse you, because it doesn't. see attached image Last edited by dmsfrr; 10-23-2018 at 11:11 AM. |
|
|
|
|
|
09-23-2018, 03:08 PM
|
#31 |
|
Member
Join Date: Sep 2018
Location: Clayton, Michigan
Posts: 48
|
Noticed that the oil pan bolts to the timing cover. What a PITA!
|
|
|
|
|
09-24-2018, 03:32 AM
|
#32 | |
|
Senior Member
Join Date: Aug 2012
Location: IN A 'GALAXIE' FAR FAR AWAY
Posts: 6,475
|
Quote:
-THIS IS WHAT YOU WILL SEE -
__________________
***** - WHY IS IT ... -... that everything you buy in the grocery store is either wrapped in or contained in plastic but the government doesn't want you to carry it out in a plastic bag? WONDERING IN W(BY GOD)V ...
DIAGNOSED CDO - (OCD In Correct Alphabetical Order) |
|
|
|
|
|
10-17-2018, 07:01 AM
|
#33 |
|
Member
Join Date: Sep 2018
Location: Clayton, Michigan
Posts: 48
|
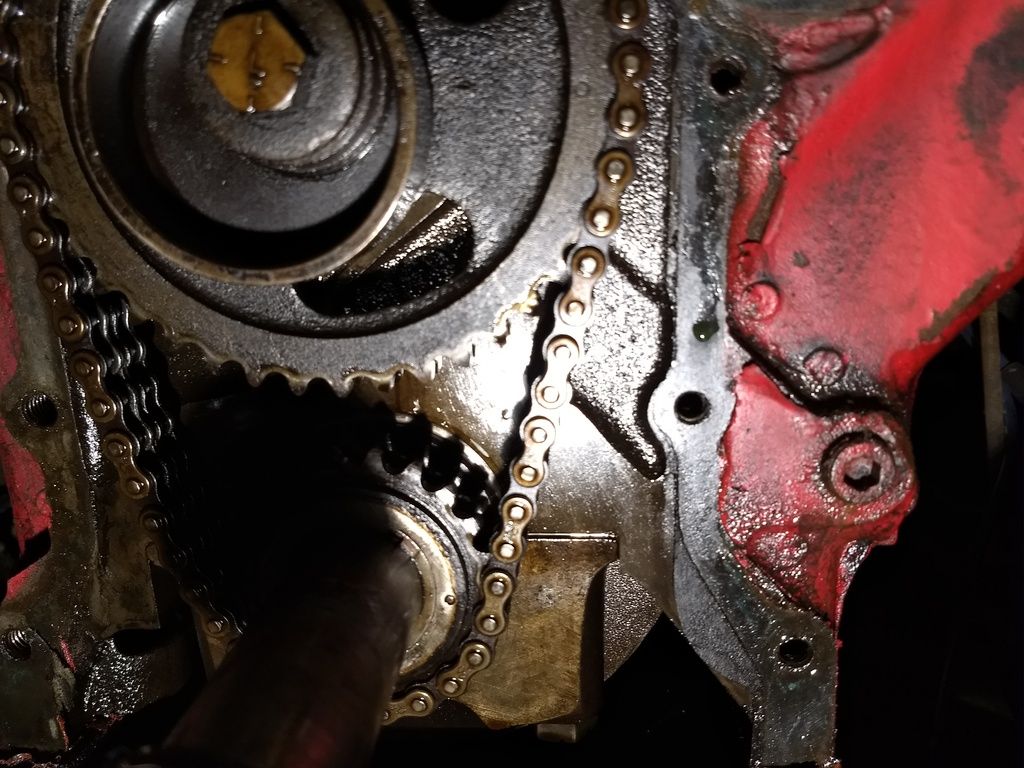
Finally got the timing cover off. I have the rotor pointing at #1 spark plug wire and this is where the timing marks are currently.
|
|
|
|
|
10-17-2018, 10:45 AM
|
#34 |
|
Senior Member
Join Date: Jun 2010
Location: Detroit suburb, MI
Posts: 3,706
|
It looks like your not getting any ignition advance with no vacuum lines to the distributor. The one port on the diaphragm appears to have the threads stripped too.
Sal |
|
|
|
|
10-17-2018, 11:11 AM
|
#35 | |
|
Senior Member
Join Date: Aug 2012
Location: Abq, NM
Posts: 3,607
|
Quote:
With the spark plugs out, use the damper pulley bolt to rotate the crankshaft until the keyway and timing mark on the crank gear are in the correct position, see attached image, then look for the timing mark on the cam gear. Looking at your 2nd photo, you may need to rotate the crankshaft another full turn. It should match the diagram, if it doesn't that's a problem to fix. Last edited by dmsfrr; 10-17-2018 at 11:40 AM. |
|
|
|
|
|
10-17-2018, 12:31 PM
|
#36 | |
|
Senior Member
Join Date: Aug 2012
Location: Abq, NM
Posts: 3,607
|
Are you sure the timing chain is new? It looks a bit loose in this photo.
. Quote:
Last edited by dmsfrr; 10-17-2018 at 07:59 PM. |
|
|
|
|
|
10-17-2018, 12:44 PM
|
#37 | |
|
Senior Member
Join Date: Aug 2012
Location: IN A 'GALAXIE' FAR FAR AWAY
Posts: 6,475
|
Quote:
Try this one-
__________________
***** - WHY IS IT ... -... that everything you buy in the grocery store is either wrapped in or contained in plastic but the government doesn't want you to carry it out in a plastic bag? WONDERING IN W(BY GOD)V ...
DIAGNOSED CDO - (OCD In Correct Alphabetical Order) |
|
|
|
|
|
10-17-2018, 01:00 PM
|
#38 |
|
Senior Member
Join Date: Aug 2012
Location: IN A 'GALAXIE' FAR FAR AWAY
Posts: 6,475
|
You gotta watch this-
https://www.youtube.com/watch?v=b1Z2L9pgMXU He's almost as old and ugly as me ... 
__________________
***** - WHY IS IT ... -... that everything you buy in the grocery store is either wrapped in or contained in plastic but the government doesn't want you to carry it out in a plastic bag? WONDERING IN W(BY GOD)V ...
DIAGNOSED CDO - (OCD In Correct Alphabetical Order) |
|
|
|
|
10-17-2018, 06:21 PM
|
#39 |
|
Senior Member
Join Date: Jun 2010
Location: Detroit suburb, MI
Posts: 3,706
|
The only thing he said wrong in the video is that there were 12 links on the timing chain between the two dots on the gears. It's actually 12 pins (not links). It makes a difference.
Sal |
|
|
|
|
10-17-2018, 06:54 PM
|
#40 |
|
Member
Join Date: Sep 2018
Location: Clayton, Michigan
Posts: 48
|
He said he changed it but it definately has a lot of slop in it. So when the timing marks are in the proper position where should I expect the rotor to be pointing? Are the marks not TDC for #1 cylinder?
|
|
|
|
|
10-17-2018, 07:01 PM
|
#41 | |
|
Senior Member
Join Date: Aug 2012
Location: Abq, NM
Posts: 3,607
|
Quote:
The "12 pins between the marks" position on the crank & cam gears is not related to cyl #1 TDC. . Last edited by dmsfrr; 10-23-2018 at 11:16 AM. |
|
|
|
|
|
10-17-2018, 07:06 PM
|
#42 |
|
Member
Join Date: Sep 2018
Location: Clayton, Michigan
Posts: 48
|
Okay after watching the video it looks like the rotor should be 180 from #1 when the timing marks are in the correct position. Should I just change the chain or put a set on it?
|
|
|
|
| Sponsored Links (Register now to hide all advertisements) |
|
|
|
10-17-2018, 07:46 PM
|
#43 | |
|
Senior Member
Join Date: May 2010
Location: Midland Park, NJ
Posts: 3,982
|
Your assumption is incorrect. When the rotor is at the # 1 wire spot on the distributor the pointer should line up with the timing mark at the pulley. At this position, both rockers on # 1 cylinder should be loose (valve lash). This is top dead center. The chain is probably ok (but looks loose) - you have to remember that the crank goes around twice in relation to the cam.
As dmsfrr said, don't confuse the chain marks with setting up the distributor at TDC Remember #1 cylinder is the front cylinder on the right (passenger side of the engine. Quote:
__________________
48 Ford Conv 56 Tbird 54 Ford Victoria Last edited by paul2748; 10-17-2018 at 08:06 PM. |
|
|
|
|
|
10-17-2018, 08:08 PM
|
#44 |
|
Senior Member

Join Date: May 2017
Posts: 566
|
My only suggestion is Take LOTS of pictures, lots of close ups. I am helping a friend with a 55 bird. Right now we are trying to figure out how to put the windshield back in. Yes did all the rope stuff. There are two metal spacers or something. We think they go between the rubber and the metal frame, but the lower rear corners do not fit all the way down. So take lots of pictures, then take more.
Steve |
|
|
|
|
10-17-2018, 08:32 PM
|
#45 | ||
|
Senior Member
Join Date: Aug 2012
Location: Abq, NM
Posts: 3,607
|
Quote:
If you're going to replace the chain, change the gears too. They wear-in to each other. FYI, the crankshaft key is at approx 7 o'clock when cyl #1 is at TDC. (photo 1 below) Quote:
. Last edited by dmsfrr; 10-19-2018 at 09:20 PM. Reason: add photo |
||
|
|
|
|
10-18-2018, 03:37 AM
|
#46 | |
|
Senior Member
Join Date: Aug 2012
Location: IN A 'GALAXIE' FAR FAR AWAY
Posts: 6,475
|
Sponsored Links (Register now to hide all advertisements)
Quote:
Setting the timing chain on this style engine has nothing to do with IGN timing. You are merely timing the cam to the crank. Once assembled with the timing cover and pointer can you verify/set the IGN timing (verify correct dist rotor position). It is also a good practice to verify possible balancer outer ring slippage and true TDC. You replace the timing set in this instance.
__________________
***** - WHY IS IT ... -... that everything you buy in the grocery store is either wrapped in or contained in plastic but the government doesn't want you to carry it out in a plastic bag? WONDERING IN W(BY GOD)V ...
DIAGNOSED CDO - (OCD In Correct Alphabetical Order) |
|
|
|
|
|
10-18-2018, 08:07 AM
|
#47 |
|
Member
Join Date: Sep 2018
Location: Clayton, Michigan
Posts: 48
|
All I know is when I took it apart I made it a point to set the timing mark on the balancer at what I thought was TDC and then just looked to see where the rotor was in relation to that and it was pointing at #1 but apparently that has nothing to do with the setting of the marks of the cam and crank. I'll roll crank gear over to where it should be by the pics and diagrams and see where the cam is then.
|
|
|
|
|
10-18-2018, 08:52 AM
|
#48 | |
|
Senior Member
Join Date: Aug 2012
Location: IN A 'GALAXIE' FAR FAR AWAY
Posts: 6,475
|
Quote:
Find #1 cyl compression stroke and align timing marks. Then you check DIST rotor position. Does that help or am I just adding to the confusion ...
__________________
***** - WHY IS IT ... -... that everything you buy in the grocery store is either wrapped in or contained in plastic but the government doesn't want you to carry it out in a plastic bag? WONDERING IN W(BY GOD)V ...
DIAGNOSED CDO - (OCD In Correct Alphabetical Order) |
|
|
|
|
|
10-18-2018, 04:22 PM
|
#49 |
|
Member
Join Date: Sep 2018
Location: Clayton, Michigan
Posts: 48
|
Don't think so. The cam and crank are lined by their marks and the balancer is marked for TDC for ignition so that the rotor is then aligned with #1 wire. Regardless the first step is to put the two gears and pin count correct. If all is right when I put it back together and put the balancer to TDC then the rotor will be positioned right.
|
|
|
|
|
10-18-2018, 05:30 PM
|
#50 | |
|
Senior Member
Join Date: Aug 2012
Location: Abq, NM
Posts: 3,607
|
Quote:
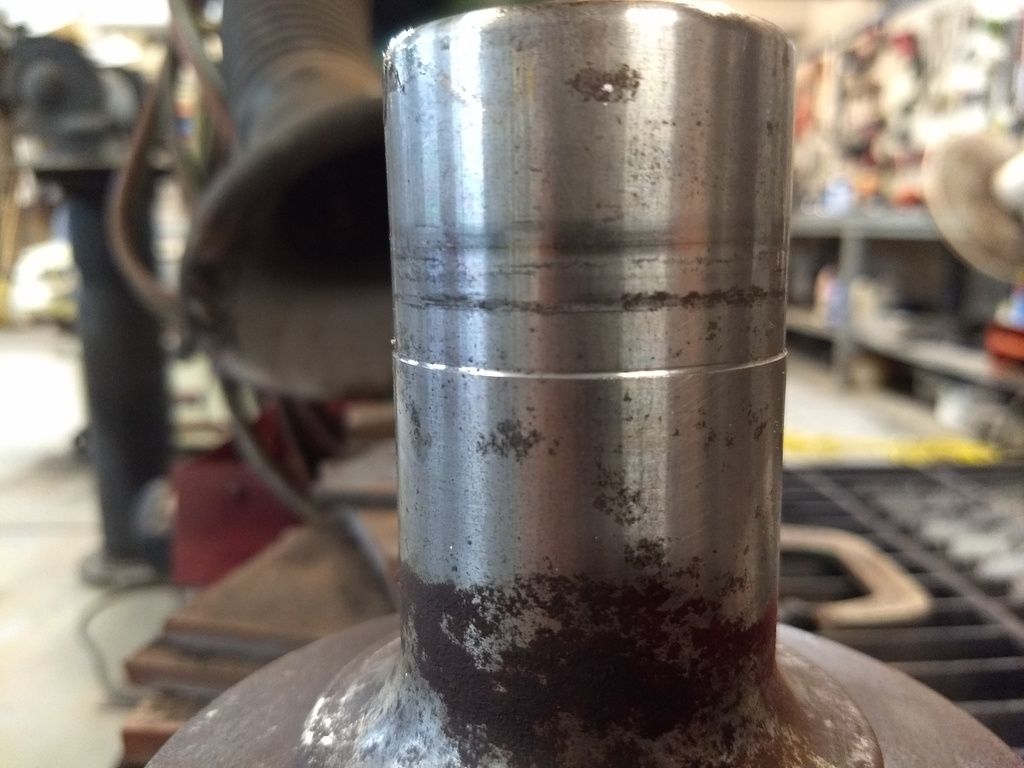
For whatever reason, when Ford made the Y-block engines the timing gear marks and installation procedure are not related to the position of the piston in cyl #1. If the crank & cam shaft keyways, dots on the crank & cam gears and the pin count on the timing chain matches the diagrams, it is correct. Make sure you have the correct style timing pointer and locate the timing marks on the rear lip of the crank pulley. If the damper ring is close to slipping off the shoulder of the pulley hub (photo 2) the pulley needs to be rebuilt (photo 3). . Last edited by dmsfrr; 10-19-2018 at 09:23 PM. |
|
|
|
|
|
10-19-2018, 12:29 PM
|
#51 |
|
Member
Join Date: Sep 2018
Location: Clayton, Michigan
Posts: 48
|
What is the crankshaft repair sleeve and seal kit for?
|
|
|
|
|
10-19-2018, 12:55 PM
|
#52 |
|
Senior Member
Join Date: Aug 2012
Location: Abq, NM
Posts: 3,607
|
The seal in the timing cover that rides on the small end of the damper pulley hub will often wear a groove in it, or the small end of the hub may be pitted from rust (photo 1 below). The repair sleeve goes over the end of the damper pulley hub to provide a new surface that is less likely to leak. The damper pulley in photo 3 above has a sleeve installed.
. Last edited by dmsfrr; 10-19-2018 at 09:26 PM. |
|
|
|
|
10-19-2018, 05:00 PM
|
#53 |
|
Member
Join Date: Sep 2018
Location: Clayton, Michigan
Posts: 48
|
Crank looks good. But from this photo it looks like it was timed right.
|
|
|
|
|
10-19-2018, 05:56 PM
|
#54 | |
|
Senior Member
Join Date: Aug 2012
Location: Abq, NM
Posts: 3,607
|
Quote:
If that's the keyway for the crankshaft timing gear I'm seeing just above & left of the small circular mark on the gear... the timing marks and pin count look right to me too. . Last edited by dmsfrr; 10-19-2018 at 09:27 PM. |
|
|
|
|
|
10-19-2018, 06:42 PM
|
#55 |
|
Senior Member

Join Date: Jun 2010
Location: San Antonio, Texas
Posts: 16,436
|
We have cam timing and ignition timing all in one thread here. Try not to mix the two up since one has no affect on the other. Cam timing just sets the cam to time with the crankshaft so that valves open & close at the correct intervals.
Ignition timing is strictly to synchronize the distributor with the position of the piston on each compression stroke starting with number 1 cylinder. On a 4-stroke engine, the timing position marker will align with the lower pulley timing mark twice for a complete firing cycle. One will be TDC on end of compression stroke and the other will be TDC on end of exhaust stroke. Always make sure it's on the #1 compression stroke when checking distributor/ignition timing. It should be blowing air out the #1 spark plug hole when coming up on compression while being rotated in normal direction of rotation. |
|
|
|
|
10-19-2018, 08:59 PM
|
#56 | |
|
Senior Member
Join Date: Aug 2012
Location: Abq, NM
Posts: 3,607
|
Quote:
But not on the Y-block engine. To someone more familiar with these other engines the Y-block timing chain installation seems somehow 'wrong', leading to all this confusion. The still image attached below is for another model of Ford engine, from the video link posted by KULTULZ, at approx 20 seconds. It applies to at least one other well known make of engine as noted in the narration of the video. ") https://www.youtube.com/watch?v=b1Z2L9pgMXU Last edited by dmsfrr; 10-23-2018 at 11:23 AM. |
|
|
|
|
|
10-20-2018, 06:03 AM
|
#57 |
|
Member
Join Date: Sep 2018
Location: Clayton, Michigan
Posts: 48
|
When I pulled some of the bolts out they must be drilled into the water jacket. Do you put some kind of sealant on these?
|
|
|
|
|
10-20-2018, 08:02 AM
|
#58 |
|
Senior Member
Join Date: Aug 2012
Location: IN A 'GALAXIE' FAR FAR AWAY
Posts: 6,475
|
Permatex® Form-A-Gasket® No. 2 - 80011 
__________________
***** - WHY IS IT ... -... that everything you buy in the grocery store is either wrapped in or contained in plastic but the government doesn't want you to carry it out in a plastic bag? WONDERING IN W(BY GOD)V ...
DIAGNOSED CDO - (OCD In Correct Alphabetical Order) |
|
|
|
|
10-21-2018, 04:09 PM
|
#59 |
|
Member
Join Date: Sep 2018
Location: Clayton, Michigan
Posts: 48
|
Awesome thanks.
|
|
|
|
|
10-23-2018, 02:50 AM
|
#60 |
|
Senior Member
Join Date: Aug 2012
Location: IN A 'GALAXIE' FAR FAR AWAY
Posts: 6,475
|
__________________
***** - WHY IS IT ... -... that everything you buy in the grocery store is either wrapped in or contained in plastic but the government doesn't want you to carry it out in a plastic bag? WONDERING IN W(BY GOD)V ...
DIAGNOSED CDO - (OCD In Correct Alphabetical Order) |
|
|
|
|
10-23-2018, 10:39 AM
|
#61 |
|
Senior Member
Join Date: Aug 2012
Location: Abq, NM
Posts: 3,607
|
Here's a link to a whole bunch of Y-block info you may eventually need...
http://www.ford-y-block.com/technical.htm |
|
|
|
|
10-23-2018, 10:45 AM
|
#62 | ||
|
Senior Member
Join Date: Aug 2012
Location: IN A 'GALAXIE' FAR FAR AWAY
Posts: 6,475
|
Quote:
Specifically- Quote:
__________________
***** - WHY IS IT ... -... that everything you buy in the grocery store is either wrapped in or contained in plastic but the government doesn't want you to carry it out in a plastic bag? WONDERING IN W(BY GOD)V ...
DIAGNOSED CDO - (OCD In Correct Alphabetical Order) |
||
|
|
|
| Sponsored Links (Register now to hide all advertisements) |
|
|
|
10-26-2018, 07:24 AM
|
#63 |
|
Member
Join Date: Sep 2018
Location: Clayton, Michigan
Posts: 48
|
Cleaning up the balancer. There is some pitting but not a noticeable groove where the seal rides. I like how they designed the seal so it cannot be put in from the outside. Have to pull the whole cover off to do that. I installed a new chain and gear set and it was definitely tighter than the old one.
|
|
|
|
|
10-26-2018, 01:41 PM
|
#64 |
|
Senior Member
Join Date: Aug 2012
Location: IN A 'GALAXIE' FAR FAR AWAY
Posts: 6,475
|
You might want to lightly sand the snout (fine paper/crocus cloth using brake fluid as a lubricant) until fairly smooth.
When installing the cover, leave loose and install balancer so as to center the snout within the seal. Then position cover to center seal over snout and torque to specs. Use white grease or engine oil to lubricate seal /snout contact surface. There was a SPECIAL SERVICE TOOL for this years ago ...
__________________
***** - WHY IS IT ... -... that everything you buy in the grocery store is either wrapped in or contained in plastic but the government doesn't want you to carry it out in a plastic bag? WONDERING IN W(BY GOD)V ...
DIAGNOSED CDO - (OCD In Correct Alphabetical Order) |
|
|
|
|
10-28-2018, 11:02 AM
|
#65 |
|
Senior Member
Join Date: Jun 2010
Location: San Antonio, Texas
Posts: 16,436
|
The flatheads just had timing gears so the Y-block cam chain drive set up was kind of a new thing for FoMoCo. At the time, it must have made some sense to the engineers but over time with various new engine designs and new set ups, it no longer stood up to modern design standards. It looks confusing by todays standards but the relatively long distance between gears was the likely reason for the way they decided set it up.
|
|
|
|
|
03-30-2019, 04:57 PM
|
#66 |
|
Member
Join Date: Sep 2018
Location: Clayton, Michigan
Posts: 48
|
Sponsored Links (Register now to hide all advertisements)
|
|
|
|
|
03-30-2019, 06:00 PM
|
#67 |
|
Senior Member
Join Date: Jun 2010
Location: Detroit suburb, MI
Posts: 3,706
|
Your car will be very low on power and performance until the distributor is dialed in. With this style distributor, there is no spark advance beyond the base timing without
vacuum to both diaphragms (and good diaphragms). Sal |
|
|
|
|
03-30-2019, 07:35 PM
|
#68 |
|
Member
Join Date: Sep 2018
Location: Clayton, Michigan
Posts: 48
|
So you don't think the water drip is a problem?
|
|
|
|
|
03-30-2019, 08:49 PM
|
#69 | |
|
Senior Member
Join Date: Aug 2012
Location: Abq, NM
Posts: 3,607
|
Quote:
Last edited by dmsfrr; 03-31-2019 at 04:21 PM. |
|
|
|
|
|
03-31-2019, 06:39 AM
|
#70 |
|
Member
Join Date: Sep 2018
Location: Clayton, Michigan
Posts: 48
|
Not antifreeze. Clearly a drip of condensation from between the carb and the intake. Was worried about a possible vacuum leak there.
|
|
|
|
|
03-31-2019, 10:55 AM
|
#71 |
|
Member
Join Date: Sep 2018
Location: Clayton, Michigan
Posts: 48
|
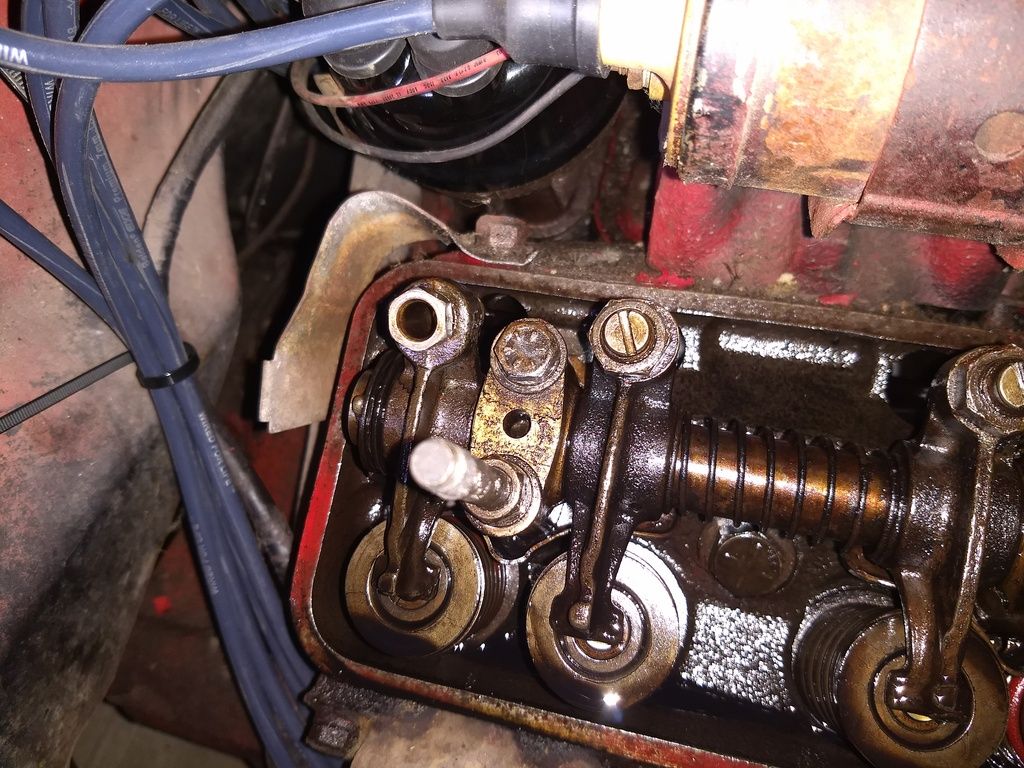 I know there were two style s of valve adjusters but when I opened it up this is what I found. Although it looks like the adjustment screw is missing from the exhaust on #4 it doesn't appear to have any threads inside it. It's also a different size. Also a little disappointed in my local parts stores. The y both sold me the wrong size cover gaskets. |
|
|
|
|
03-31-2019, 01:01 PM
|
#72 |
|
Senior Member
Join Date: Jun 2010
Location: San Antonio, Texas
Posts: 16,436
|
The adjuster is likely home brewed. The parts store catalogs might both have the same part number flaw. No one experienced in Y-blocks behind the counters now days.
|
|
|
|
|
03-31-2019, 03:03 PM
|
#73 |
|
Senior Member
Join Date: Jun 2010
Location: Detroit suburb, MI
Posts: 3,706
|
That adjuster is correct. In '57 they eliminated the one with the lock nut (two piece) and replaced it with one screw using interference threads instead of a lock nut. In '57 they also increased the rocker arm ratio to 1.54:1. Previous to '57 it was 1.44:1 I believe. Maybe 1.41 ? Looks like it's had some parts changed along the line.
Sal Last edited by scicala; 03-31-2019 at 05:01 PM. |
|
|
|
|
03-31-2019, 04:14 PM
|
#74 | |
|
Senior Member
Join Date: Aug 2012
Location: Abq, NM
Posts: 3,607
|
Quote:
I suspect the 1.54 rocker arms may(?) have been used only in the 'performance' engines, T-Bird, etc. They can often be mixed up by someone not watching the numbers. EAN-6564 rocker is 1954-1955 1.43:1 ratio 5751066 is 1958 - 1964 1.43:1 ratio 1.54:1 HIGH RATIO ROCKERS ARE ECG-6564 (from this link) http://www.ford-y-block.com/rockerarm.htm Last edited by dmsfrr; 03-31-2019 at 10:53 PM. |
|
|
|
|
|
03-31-2019, 07:37 PM
|
#75 |
|
Senior Member
Join Date: May 2010
Location: Midland Park, NJ
Posts: 3,982
|
The 1.54 rockers were used in all 57 engines, regardless of HP. They had the two kinds of adjusters, the changeover made mid year in 57.
__________________
48 Ford Conv 56 Tbird 54 Ford Victoria |
|
|
|
|
04-01-2019, 12:57 PM
|
#76 |
|
Senior Member
Join Date: Jun 2010
Location: San Antonio, Texas
Posts: 16,436
|
I wonder if they just replaced the adjuster and not the rocker arm. A person would have to confirm the part numbers unless the thread was different. Sort of a mix & match.
|
|
|
|
|
04-01-2019, 02:00 PM
|
#77 |
|
Member
Join Date: Sep 2018
Location: Clayton, Michigan
Posts: 48
|
The numbers are on the side of the rockers. I'll have to check it out. Just got done adjusting them. Waiting on the gaskets. Hopefully they're the right ones this time.
|
|
|
|
|
04-01-2019, 08:25 PM
|
#78 |
|
Senior Member
Join Date: May 2010
Location: Midland Park, NJ
Posts: 3,982
|
The rockers had two different suffixes denoting the ones with the nut and the ones with the interference thread -A for lock nut, B for interference.
Additionally, the rockers were slightly different in the adjuster end. The one that used the interference thread was slightly shorter The actual thread size and count were the same in both rockers. It was the adjuster that had the interference thread. You can use either adjuster in any rocker, but when using an interference adjuster in a lock nut rocker it is close to bottoming out when the factory clearance was set. I ran a interference adjuster in a lock nut rocker it it was very close but it worked.
__________________
48 Ford Conv 56 Tbird 54 Ford Victoria |
|
|
|
|
04-02-2019, 01:22 PM
|
#79 |
|
Senior Member
Join Date: Jun 2010
Location: San Antonio, Texas
Posts: 16,436
|
I noticed that the one in the photo looks pretty deep in the threaded bore. That's what made me think it was a home brewed repair.
|
|
|
|
|
04-03-2019, 07:39 PM
|
#80 |
|
Member
Join Date: Sep 2018
Location: Clayton, Michigan
Posts: 48
|
Got everything adjusted and the valve covers back. Suddenly I have no spark. Got six volts going through the primary coil windings. I haven't checked the secondary winding resistance yet. New coil wire so I think it's good. I hooked a jumper wire from the coil wire to a spare spark plug and grounded the plug and got no spark. What's the best way to test the electronic pick up?
|
|
|
|
|
04-03-2019, 08:46 PM
|
#81 | |
|
Senior Member
Join Date: Aug 2012
Location: Abq, NM
Posts: 3,607
|
Quote:
Just my opinion, but I use points in my distributor on purpose. Easier to troubleshoot & fix. . Last edited by dmsfrr; 04-04-2019 at 12:33 AM. |
|
|
|
|
|
04-04-2019, 01:03 PM
|
#82 |
|
Member
Join Date: Sep 2018
Location: Clayton, Michigan
Posts: 48
|
I may if I can determine that the module is bad. It's just a magnetic switch. I should be able to disconnect it and hook an ohm meter to it and crank the car and see it its making and breaking contact.
|
|
|
|
| Sponsored Links (Register now to hide all advertisements) |
|
|
|
04-04-2019, 01:19 PM
|
#83 |
|
Senior Member
Join Date: Jun 2010
Location: San Antonio, Texas
Posts: 16,436
|
Hall effect switches are breaker less and they are only as good as the quality of the magnetic pickup. Generally they are very reliable. Modules, not so much. The GM HEI is still the most reliable I've ever used in a distributor set up but they are big ugly things (the distributor).
|
|
|
|
|
04-06-2019, 08:32 AM
|
#84 |
|
Member
Join Date: Sep 2018
Location: Clayton, Michigan
Posts: 48
|
Pulled the coil off this morning. No resistance on the primary windings. It wasn't an open circuit though. It did show an open circuit though between the primary and the secondary where the coil wire plugs in. Is there a reason to have a 12 volt coil with a resistor knocking it down to 6 volts?
|
|
|
|
|
04-06-2019, 09:24 AM
|
#85 | |
|
Senior Member
Join Date: Aug 2012
Location: Abq, NM
Posts: 3,607
|
Quote:
There is a bypass circuit, from terminal "I" on the starter solenoid, that provides full 12v only during cranking for easier starting. Since you're no longer using points and may not have an original coil (?) something else might need to change. Points conversion kits usually have specific coil re-wiring instructions. . Last edited by dmsfrr; 04-06-2019 at 11:04 AM. |
|
|
|
|
|
04-06-2019, 09:26 AM
|
#86 |
|
Senior Member
Join Date: Jun 2010
Location: San Antonio, Texas
Posts: 16,436
|
Sponsored Links (Register now to hide all advertisements)
I would never have thought that the auto manufacturers would return to the one coil per each cylinder design like they have now. The model T had an arrangement like this except that they were large trembler type coils. Nothing is new under the sun. A modern coil that is made for 12-volts will generally always have 12V or the like printed on it somewhere. The resistance of the primary coil will tell too as long as you know what the values should be. Last edited by rotorwrench; 04-06-2019 at 09:55 AM. |
|
|
|
|
04-06-2019, 03:49 PM
|
#87 |
|
Member
Join Date: Sep 2018
Location: Clayton, Michigan
Posts: 48
|
I did replace the coil but it was not bad, since the old one looked ratty. The new one is marked use external resistor. I tested the pertronix and it doesn't look like it's working right. I can get voltage through it but it doesn't change voltage at all when you turn it. Was there a breaker plate originally for the old points that might have been tossed if I decide to go back to points?
|
|
|
|
|
04-06-2019, 04:29 PM
|
#88 | |
|
Senior Member
Join Date: Aug 2012
Location: Abq, NM
Posts: 3,607
|
Quote:
A ground wire for the points will hopefully be intact. (photo 3) Photo 4, just for reference, a '56 distributor with what might be a Pertronix module inside, but you can barely see it because the rotor is in the way. Last edited by dmsfrr; 04-06-2019 at 04:45 PM. Reason: add photo |
|
|
|
|
|
04-06-2019, 04:41 PM
|
#89 |
|
Member
Join Date: Sep 2018
Location: Clayton, Michigan
Posts: 48
|
Looks like mine. Is there a post though that the points sit around?
|
|
|
|
|
04-06-2019, 04:59 PM
|
#90 | |
|
Senior Member
Join Date: Aug 2012
Location: Abq, NM
Posts: 3,607
|
Quote:
Last edited by dmsfrr; 04-06-2019 at 06:34 PM. |
|
|
|
|
|
04-06-2019, 07:18 PM
|
#91 |
|
Member
Join Date: Sep 2018
Location: Clayton, Michigan
Posts: 48
|
What's the point gap?
|
|
|
|
|
04-06-2019, 08:05 PM
|
#92 | |
|
Senior Member
Join Date: Aug 2012
Location: Abq, NM
Posts: 3,607
|
Quote:
If you don't have a '56 Ford Car Shop Manual you could use one. I bought a second shop manual for my '55 (on ebay) so I could misplace one and have another to use until I found the first one.
Last edited by dmsfrr; 04-06-2019 at 10:47 PM. |
|
|
|
|
|
04-07-2019, 02:32 PM
|
#93 |
|
Member
Join Date: Sep 2018
Location: Clayton, Michigan
Posts: 48
|
Well I should have known the parts store would get it wrong. Exact fit they said. NOT! I'm going to take your photos with me to show them what I need.
Last edited by Yotehunter66; 04-07-2019 at 02:33 PM. Reason: Spelling |
|
|
|
|
04-15-2019, 11:40 AM
|
#94 |
|
Member
Join Date: Sep 2018
Location: Clayton, Michigan
Posts: 48
|
Replaced the pertronix with a set of points and a condenser and it fired right up. It runs pretty rough, I think, so I rechecked my wiring and the plugs are correct. All seem to be firing but when I pull #3, 4, 7 & 8 the engine idle does not change like no fuel to the back cylinders. Pulling #1,2,5 & 6 there is a noticable change in rpms. Any thoughts?
|
|
|
|
|
04-15-2019, 12:10 PM
|
#95 | |
|
Member

Join Date: Aug 2017
Posts: 66
|
Quote:
If your plugs and wires all check out good can you do a quick compression test on the cylinders? it will tell you of there is possibly a mechanical issue. I would tend to think it's something mechanical because fuel and air would get to all cylinders if it gets to four of them. Spark should also get to all cylinders, if it gets to four of them, if the distributor shaft / bearings are good. I would do a compression test and possibly a leak down test. |
|
|
|
|
|
«
Previous Thread
|
Next Thread
»
 Linear Mode

|
|

| Sponsored Links (Register now to hide all advertisements) |
|
|
All times are GMT -5. The time now is 04:16 AM.