|
|||||||


| Sponsored Links (Register now to hide all advertisements) |
|
|
 |

|
Thread Tools | Display Modes |
 11-02-2012, 08:31 PM
|
#1 |
|
Senior Member

Join Date: May 2010
Location: Mpls, MN
Posts: 27,582
|
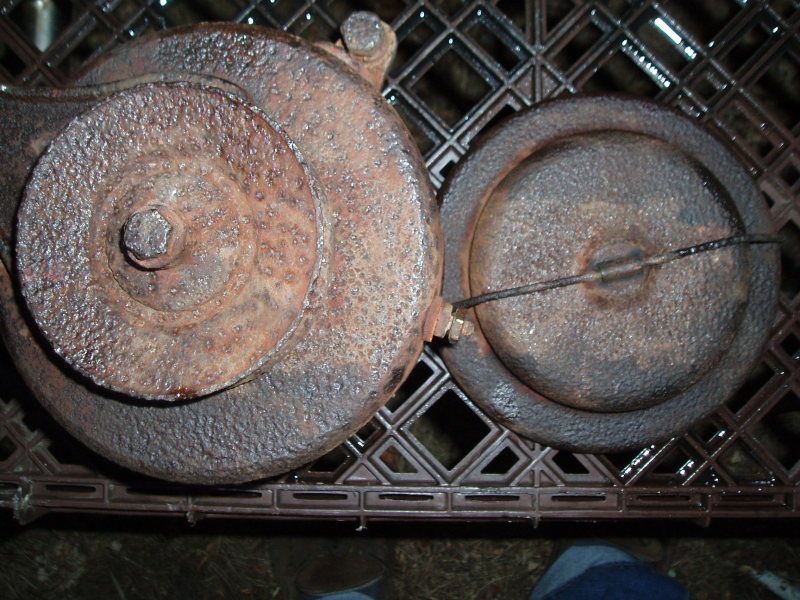
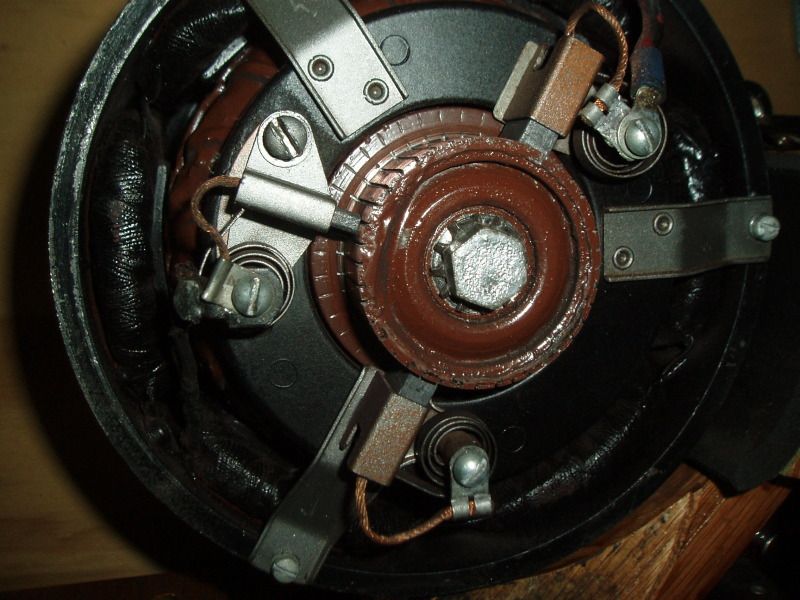 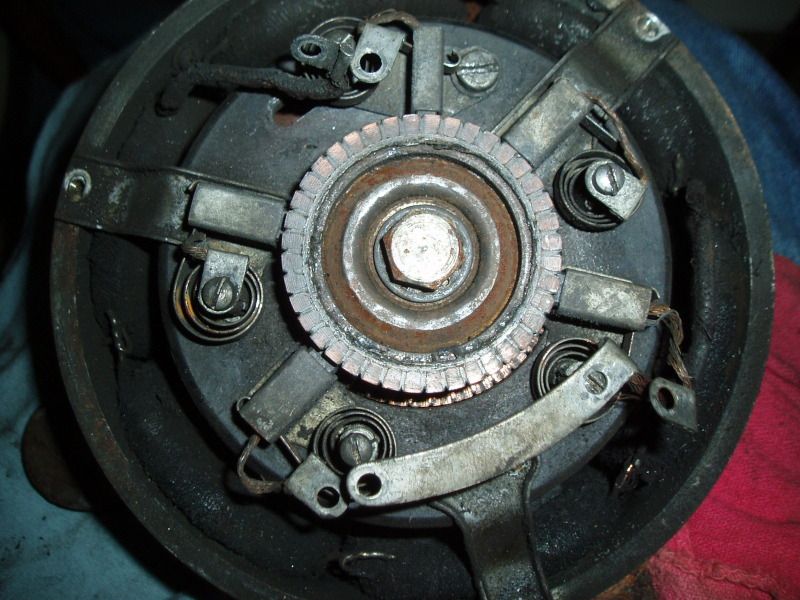 Someone sent me a powerhouse to fix. It was purchased on ebay and hadn't been used much when it quit charging. When I tested it, it showed no charge until I polarized it, but as soon as it stopped and started, it showed no charge again until I once again polarized it. Each time it started it needed to be repolarized. There was also way too many sparks coming from the brushes. Growler tests showed the armature was good, but I could see a poor job of undercutting. I used my ATLAS hobby saw to undercut it by hand and then I polished the commutator with crocus cloth. Now it works fine and the sparking is gone. What I don't like is how someone cut the commutator down. The diameter is almost 1/4" less than what it should be and this can be seen by the thin bars and the large gap between the commutator and brush holder. I think this generator came from someone in Texas and I've seen this same thing before from the same guy. Just because you're working on or restoring a generator doesn't mean it needs to be turned on a lathe. I've only had to do any cutting on the commutator a few times and that was only a few thousandths. Almost always all it needs is a polishing with fine crocus and undercut by hand so the insulation is about .010" under the bars. Due to the large gap this will now get less useful life from the brushes before the springs hit the brush holders. Plus, the larger the gap between the brush holder and commutator, the less the support for the brushes. I also don't like the looks of a thick coat of Glyptal all over the armature, and black paint on the field coils. The brush screws should also be fillister head, not round head, the external tooth lock washer on the armature should be an internal tooth lock washer, and the screw on the adjustable brush holder should be a pan head, not a round head. The bottom picture is a powerhouse I picked up last year at a swap meet. The outside is totally rust pitted, so it must have sat out in the weather most of it's life, but inside it looks like NOS, or will after I clean it off with some gas. Thankfully nobody has messed with it and that's the way I like to find them. It could actually be used just the way it is, but the rust pits on the pulley would chew up the V belt. Someday I'll move all the insides to a better case and have what I'd consider a mint powerhouse. 
Last edited by Tom Wesenberg; 11-03-2012 at 01:04 AM. |

|

|
|
11-02-2012, 09:15 PM
|
#2 |
|
Senior Member

Join Date: Jun 2011
Location: Oakton, VA
Posts: 437
|
Thanks again, Tom, for the informative posting! The pictures really illustrate the points you are making.
|
|
|
|
| Sponsored Links (Register now to hide all advertisements) |
|
|
|
11-02-2012, 09:35 PM
|
#3 |
|
Senior Member

Join Date: Jun 2010
Location: Redwood City, CA
Posts: 1,591
|
I see what you mean Tom, thanks for posting these pictures. Your help and insight with Model "A" electrical issues is a Godsend!!!!
|
|
|
|
|
11-02-2012, 11:28 PM
|
#4 |
|
BANNED
Join Date: May 2012
Location: inside your RAM
Posts: 3,134
|
wow that has been way over cut
__________________
'31 180A |
|
|
|
|
11-03-2012, 12:21 AM
|
#5 |
|
Senior Member
Join Date: May 2010
Location: Victoria, Australia
Posts: 1,177
|
I bet that the outside looked a million dollars to. Some think a shiny coat of paint means it has been restored.
|
|
|
|
|
11-03-2012, 12:43 AM
|
#6 | |
|
Senior Member
Join Date: May 2010
Location: Mpls, MN
Posts: 27,582
|
Sponsored Links (Register now to hide all advertisements)
Quote:
Also notice in the top right of the generator picture, it has a crimp on blue terminal and red plastic output wire. I'll change that to a better cloth covered wire with a soldered terminal. Colored plastic wire looks so wrong on a Model A. 
Last edited by Tom Wesenberg; 11-03-2012 at 12:49 AM. |
|
|
|
|

|
11-03-2012, 05:04 AM
|
#7 |
|
BANNED
Join Date: May 2012
Location: inside your RAM
Posts: 3,134
|
ya those crimp-ons with the blue plastic are terrible. I remove the blue plastic, crimp, and solder, then insulate with the appropriate period-correct material (I work on cars from all decades). My nephew just graduated McPherson College Antique Car Restoration program and I found it interesting that is just what they taught him.
__________________
'31 180A |
|
|
|
|
11-03-2012, 04:41 PM
|
#8 |
|
Senior Member

Join Date: May 2010
Location: Between Seattle & Tacoma
Posts: 2,354
|
Tom: I had a local guy do the same thing to my generator, when I first got into model A's 15 years ago. I was really upset that he unnecessarily cut so much off the commutator. Besides the problems you mentioned, I thought it also (because you have less contact per revolution) would't put out as much voltage. Whether that is enough to actually make a difference or not, I'm not sure. What do you think? I guess I was looking at it like a variable speed pulley on a fixed rpm motor. Chuckkk
|
|
|
|
|
11-03-2012, 08:04 PM
|
#9 |
|
Senior Member
Join Date: May 2010
Location: Mpls, MN
Posts: 27,582
|
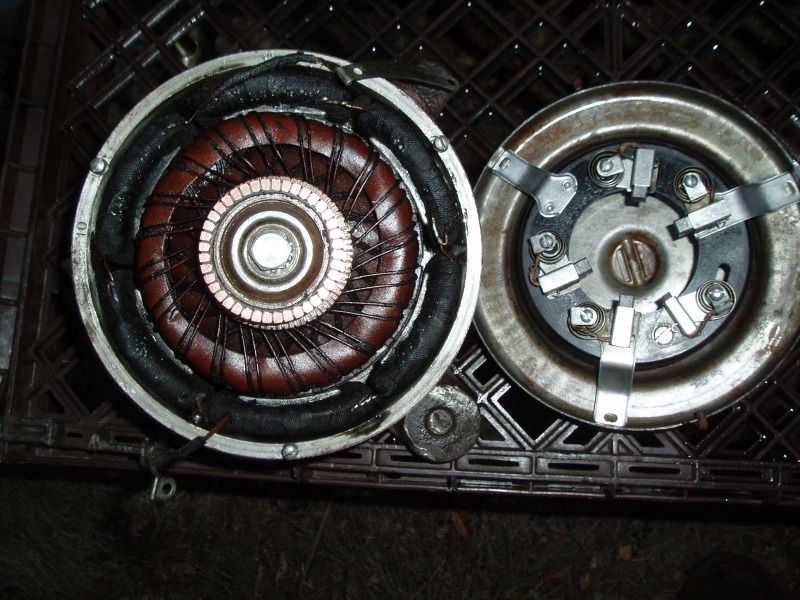   I took some gas and a brush and cleaned up my nice (on the inside) original powerhouse. You can see how much nicer it looks when it's left original instead of a heavy coat of Glyptal brushed all over the armature, and black paint on the field coils. Glyptal would also inhibit cooling of the armature. The last picture shows the damage caused by someone leaving it outside. What a shame, but I think I have a good case for it. Just for kicks I should sand smooth the V of the pulley and run it as is. That ebay powerhouse looks like it was dipped or heavily brushed with Glyptal, then the armature appears to have been sanded on a belt sander. This is also poor practice. The armature should NOT be sanded nor turned on a lathe, as it will increase the air gap between the armature and field poles, which will decrease output. If the armature has rust, just wire wheel it off. The most rust I've seen on one is just a light coat of surface rust, which came right off on the wire wheel. Someone asked about the smaller diameter of the commutator and how it affects performance. It would very slightly increase the degrees of rotation the brushes are in contact with each commutator bar, but the change would hardly be measurable. After I install the EVR I will check it against another good 3 brush. The powerhouse has good output and I'm sure it will be fine, but I sure don't like what was done to this one needlessly. |
|
|
|
|
11-04-2012, 07:23 AM
|
#10 |
|
Senior Member

Join Date: May 2010
Location: Naples, New York
Posts: 182
|
Tom when you say undercut by hand so the insulation is just under the bars. Can you explain that to some one that not sure what you mean.
|
|
|
|
|
11-04-2012, 08:10 AM
|
#11 |
|
Senior Member

Join Date: Jul 2012
Location: Venice, FL
Posts: 648
|
Tom,
You described my car perfectly. I take trophies all the time with my 29 Tudor but the running gear was never touched. It needs or needed everything that doesn't show. Thanks for the class in generator restoration. Someday I may go over mine and reinstall it. Thanks again. Al |
|
|
|
|
11-04-2012, 08:54 AM
|
#12 |
|
Senior Member

Join Date: Oct 2010
Location: Oregon and Baja Mexico
Posts: 617
|
Very informative thread! Thanks Tom!
PS: Why did it need polarizing every time it started? Was it lack of undercutting? |
|
|
|
|
11-04-2012, 09:30 AM
|
#13 | |
|
Senior Member
Join Date: May 2010
Location: Mpls, MN
Posts: 27,582
|
Quote:
Al, I'll come back with another picture and some more information. |
|
|
|
|
|
11-04-2012, 02:17 PM
|
#14 |
|
Senior Member
Join Date: Oct 2010
Location: Oregon and Baja Mexico
Posts: 617
|
Thanks for the info Tom.
|
|
|
|
|
11-04-2012, 02:35 PM
|
#15 | |
|
Senior Member
Join Date: May 2010
Location: Mpls, MN
Posts: 27,582
|
Quote:
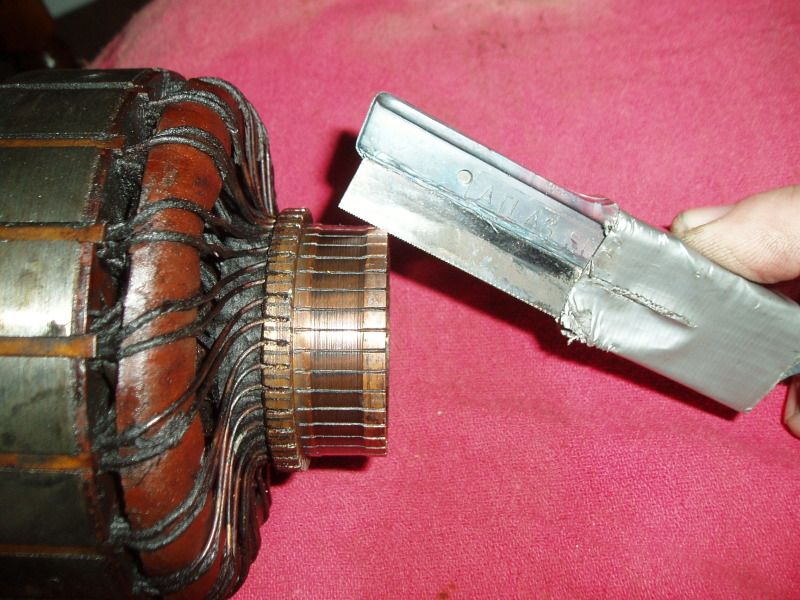 I start at the outer edge to get a good bite between the bars, then slant the saw level as I cut away the insulating material between the bars. The ATLAS saw only costs about $2 and cuts on the backstroke, not the forward stroke. Go slow and working under a magnifying glass helps. I wrap duct tape around half the saw so it's more comfortable to wrap my hand around while cutting. Polish with crocus cloth after the undercut, in case the saw slips and puts a light scratch in the bars. Remember it ONLY needs to be undercut about .007 to .010" of an inch. This is the same armature from the rusty housing. Notice that there is a slight bit of wear showing on the bars, but there is a lot of wear left on the brushes, so I'll just polish the commutator with some fine crocus and reuse the brushes. Only the adjustable brush is worn enough to need replacing, but I remove that brush anyway when I install the EVR. |
|
|
|
|
|
11-04-2012, 08:27 PM
|
#16 |
|
Senior Member
Join Date: May 2010
Location: Naples, New York
Posts: 182
|
Thanks for the information Tom.
|
|
|
|
|
11-04-2012, 09:13 PM
|
#17 |
|
Senior Member

Join Date: Mar 2012
Location: Addison,ll.
Posts: 454
|
Tom, I was also taught the smaller the commutator the less available spring pressure at the brushes. Thanks for all the info.
|
|
|
|
|
11-05-2012, 12:19 PM
|
#18 |
|
Senior Member
Join Date: May 2010
Location: Mpls, MN
Posts: 27,582
|
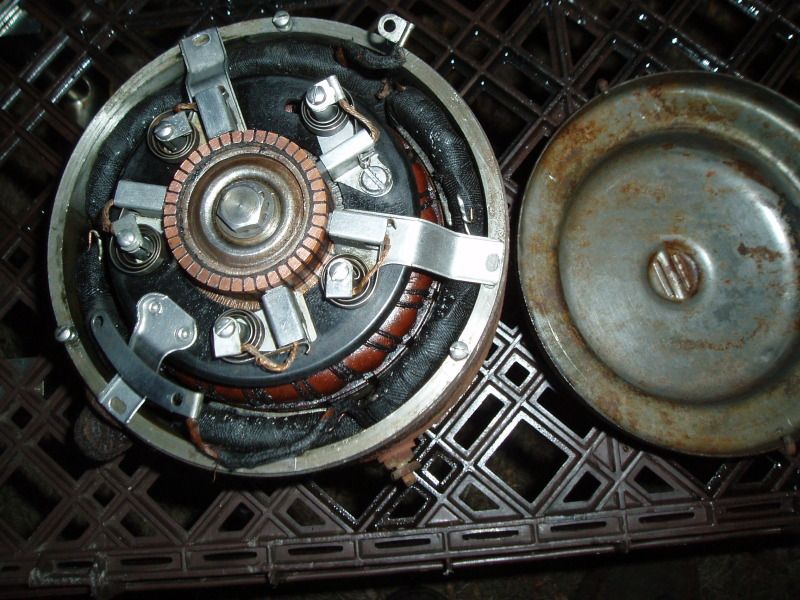
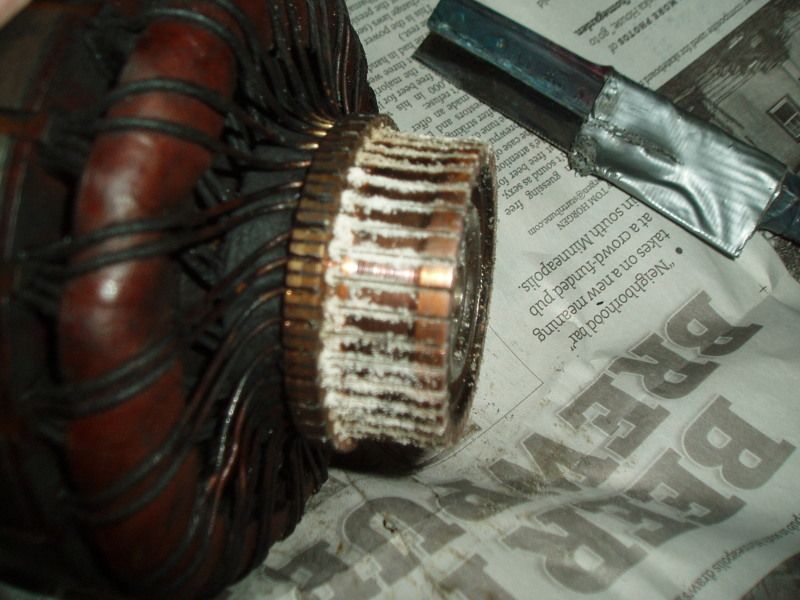 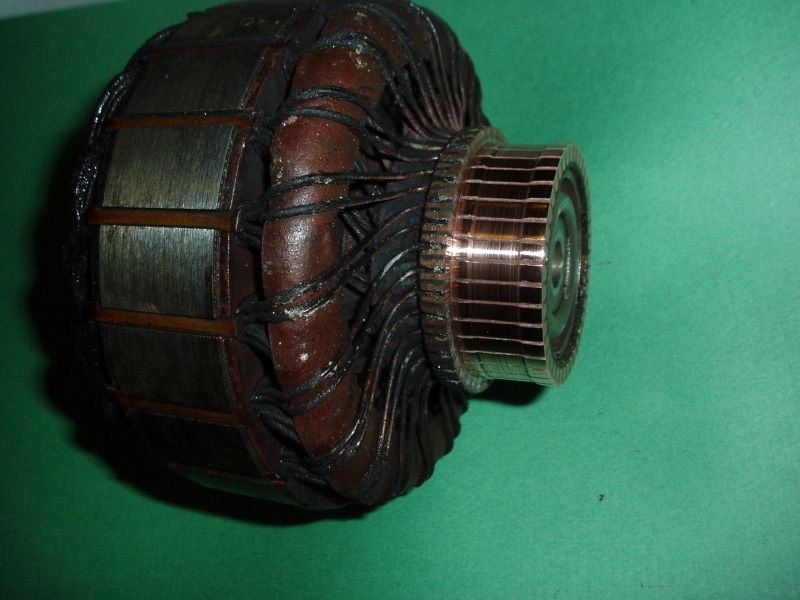  The top picture shows what the commutator looks like after I undercut it. I leave the dust until I finish the undercutting, as that makes it easier to tell which slots have been done. The second picture shows the armature after I polished the commutator with fine crocus cloth. Since I'm using the same brushes and brush holder, there was really no need to turn the commutator to remove the unworn higher ends on the bars. To check for commutator concentricity, just spin the armature and watch the brushes. If the brushes don't move in and out at all then it's perfectly concentric. The powerhouse is so well sealed that you will rarely see any rust inside, but I'll wipe an oily rag over the armature core to keep it looking good. The third picture shows an Autolite armature from a K 5 dated generator that I cleaned up yesterday. Someone had a thick coat of red paint over a fairly heavy coat of rust. This is a hard to find generator because only a few were made with the long taper on the front and the bushing on the rear. I've seen 2 or 3 like this with a K 4 date stamp on the band, but this is the only K 5 I've seen with the long taper still on the front. During April 1930 the taper changed to a short taper with a shorter pulley hub, and the rear ball bearing in a stamped steel end plate was changed to a bushing in a cast iron end plate. The output stud was also moved from the front end to the rear end of the case, and the pulley bolt was changed from 1/4" to 5/16", both fine thread. As you can see this generator had very little use, as shown by the full diameter commutator with no wear. The armature core had rust, which I removed on the wire wheel. Just wear cloth gloves and hold the armature against the wire wheel. The cloth gloves will allow the armature to spin as you clean, then flip it end for end, so you attack the rust from the other direction also. I gave the undercut a couple strokes to be sure it was clean in each slot, then I polished it with fine crocus cloth. After cleaning it with some gas and blow drying I wrapped some paper around the commutator and gave it a light coat of clear laquer. I didn't use tape because I don't want any sticky residue left on the commutator. The insulation paper was looking very dry and some of the insulation fell off the wires over the years. The clear laquer will preserve the original look and help protect it. This armature has no date stamp, but many do. |
|
|
|
|
11-05-2012, 02:40 PM
|
#19 |
|
Senior Member
Join Date: Jun 2011
Location: Oakton, VA
Posts: 437
|
Tom,
Does the autolite armature with the long nose and long tail with a bushing take a type 1 tube with a type 2 rear plate designed for a bushing? Thanks, Bud |
|
|
|
|
11-05-2012, 03:00 PM
|
#20 | |
|
Senior Member
Join Date: May 2010
Location: Mpls, MN
Posts: 27,582
|
Quote:
|
|
|
|
|
|
«
Previous Thread
|
Next Thread
»
 Linear Mode

|
|

| Sponsored Links (Register now to hide all advertisements) |
|
|
All times are GMT -5. The time now is 11:41 PM.