|
|||||||


| Sponsored Links (Register now to hide all advertisements) |
|
|
 |

|
Thread Tools | Display Modes |
 08-06-2010, 07:43 AM
|
#1 |
|
Senior Member

Join Date: May 2010
Location: Irving, Texas
Posts: 598
|
Does anyone have a copy of the "Instructions for using KRW Timing Fixture on Ford V8 Distributors"? This is the instructions for the medal case fixture shown below. What I am not sure of is how the movable "degree dwell" scale is used in the setup. Thanks, Ed
|

|

|
|
08-06-2010, 09:35 AM
|
#2 |
|
Senior Member

Join Date: May 2010
Location: Jacksonville FL
Posts: 1,137
|
To understand the dwell scale, you must understand what you are trying to "set"/"adjust" in your distributor.
Without a huge amount of theory, you are looking for each set of points to be open for 22 1/2 degrees ... then closed for 22 1/2 degrees. The degree scale indicates when they are open/closed. It does not matter where the scale is positioned as long as you can read the degrees of open/close. In other words, if the points open at 10 and close at 32 1/2 ... that's 22 1/2. The scale does not have to move ... I have an older model that did not originally have a degree scale; I added one that does not move, and it works great. By the way, the original instructions are confusing and spend more time talking about slot A, bolt b and index c .... and never telling you what you need to understand. So, the steps are, in this order: 1. Slip a bit of paper/card stock between the right-hand points to prevent them from closing ... work on the left-hand points first and set them to be open for 22 1/2 degrees (and closed for the same). Put the degree scale in any position that is easy to read. Note: There will be some slop in moving the fixture wheel back and forth. Move it far enough each way to eliminate this. Also, I prefer to use a ohm meter with a beeper rather than the fixture light. 2. Set the advance using the adjustment index on the side of the distributor so that the points open when a "firing line" (F) on the fixture wheel aligns with the "index" on the fixture. 3. Move the paper/card stock block from the right-hand points over to the left-hand points and use the same procedure to set the right-hand points to 22 1/2. You do not have to reset the advance. Here's a visual: 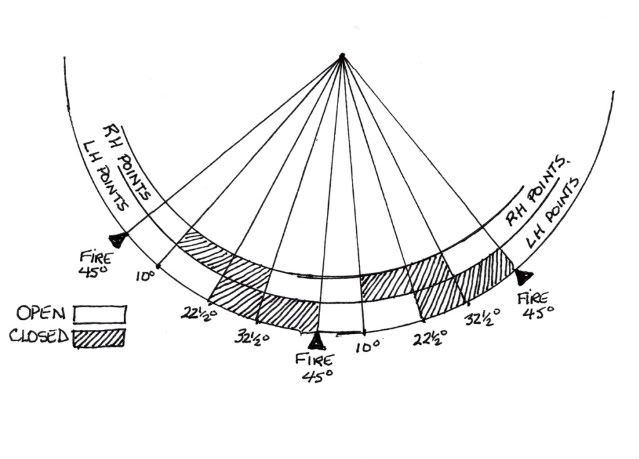
__________________
"Remember that when it comes to intelligence, half of all of us are below average." Last edited by Hoop; 08-06-2010 at 09:41 AM. |
|
|
|
| Sponsored Links (Register now to hide all advertisements) |
|
|
|
08-06-2010, 09:58 AM
|
#3 |
|
Member Emeritus
Join Date: May 2010
Location: Madison, NJ
Posts: 5,230
|
And...the two 22 1/2 degree dwells overlap tp produce total working dwell of 36.
The two points when set should put you right there, and setting the gap with a feeler gauge at the beginning should get all 3 figures of dwell to a starting point very close to right. If the two single point dwells do not add up properly or if getting proper dwell requires big change in gap from spec, either the point plate or something is damaged (unlikely) or you have badly made points with pivots located inaccurately. |
|
|
|
|
08-06-2010, 10:00 AM
|
#4 |
|
Senior Member
Join Date: May 2010
Location: Irving, Texas
Posts: 598
|
Hoop, thanks. That is the information I was looking for. It makes sense now. Ed
|
|
|
|
|
08-06-2010, 10:03 AM
|
#5 |
|
BANNED
Join Date: May 2010
Posts: 3,019
|
Ed,
Send me a stamped self addressed envelope and I'll send you a copy of the instructions. Charlie ny Charles Schwendler 5845 Cole Rd. Orchard Park, N.Y. 14127 |
|
|
|
|
08-06-2010, 10:11 AM
|
#6 |
|
Senior Member
Join Date: May 2010
Location: Irving, Texas
Posts: 598
|
Sponsored Links (Register now to hide all advertisements)
|
|
|
|
|
08-07-2010, 05:46 PM
|
#7 | |
|
Senior Member

Join Date: May 2010
Location: PASADENA, CA
Posts: 1,882
|
Quote:
Thanks for the info. I also have a KRW Timing Fixture I bought a while back and do not have the instructions. I have yet to set up a stock Distributor on it but I did do a Harman Collins a few monthes ago. I was mostly interested in adjusting the points so they opened at 45 Deg. of each other and I found the Timing Fixture worked well for this. On that engine, I had determined TDC and made a pointer so actual timing was not important, just the relation ship of one point set to the other and the dwell of each point set. When I got the thing running and checked with my timing light, I found I was within 1 Deg. which is about as good as you could expect. Thanks for the info and diagram. Now that I know the relationship of the points to each other and that the dwell of each point set is 22 1/2 deg, it will be easy to set up a stock distributor. Chris |
|
|
|
|

|
08-08-2010, 07:05 PM
|
#8 |
|
Senior Member

Join Date: May 2010
Location: Charlotte NC KiWi-L100 available here
Posts: 2,954
|
great info !!
Thanks |
|
|
|
|
«
Previous Thread
|
Next Thread
»
 Linear Mode

|
|

| Sponsored Links (Register now to hide all advertisements) |
|
|
All times are GMT -5. The time now is 12:21 AM.