|
|||||||


| Sponsored Links (Register now to hide all advertisements) |
|
|
 |

|
Thread Tools | Display Modes |
 08-13-2011, 03:13 AM
|
#1 |
|
Senior Member

Join Date: May 2010
Location: Bellingham, Washington
Posts: 362
|
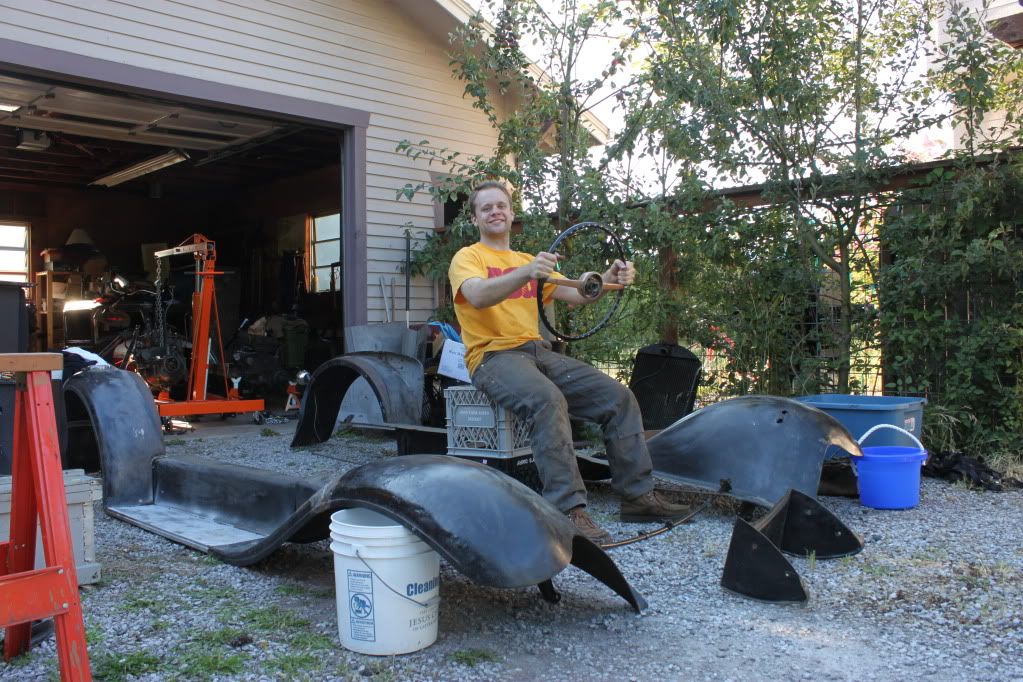
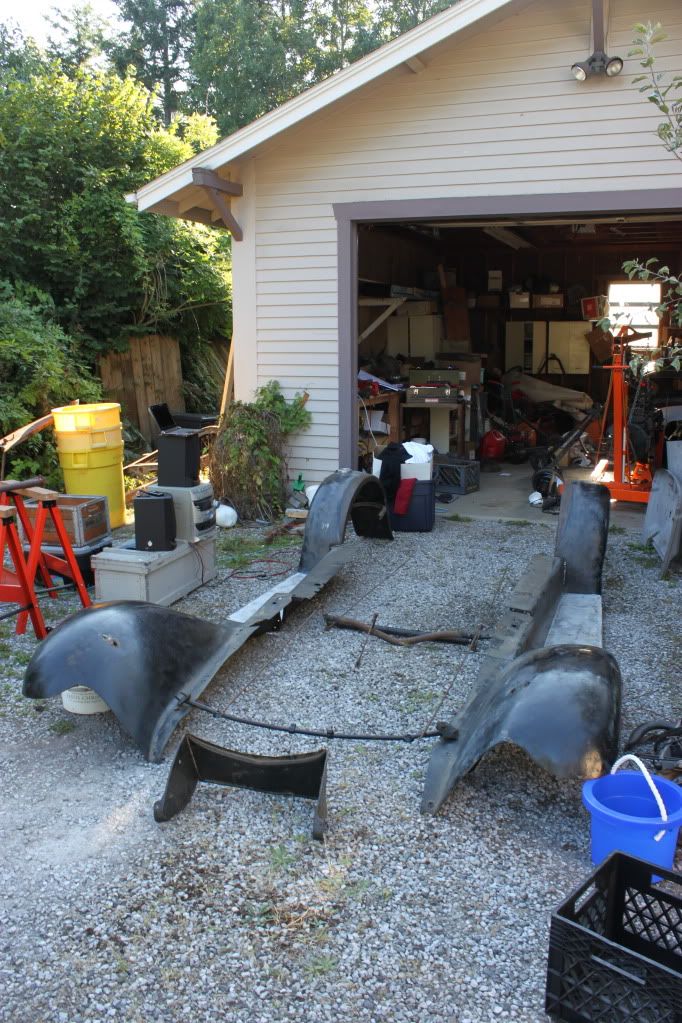
A couple days ago I posted a question about fenders and their value. I ended up buying them, an engine with attached transmission, front axle, hood, brake parts, firewall, and a bunch of other stuff. Drove about 497 miles round trip to pick all this stuff up, but took a road trip with a buddy so it was pretty nice. Pretty excited to be accumulating a bunch of stuff. Makes my garage a little cramped though!
|

|

|
|
08-13-2011, 03:19 AM
|
#2 |
|
Senior Member
Join Date: May 2010
Location: Bellingham, Washington
Posts: 362
|
      
|
|
|
|
| Sponsored Links (Register now to hide all advertisements) |
|
|
|
08-13-2011, 07:17 AM
|
#3 |
|
Senior Member

Join Date: May 2010
Location: Naperville, IL
Posts: 1,387
|
What a great collection of Model A parts! I especially enjoy the picture of you ready for a test drive. Now you need to find buckets of original Model A hardware to use during the assembly. Enjoy! Gar Williams
|
|
|
|
|
08-13-2011, 07:33 AM
|
#4 |
|
Senior Member

Join Date: May 2010
Location: Eastern Tennessee
Posts: 11,516
|
Take a look at the engine, ...especially the side cover, drain tube, the intake manifold, and the pan. Whatdoyasee? Engine number kinda confirms a 1st or 2nd week of Nov build huh? The sheetmetals' a little newer (sans the hidden cowl) but what the heck. "Trivial details".
 And since I believe you said you did Landscaping, the trimmer on the cab is a nice touch too! (Sure beats an old push reel mower!! And since I believe you said you did Landscaping, the trimmer on the cab is a nice touch too! (Sure beats an old push reel mower!!  ) )I too like your enthusiasm. Best wishes in your endeavor and ...full speed ahead!! (Ohh, and keep us updated with photos of your progress!!) , |
|
|
|
|
08-13-2011, 07:36 AM
|
#5 |
|
Senior Member

Join Date: May 2010
Location: Ridgefield, Ct
Posts: 3,441
|
Looks like some "Left Over" Hot Rod parts are on there way to a restoration, good score.
__________________
They don't have to run to be enjoyed. I'm here to enjoy the hobby, and enjoy the cars no matter what they look like. Most of the worlds problems are electrical. |
|
|
|
|
08-13-2011, 07:40 AM
|
#6 |
|
Senior Member

Join Date: May 2010
Location: Van, Texas
Posts: 1,122
|
Sponsored Links (Register now to hide all advertisements)
|
|
|
|
|
08-13-2011, 07:46 AM
|
#7 |
|
Senior Member

Join Date: May 2010
Location: NC
Posts: 908
|
Crank that stereo up and have some FUN!
|
|
|
|
|
08-13-2011, 11:05 AM
|
#8 |
|
Senior Member

Join Date: May 2010
Location: Daytona Beach, Fl & Spencer, W. Va,
Posts: 4,442
|
It looks like you have some fairly good parts to work with. Don't rush it !
Good luck ! MIKE 
|
|
|
|
|
08-13-2011, 11:38 AM
|
#9 |
|
Senior Member
Join Date: May 2011
Location: Snohomish,Wa.
Posts: 139
|
Hey good to se another local Model A'er. Looks like your missing the windshield frame I have a spare one I didnt use ,not the greatest but it would work as well as a few other parts I would sell if your interested....Shoot me a pm if you like....Nice start.....Dave
|
|
|
|
|
08-13-2011, 08:13 PM
|
#10 |
|
Senior Member

Join Date: May 2010
Location: Camino, CA.
Posts: 3,086
|
Looks like some good stuff. You're a lucky guy.
|
|
|
|
|
08-15-2011, 01:48 AM
|
#11 | ||||||||
|
Senior Member
Join Date: May 2010
Location: Bellingham, Washington
Posts: 362
|
Quote:
Quote:
Yeah, the engine is pretty early and in good shape. It seems to have a mixture of parts too. I am glad it came with so many extra pieces, so now I have a bunch of parts to use. The trimmer is only there because I'm running out of room...  Quote:
 Quote:
Quote:
Quote:
I'll keep updating this thread as I go along with the parts I pick up. Thanks for the encouragement, this is a really fun hobby. |
||||||||
|
|
|

|
09-02-2011, 01:41 AM
|
#12 |
|
Senior Member
Join Date: May 2010
Location: Bellingham, Washington
Posts: 362
|
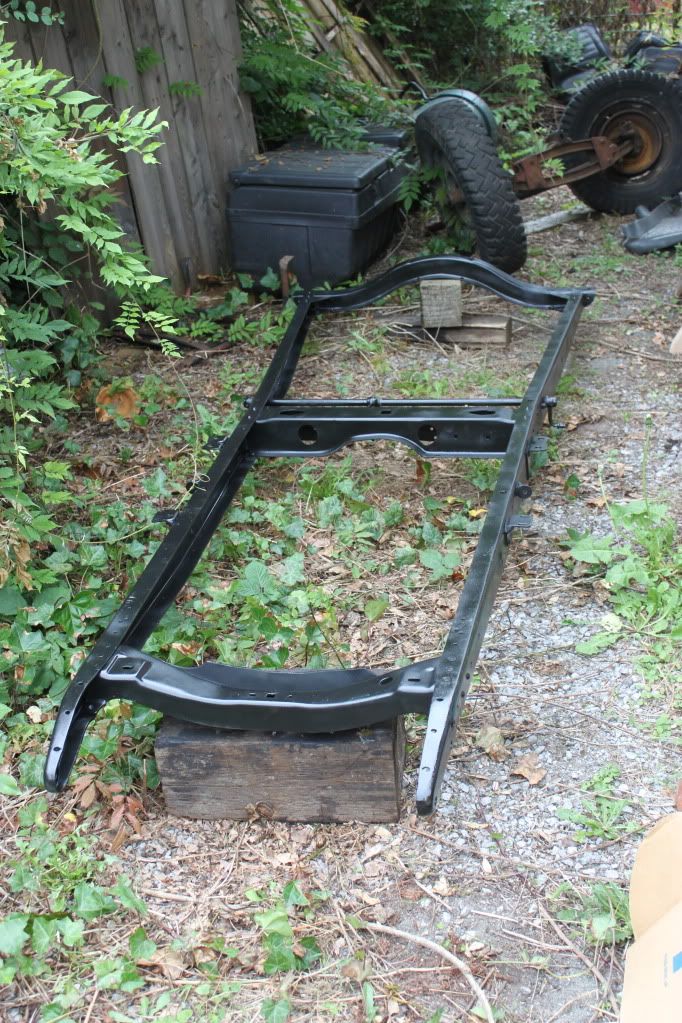
Got my frame from a man named Rolf from the HAMB and ground it down and primered it and then rattle canned it gloss black by Rustoleum automotive paint. Now it is shiny black!
|
|
|
|
|
09-02-2011, 01:42 AM
|
#13 |
|
Senior Member
Join Date: May 2010
Location: Bellingham, Washington
Posts: 362
|

|
|
|
|
|
09-02-2011, 06:09 AM
|
#14 |
|
Senior Member
Join Date: May 2010
Location: South East NJ
Posts: 3,398
|
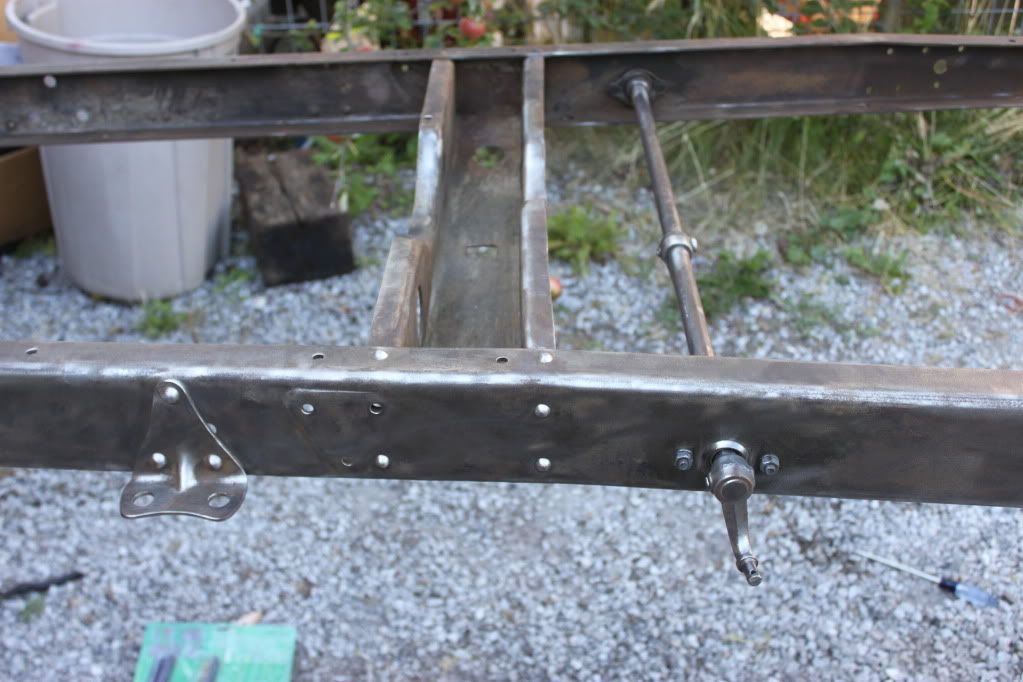
The frame has the holes for the #6 frame mount. The are the 3 holes ahead of the rear running board bracket in triangle shape. This puts the frame in the late 30 to 31 time period. You could use this frame with a slant window body.
For whatever those details are worth. The frame will work fine for your project. |
|
|
|
|
09-02-2011, 06:15 AM
|
#15 |
|
Senior Member
Join Date: May 2010
Location: Eastern Tennessee
Posts: 11,516
|
Lookin' real good there young man!! And it looks like it was a nice frame to start with. Did you happen to take any pictures of when you straightening it?
Also, it sure would be tempting to have eaten those Apples(??) off of that tree in the background when taking a break! . |
|
|
|
|
09-02-2011, 07:36 AM
|
#16 |
|
Senior Member

Join Date: Aug 2011
Location: Illinois
Posts: 730
|
I am also curious on the method you used to check for the straightness of the frame. A tight elevated string along the length of the frame gives you a reference to measure against. Lots of frames have a sag in the cowl area from years of use and abuse. A frame that is not straigh will haunt you later when you are aligning up the body / hood.
|
|
|
|
|
09-02-2011, 09:47 AM
|
#17 |
|
Senior Member

Join Date: May 2010
Location: Didsbury Alberta
Posts: 838
|
The rear axle backing plates shown, are for the very early A, built in November of 1927. Note there is no support boss for the emergency brake mechanism. I would be interesting to know if the rear axle housings show weld seams on the outside. If I am correct, there should be no brake surface for the emergency brake shoe in the rear drums either
|
|
|
|
|
09-02-2011, 03:12 PM
|
#18 |
|
Senior Member

Join Date: May 2010
Location: Toronto, Ontario, Canada
Posts: 1,289
|
What a great looking frame! I wish that frames like that were available up here in the frozen north. Most are rusted really bad and are pitted. Good start to a project. Good Luck!
|
|
|
|
|
09-02-2011, 03:38 PM
|
#19 |
|
Member Emeritus
Join Date: May 2010
Location: Madison, NJ
Posts: 5,230
|
There is something inspiring about seeing an olde Ford laid out looking like an AMT 3-in-1 kit!
|
|
|
|
|
09-02-2011, 03:51 PM
|
#20 |
|
Senior Member

Join Date: May 2010
Location: Stayton, Oregon
Posts: 3,806
|
I didn't notice a rear end in your pictures. If you need one, I have a complelte one with spring, hubs, all brake parts, etc.. It is a 1929. Also I am in the Portland area. If interested, PM me and we can see what we could work out.
Good luck with your project. Sounds like me 50 or 60 year ago.
__________________
Fred Kroon 1929 Std Coupe 1929 Huckster |
|
|
|
|
09-16-2011, 06:44 AM
|
#21 |
|
Senior Member

Join Date: May 2010
Location: Direct Enclosed Transport Since 2006
Posts: 4,160
|
Nice Thread
Glad to see there are still folks doing New Old School Jim |
|
|
|
|
09-16-2011, 06:59 AM
|
#22 |
|
Senior Member

Join Date: May 2010
Location: Gwynn's Island Va
Posts: 1,386
|
Very good Find! I enjoyed seeing the progress your making and hope to see more as it comes along.
Wick |
|
|
|
| Sponsored Links (Register now to hide all advertisements) |
|
|
|
09-28-2011, 02:52 AM
|
#23 |
|
Senior Member
Join Date: May 2010
Location: Bellingham, Washington
Posts: 362
|
OKAY, so today/this evening, my roommate and I got much of the chassis assembled.
Started around 6PM and finished around 10PM with what we did. All we accomplished tonight was: 1. Mount axles and the springs to the frame 2. Mount engine to the Float-a-Motor (WORST INSTRUCTIONS EVER!) 3. Lose tools in the driveway 4. Clean the garage enough to get the whole shebang into the garage Tomorrow will be mount radiator, install new water pump, mount radiator shroud and all of the hosery and brake shafts... It turns (pushed it to the road to spin it around and nose it in to mount engine. I am very tired as I had a Chinese test at 10AM this morning and then found this frustrating. I will post photos once I find my battery charger. I would have taken photos of it in progress, but my battery was dead. Hopefully you like what you (will eventually) see!
|
|
|
|
|
09-29-2011, 06:09 AM
|
#24 |
|
Senior Member

Join Date: Oct 2010
Location: Grafton, MA
Posts: 1,226
|
Way to go! We are all waiting to see some pictures once you've had some sleep and recharged your batteries (yours and the camera's).
|
|
|
|
|
10-21-2011, 12:14 AM
|
#25 |
|
Senior Member
Join Date: May 2010
Location: Bellingham, Washington
Posts: 362
|
So, I got the engine, axles, and torque tube mounted. I have been fiddling around with the gas "pedal" but the spring is not very springy, so I am going to have to replace that. I have to hook up the carb controls, and then still put gaskets into the U-joint housing, and then grease it up. I've ordered some parts that are coming soon, so when I get a break from school and work, maybe I'll be able to put it together!
Hope you enjoy the pics!   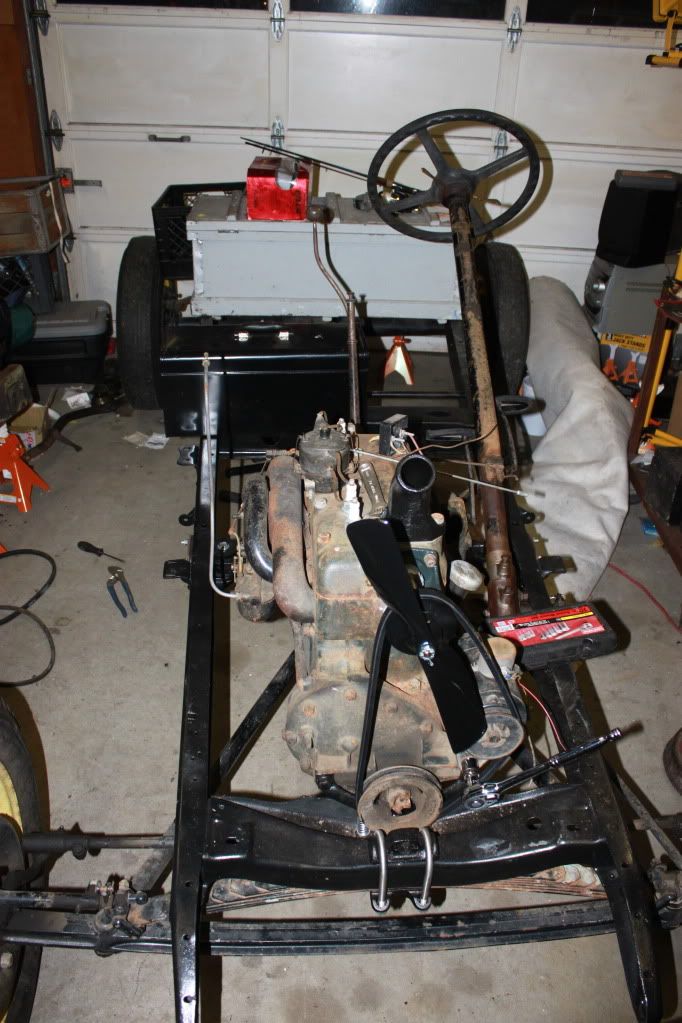     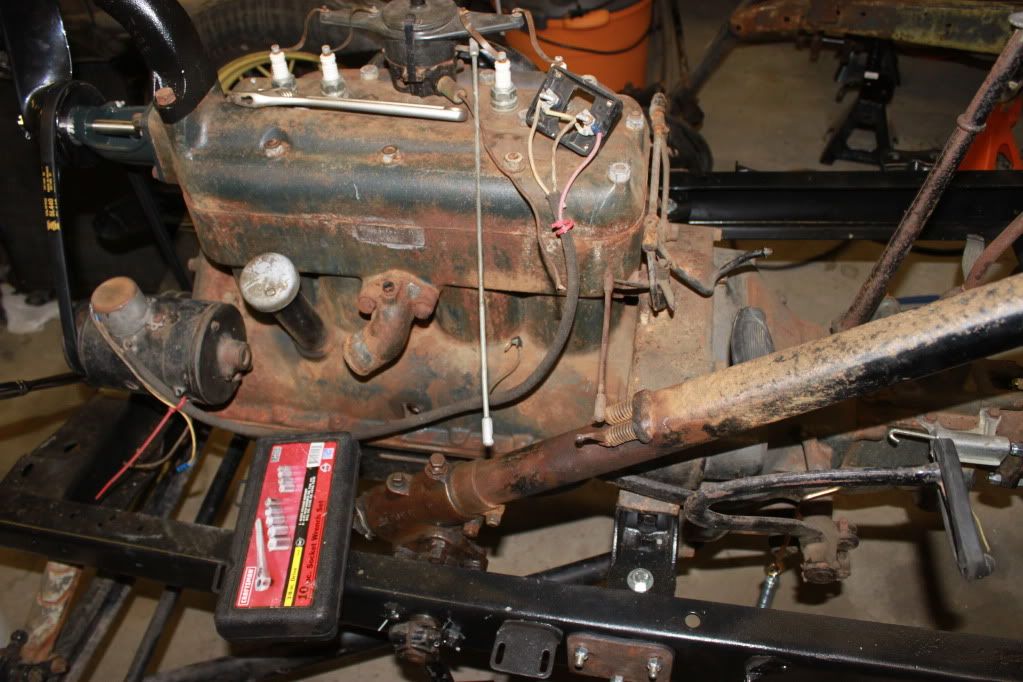 
|
|
|
|
|
10-21-2011, 08:13 AM
|
#26 |
|
Senior Member

Join Date: May 2010
Location: new britain,ct 06052
Posts: 9,390
|
Sponsored Links (Register now to hide all advertisements)
Paul in CT |
|
|
|
|
10-21-2011, 09:32 AM
|
#27 |
|
Senior Member

Join Date: May 2010
Location: OKC / Tonkawa, Ok.
Posts: 1,977
|
There is actually a rear mount for the float a motor kit. There will never be an easier time to replace that accelerator spring. If you try doing it once you have the car together you will know what I mean. Thanks for posting your project and good luck with those lost tools
__________________
Oklahoma City Model A Restorers Group. |
|
|
|
|
10-21-2011, 09:35 AM
|
#28 |
|
Senior Member

Join Date: May 2010
Location: ASTON, PA.
Posts: 725
|
Nice job so far but if I can say SLOW DOWN PAINT THAT ENGINE, TRANS, REAR AND FRONT END
|
|
|
|
|
10-21-2011, 11:18 AM
|
#29 |
|
Senior Member

Join Date: May 2010
Location: Pitt Meadows BC
Posts: 1,003
|
Before you start this engine.............remove the grease nipple acting as a plug in the intake. I'd bet you'll create enough vaccum to lift the ball off its seat and create a leak. Try a nice brass plug instead.
Good work and carry on but don't forget your other "studies" Cheers! |
|
|
|
|
10-21-2011, 12:29 PM
|
#30 | |
|
Senior Member
Join Date: May 2010
Location: Stayton, Oregon
Posts: 3,806
|
Quote:
Thanks for posting the pictures.
__________________
Fred Kroon 1929 Std Coupe 1929 Huckster |
|
|
|
|
|
10-21-2011, 01:31 PM
|
#31 | |||||
|
Senior Member
Join Date: May 2010
Location: Bellingham, Washington
Posts: 362
|
Quote:
Quote:
 Quote:
As for the axles and whatnot, I like the patina.Quote:
 Quote:
Thanks for the words of encouragement everyone! |
|||||
|
|
|
|
10-21-2011, 01:45 PM
|
#32 |
|
Senior Member
Join Date: Jul 2010
Location: Pottersville, NJ
Posts: 238
|
Make a Speedster!!!! Nice work so far!!!
Consider doing a high compression head while you are doing all of this work. |
|
|
|
|
10-21-2011, 03:11 PM
|
#33 | |
|
Senior Member
Join Date: May 2010
Location: Bellingham, Washington
Posts: 362
|
Quote:
 As for the high compression head, I just can't afford it, the basic parts and to save for my teaching abroad (if that still pans out). If I end up not going abroad, I guess I will have plenty of Model A funding...   I have ordered a new gasket set so I may be pulling this thing apart more than I anticipated/wanted... How does one usually paint an engine without dismantling it completely? I don't really have the shop space to do that right now...you can probably see the clutter in my garage, and on top of that, one of my roommates moved in and brought a bunch of stuff for the garage.
|
|
|
|
|
|
10-21-2011, 04:53 PM
|
#34 |
|
Senior Member
Join Date: May 2010
Location: Stayton, Oregon
Posts: 3,806
|
"Yeah, I was looking at that last night and wondering why there was a grease fitting there. What would the proper plug look like? If I want to run a vacuum line I assume this would be where it goes? A vacuum line for what though? As for the other studies...yeah, they are taking all of my time it seems. I am trying to maintain my sanity by doing something other than Chinese and English grammar.."
I am not sure but I think the plug is just a 1/4 plug you can buy from any hardware store. If I am wrong, please someone else get me squared away. The hole is for a vacuum line that would go to your windshield wiper or could be used for other things-like a horn, etc.
__________________
Fred Kroon 1929 Std Coupe 1929 Huckster |
|
|
|
|
10-21-2011, 08:38 PM
|
#35 | |
|
Senior Member
Join Date: Jul 2010
Location: Pottersville, NJ
Posts: 238
|
Quote:
|
|
|
|
|
|
10-21-2011, 08:42 PM
|
#36 |
|
Senior Member
Join Date: Jul 2010
Location: Pottersville, NJ
Posts: 238
|
Link to the thread on what I did..... pics of engine painting also.
https://fordbarn.com/forum/showthread.php?t=8958 |
|
|
|
|
10-22-2011, 04:39 AM
|
#37 | |
|
Senior Member
Join Date: May 2010
Location: Bellingham, Washington
Posts: 362
|
Quote:
It looks really nice! I also have to change the oil and put a new seal in it. I have 5 new quarts of 10w30 oil and ZDDP for the oil. If I pour Mystery Marvel Oil into the spark plug holes, where does it end up going? Anything else I should do before I try to start it up? I'll be ordering the bits for the starter soon. What are the silver spring loaded arms connecting the little arms on the steering column called? Any diagrams of how the engine should be configured? I can't seem to find them anywhere. Is it a pain to remove the distributor? Thanks everyone! I'll keep the progress reports coming now that I found my charger.
|
|
|
|
|
|
10-22-2011, 11:53 AM
|
#38 |
|
Senior Member
Join Date: May 2010
Location: Stayton, Oregon
Posts: 3,806
|
If you can remove the distributor, it would be good to pour some oil (regular oil) down the hole before you start the engine. If after taking out the bolt thing (on the right side of the motor) right below the distributor, you should be able to pull the distributor out. If not, I see there is a tool you can buy that is suppose to take it out.
It looks like Bill had a good way to paint the engine. Where you are now in your assembly process, it would seem like his method should work so you would not have to pull the engine again. I just used a rattle can of hi-temp paint on the exhaust manifold and the engine paint on the intake. Don't know if this is the "official" thing to do but I liked the results. "What are the silver spring loaded arms connecting the little arms on the steering column called? Any diagrams of how the engine should be configured? I can't seem to find them anywhere" Do you mean the "control rods" that connect the spark lever to the distributor and the one for the gas? If so, based on what you show in one of your pictures above, it looks like you only need the one going from the steering column to the distributor (the long one) and to the gas. If you happend to have Sacramento Ford Cat, it is on page 139. MAC's, page 89.
__________________
Fred Kroon 1929 Std Coupe 1929 Huckster Last edited by Fred K-OR; 10-22-2011 at 02:32 PM. |
|
|
|
|
10-22-2011, 12:58 PM
|
#39 |
|
Senior Member
Join Date: Jul 2010
Location: Pottersville, NJ
Posts: 238
|
High temp primer and the Ford paint from Snyders. I would remove anything you can. The final product will look that much nicer!! Definitely remove the intake and exhaust manifolds. I had my exhaust maniful Jet Hot coated. Quite expensive at $300 but it will last for decades.
You can use a wire brush if you have scaley paint and rust. The foam sanding blocks work quite well for the final sanding. The distributor is SIMPLE to remove. Be sure before you reinstall it to throughly clean the small 'locator' hole to prevent any issues. |
|
|
|
|
10-25-2011, 01:51 PM
|
#40 |
|
Senior Member
Join Date: May 2010
Location: Bellingham, Washington
Posts: 362
|
Just placed my final orders today and all parts should be here in a week or so! I have another batch coming within a day or two...
I'm excited and once I get to work on it, I will post more photos of the progress! |
|
|
|
|
10-25-2011, 02:52 PM
|
#41 | |
|
Senior Member

Join Date: May 2010
Location: Connecticut
Posts: 220
|
Quote:
 I understand the vacuum plug is 1/8-27 NPT Pipe thread (same as oil pump port); Synder's pn # A-6621 or Bratton's pn # 9900. Cars with a vacuum wiper would use this port, otherwise it would be plugged for cars equipped with electric wipers. Rich
__________________
E30 68-B Cabriolet
|
|
|
|
|
|
10-25-2011, 04:37 PM
|
#42 |
|
Senior Member
Join Date: May 2010
Location: Stayton, Oregon
Posts: 3,806
|
In one of your photos, I noticed you did not have a battery rack. This fits right under the drivers feet. And when you get it installed you need to put your ground cable on the other side of the tranny.
Reason I posted this is that I have a battery rack. If you need it, send me an email.
__________________
Fred Kroon 1929 Std Coupe 1929 Huckster |
|
|
|
| Sponsored Links (Register now to hide all advertisements) |
|
|
|
10-26-2011, 01:56 PM
|
#43 |
|
Senior Member
Join Date: May 2010
Location: Bellingham, Washington
Posts: 362
|
I picked up a port plug in my last order. I have almost everything I need now. I decided to bite the bullet and purchase most everything (except for shocks, need to do some more research on them) I will be needing.
Thanks Fred, I have a battery rack, I need to clean it up, prime and paint it. Got it with the fenders and engine that I picked up back in July. Progress is just kind of slow due to the amount of school work and work work I have. I picked up a second job doing landscaping, and I start tomorrow (I run my own business, so I am able to schedule my free days for work). I think it is Model A money that I will be earning at the landscaping job and savings money at my seafood job. Thanks everyone! I will be probably doing an entire gasket swap on the engine to freshen everything up. Is there something I should do/not do when replacing the gaskets? I will be doing the oil pan also, so I will drop the pan, clean it out, replace the gaskets and the rope(?) thingy too. It is too bad it is getting cold, fast. I hate working on engines in the cold. Freezes your fingers something awful. |
|
|
|
|
10-26-2011, 03:04 PM
|
#44 | |
|
Senior Member

Join Date: Nov 2010
Location: Anchorage, Alaska
Posts: 9,115
|
Quote:
|
|
|
|
|
|
10-26-2011, 09:48 PM
|
#45 |
|
Senior Member
Join Date: May 2010
Location: Tulsa Oklahoma
Posts: 298
|
When you take off the engine pan you will find a dipper tray for the rods to splash in and oil all it touches. After you wipe out the liquid oil, turn it upside down and holding it about 12-18" off of the grass slam it to the ground to remove the dipper tray. You should put some cardboard on the ground first to catch the sludge and debris and to be "green". After it is cleaned it will press back in by hand. One other thing I didn't do once, and only once, remove the spark plugs and rotate the engine with the hand crank and make sure you don't hear the rod ends hitting the dipper tray. I say this because I bought a rebuilt engine, installed it, put the radiator back on, hood etc. before I started it for its' test run and heard a terrible racket. Thought the pistons were swapping holes!
Well, back apart with the engine, checking everything and found it had the wrong dipper tray in the pan. Grabbed another one from my stash and put it back together again. Can't continue the other problems at this time I have encountered, sorry for the long, Woe is me, tale. Have fun and keep the pictures coming. |
|
|
|
|
10-28-2011, 10:48 AM
|
#46 |
|
Senior Member
Join Date: May 2010
Location: Bellingham, Washington
Posts: 362
|
Sponsored Links (Register now to hide all advertisements)
On the other hand, it does free up some extra money for my project! Maybe I can afford a high compression head now...? Anyway, I just didn't see myself in Taiwan and it was a big move to make. I'm looking at a job offer at a business where they make UAV parts out of carbon fiber, so it would be a new type of job from my current grocery store position.I may get the high compression head and then do the gasket swap. Also got new spark plugs and brass straps for them. I have A LOT (!!!) of parts coming this next week and received a big order on Tuesday. |
|
|
|
|
10-28-2011, 11:06 AM
|
#47 |
|
Senior Member
Join Date: Jul 2010
Location: Pottersville, NJ
Posts: 238
|
Hey, a head that I regret not getting is the Winfield aluminum head:
http://www.reds-headers.com/html/mod...ine_parts.html |
|
|
|
|
10-28-2011, 01:44 PM
|
#48 | |
|
Senior Member
Join Date: May 2010
Location: Bellingham, Washington
Posts: 362
|
Quote:
Any other brand recommendations? I am looking for a good buy, and would even consider a used one... Thanks! |
|
|
|
|
|
11-07-2011, 02:25 PM
|
#49 |
|
Senior Member
Join Date: May 2010
Location: Bellingham, Washington
Posts: 362
|
I got the starter mounted and took some photos. I'll try to get them uploaded either tonight or tomorrow...
Not a ton of progress I know, but school has been taking over my life along with work. I might also get a different job, so I've been trying to figure that out. I would have much better hours (8-3PM), so I would be able to work on the truck much more. As for overhauling the engine, I'd like to wait for a high compression head before I pull everything apart and replace all of the gaskets, studs, etc. IF I put a new head on it, what should I plan on doing aside from putting in new gaskets? I'm tempted to not do anything to it and just leave the stock head on, but I've got some extra cash building up for my project, so I'd like to do it all in one fell swoop. I'm planning on running the engine before I dismantle it and redo the entire beast. Should I change the oil, oil pan gaskets and make sure there isn't any sludge in it before I pull it apart or should I do that after I just check to see if it will run? Also, any leads or recommendations on high compression heads would be greatly appreciated!
|
|
|
|
|
11-07-2011, 04:28 PM
|
#50 | |
|
Senior Member
Join Date: May 2010
Location: Stayton, Oregon
Posts: 3,806
|
Quote:
After checking the pan and if there was some way to get the engine started, I think I would get it running and then see what it needs. In this statement, I am assuming you do not know the condition of your engine. So I would think it would be good to check it out before you do much more with it unless you wanted to go for a complete rebuild.
__________________
Fred Kroon 1929 Std Coupe 1929 Huckster |
|
|
|
|
|
11-07-2011, 09:11 PM
|
#51 | |
|
Senior Member
Join Date: May 2010
Location: Bellingham, Washington
Posts: 362
|
Quote:
I'm still debating on the high compression head. It would be nice to have the extra "oomph", but what will the cost (head, gaskets, studs, etc) cost me in the long run? I will have to figure that out to see if I want to go the extra bucks for all of that...
|
|
|
|
|
|
11-08-2011, 12:32 AM
|
#52 | |
|
Senior Member
Join Date: May 2010
Location: Stayton, Oregon
Posts: 3,806
|
Quote:
__________________
Fred Kroon 1929 Std Coupe 1929 Huckster |
|
|
|
|
|
11-08-2011, 05:28 AM
|
#53 |
|
Senior Member

Join Date: May 2010
Posts: 203
|
I would get the chassis to running and driving condition. You can install a different head later easy enough. You might be satisfied with the stock motor.
|
|
|
|
|
11-09-2011, 04:33 AM
|
#54 |
|
Senior Member
Join Date: May 2010
Location: Bellingham, Washington
Posts: 362
|
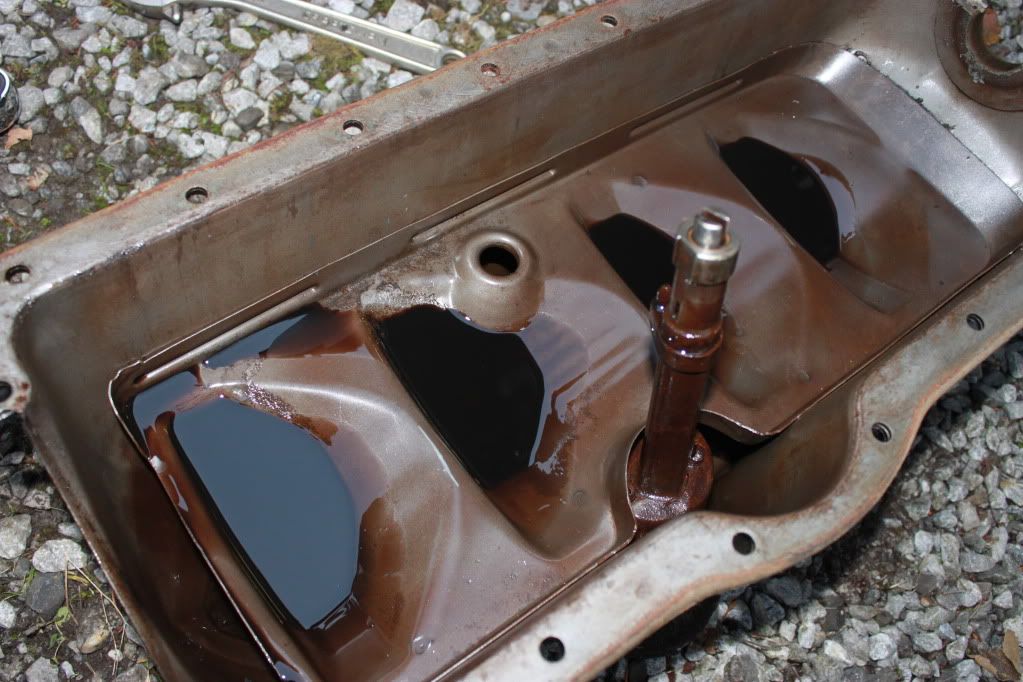
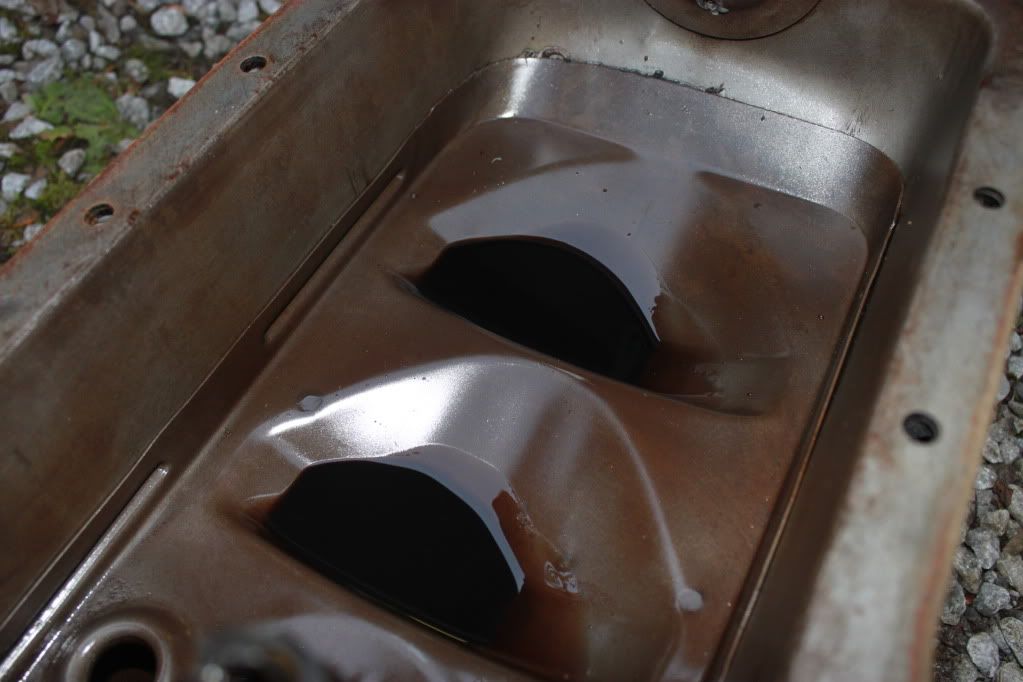
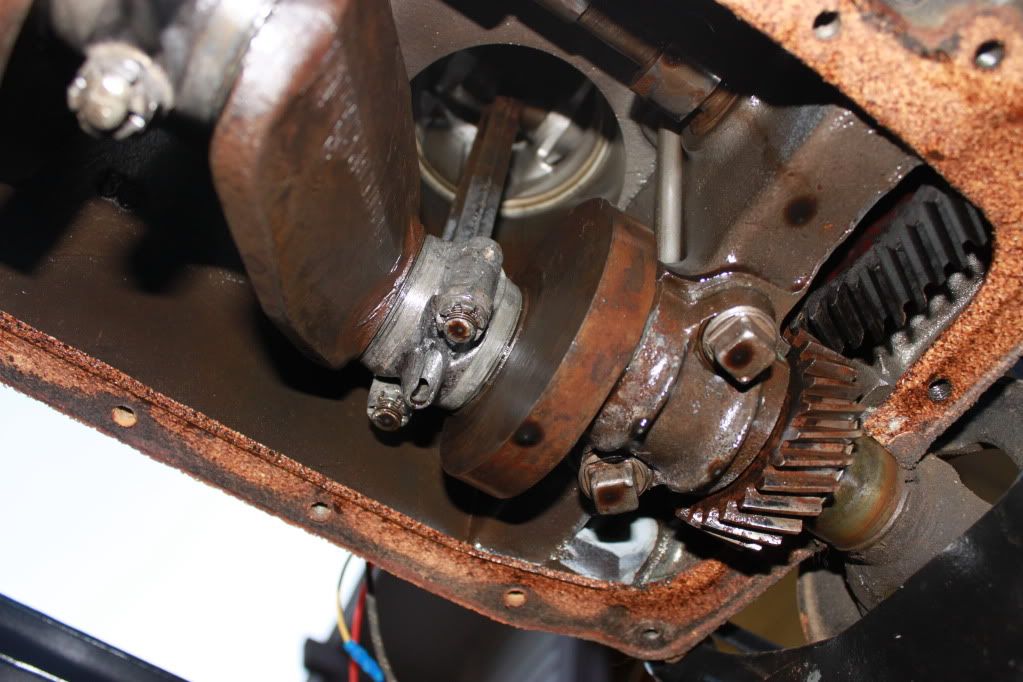
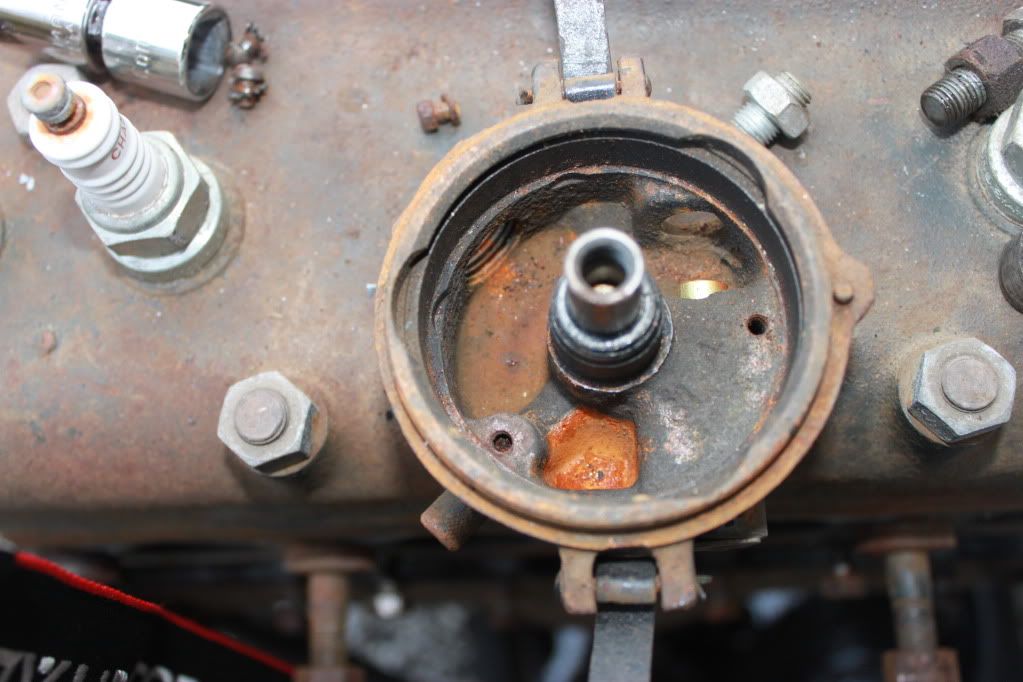
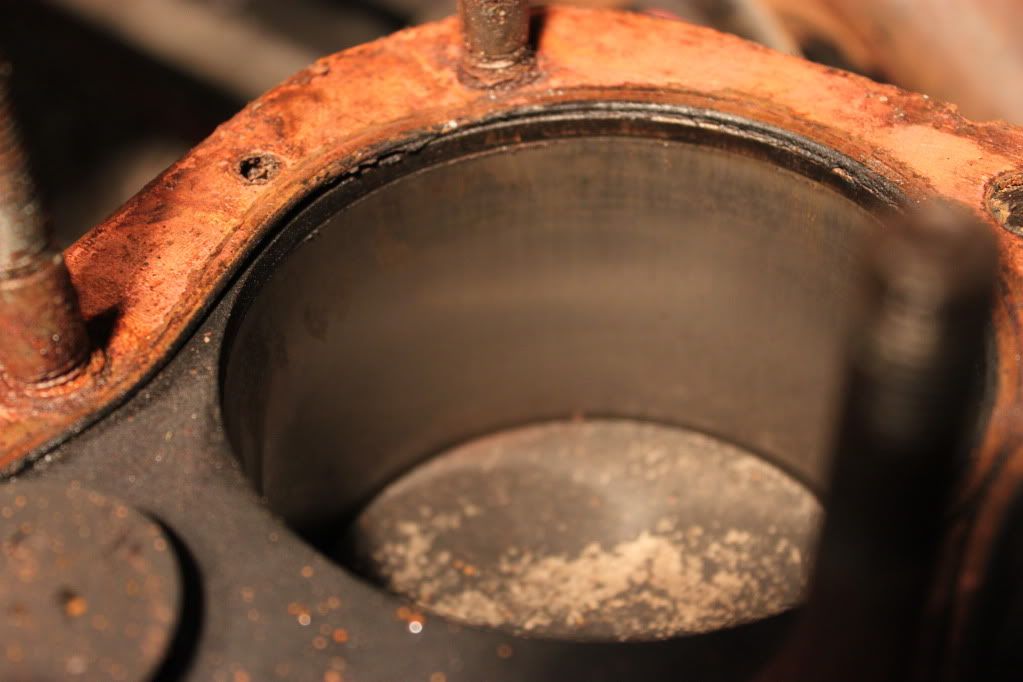
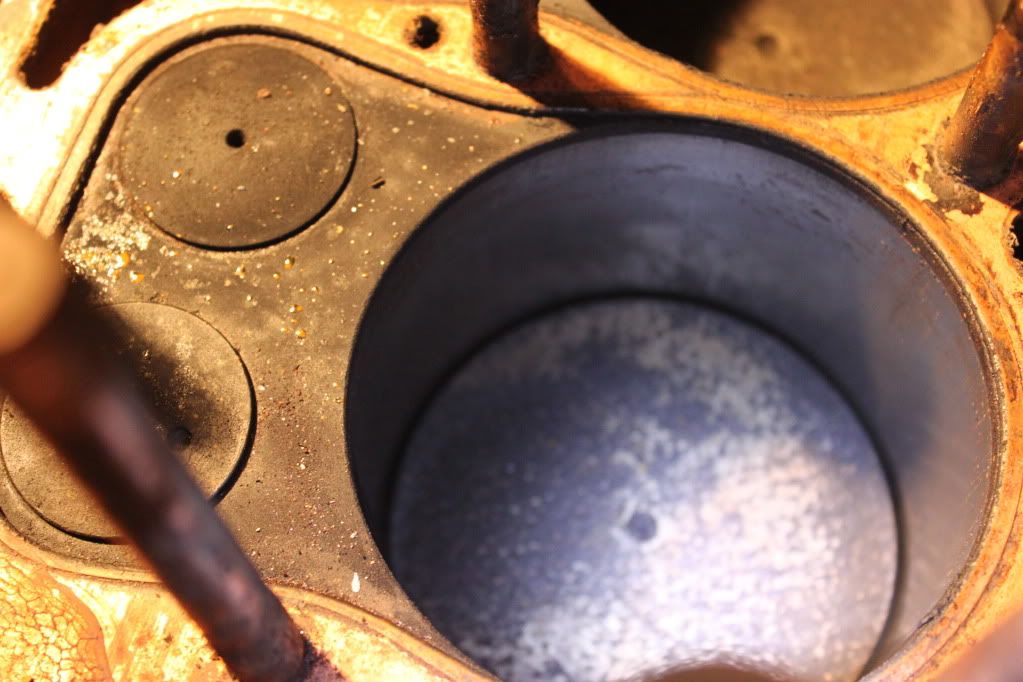
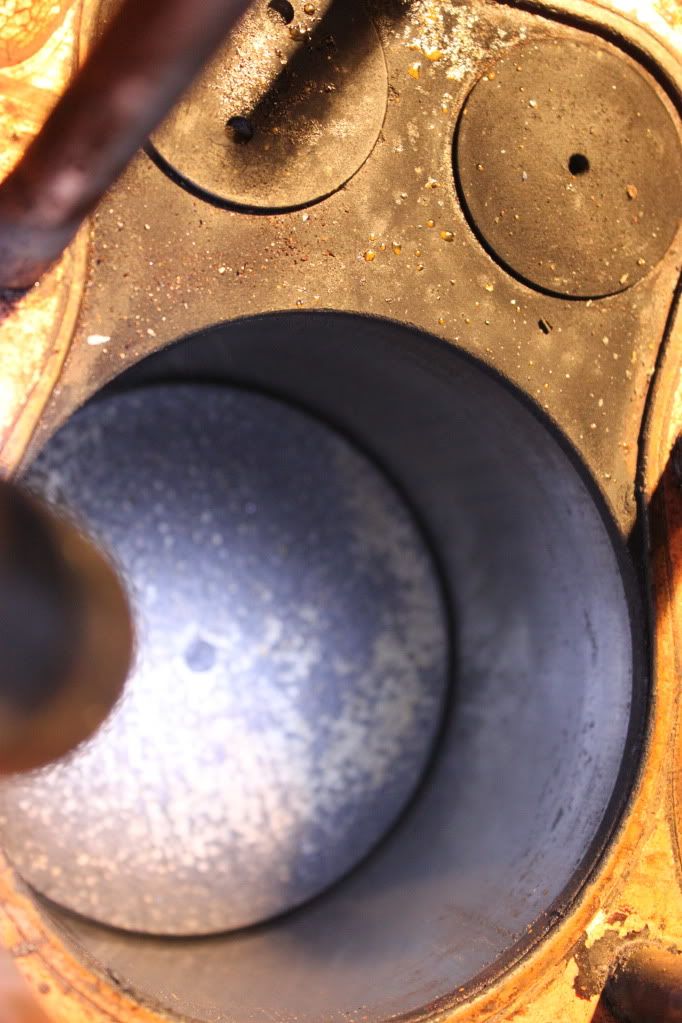
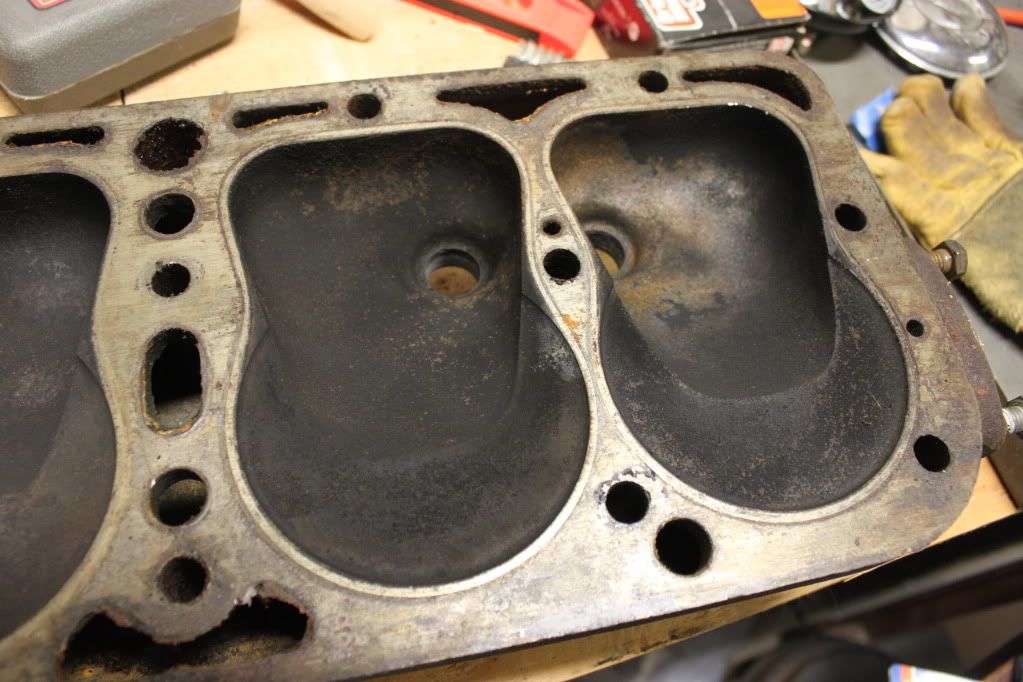
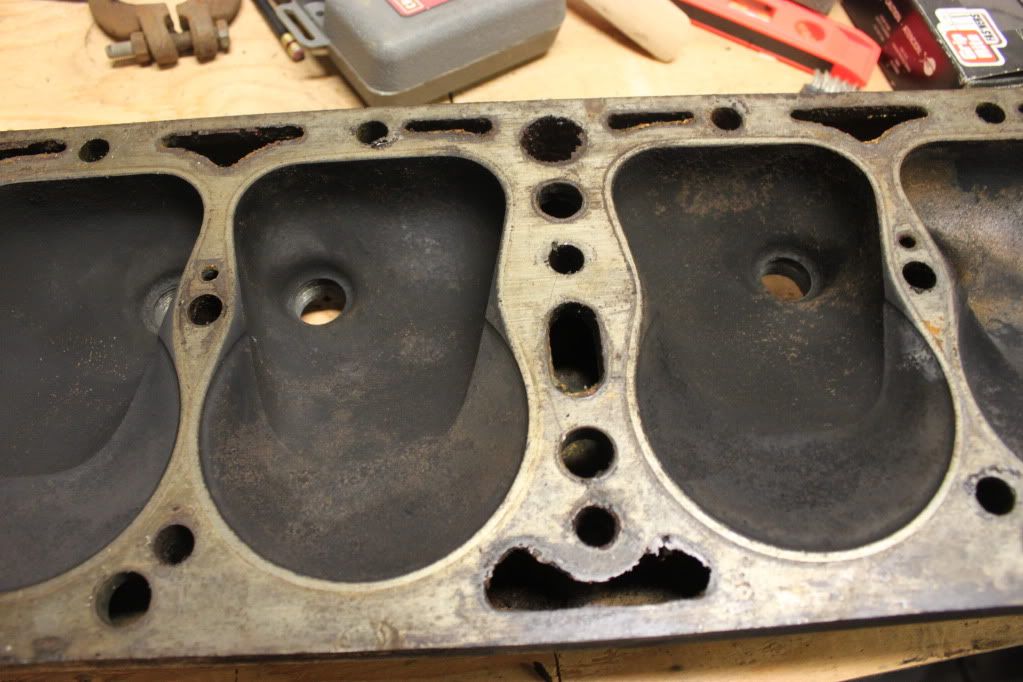
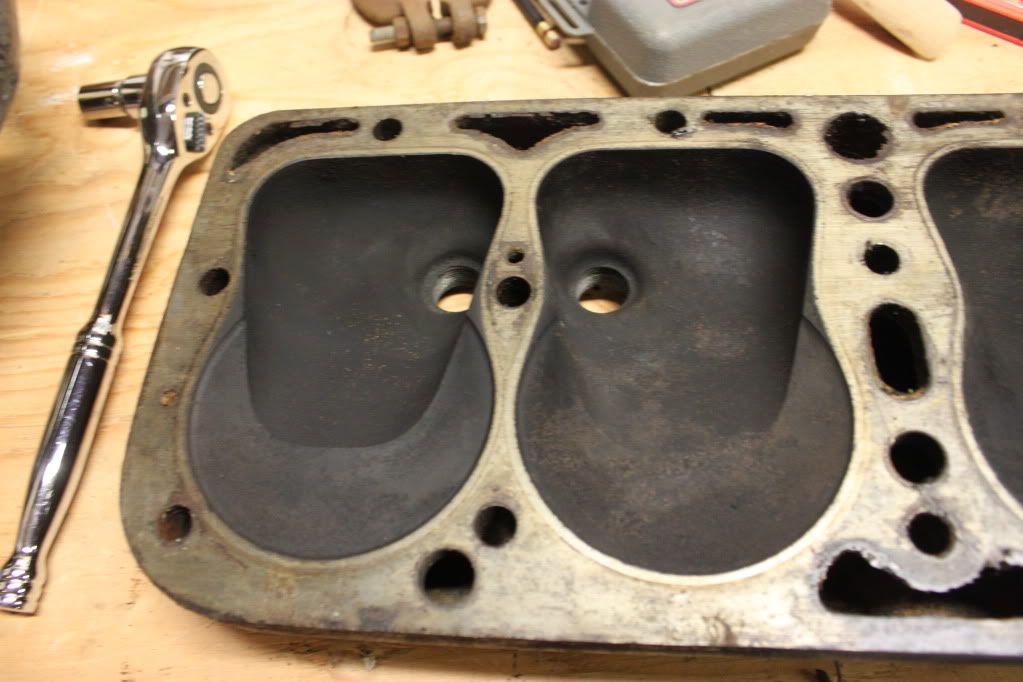
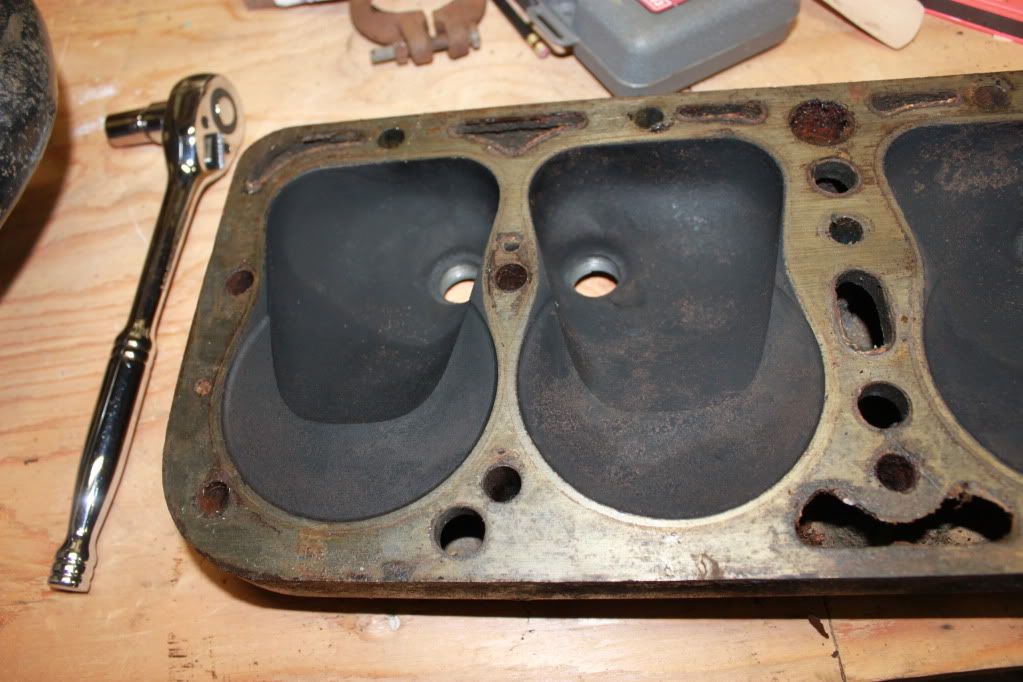
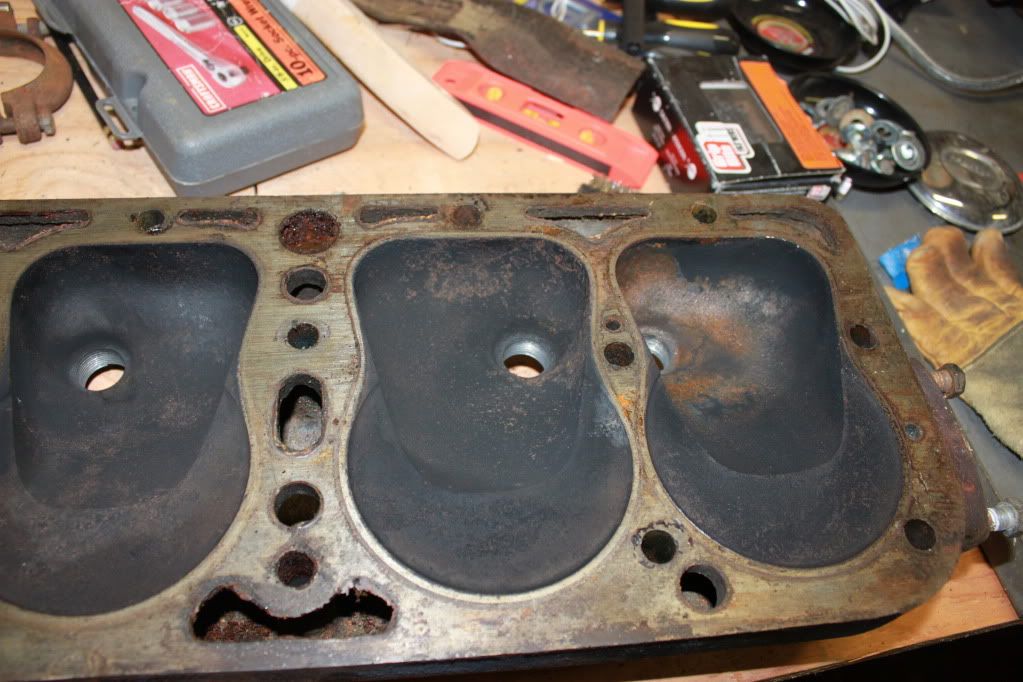
What I started with...the engine seems to be pretty clean inside. The intake and exhaust seems to be black, but I'm not sure how clean they should be. I popped the distributor apart, but I can't figure out how to get it to come out of the block...anybody know something that I'm not doing right? I unscrewed the nut and bolt from below the distributor and it sill won't come out.
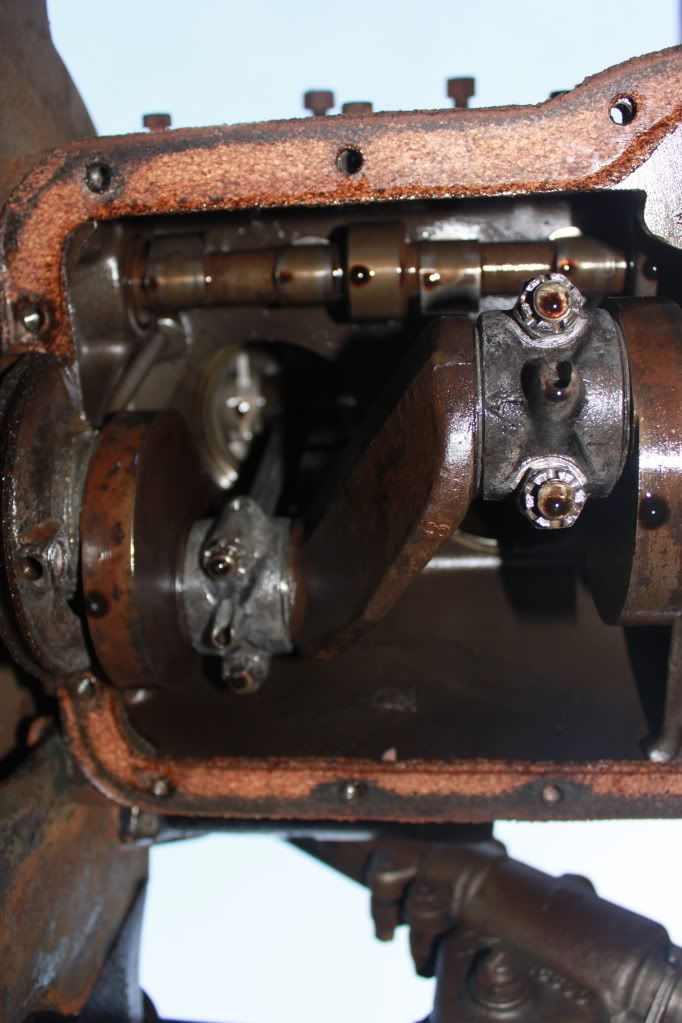
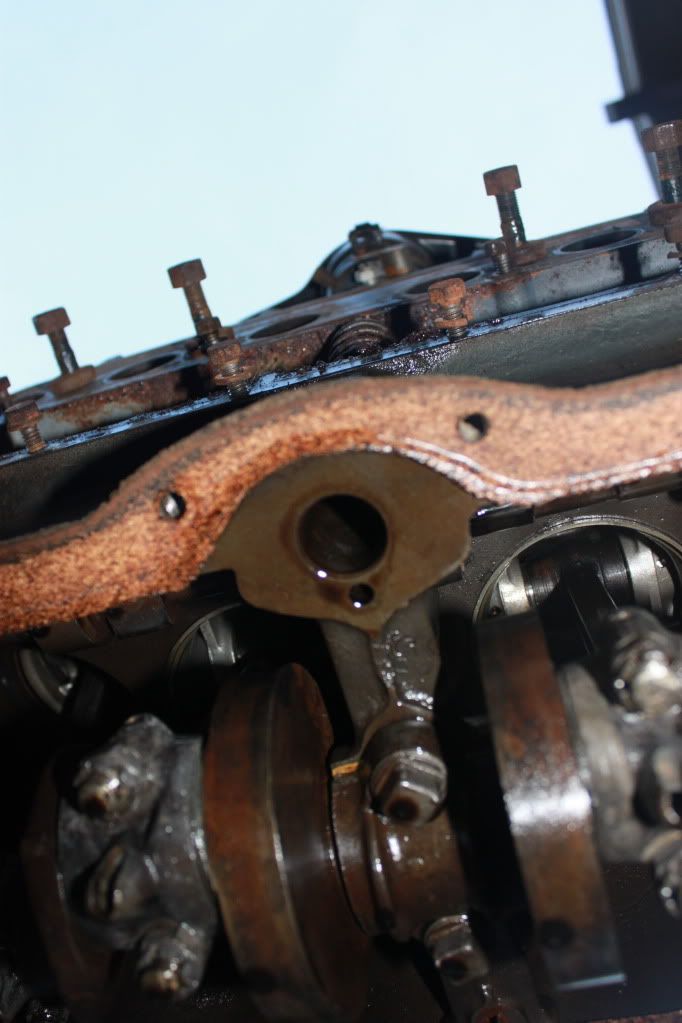
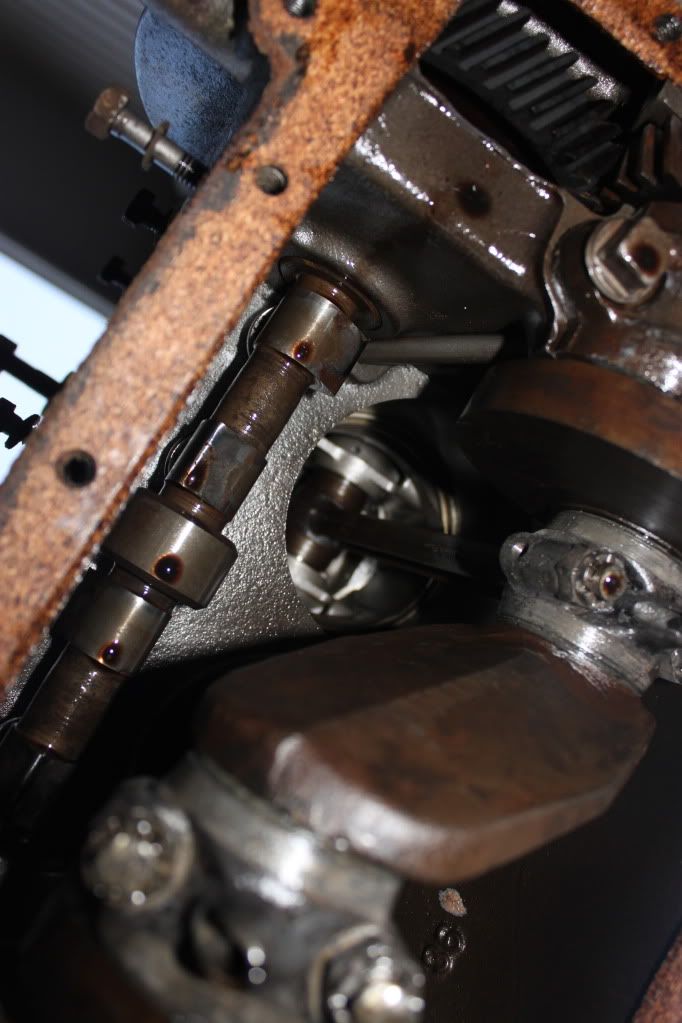
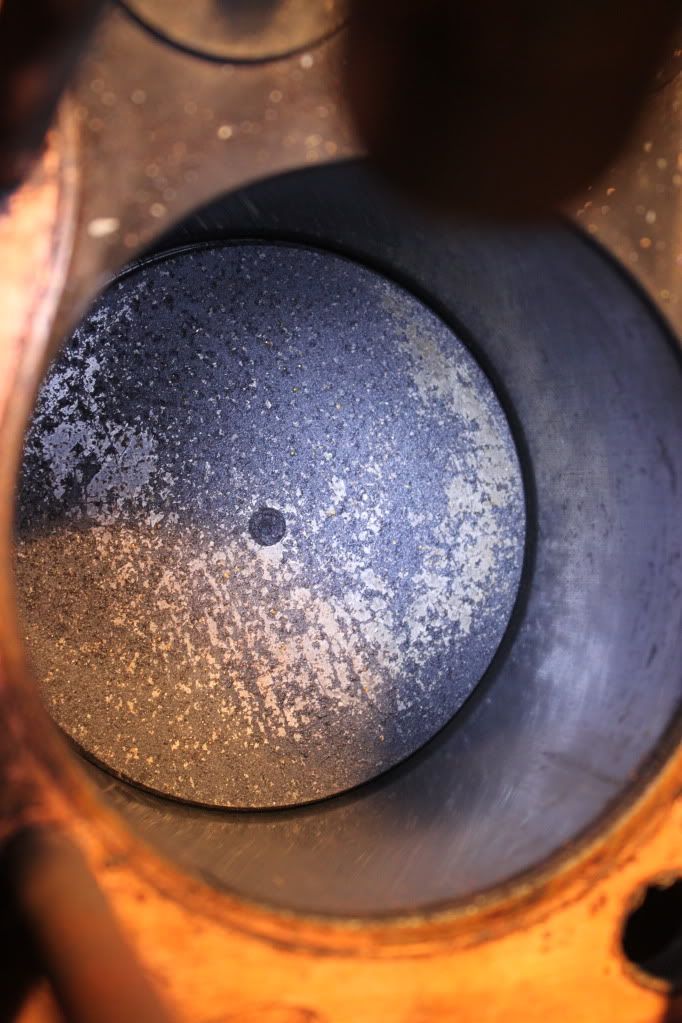
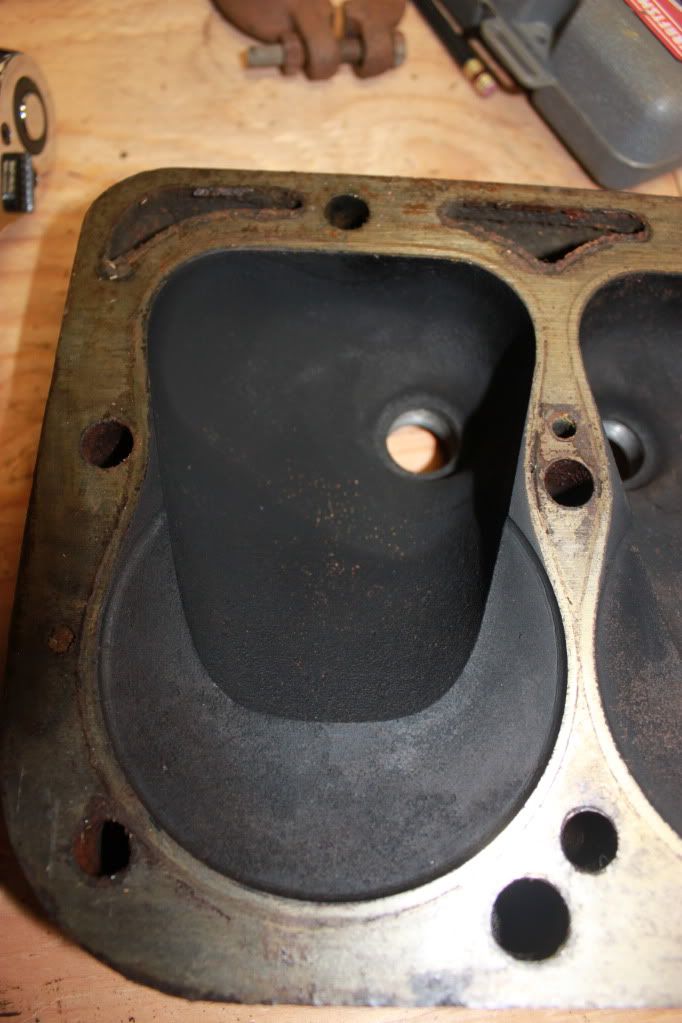
The oil pan was pretty darned clean! I was surprised that there wasn't more build up. Anyway, hope you enjoy the photos! I was happy to get the engine to this point. The fun part will be replacing the gaskets. How should I get the old ones off? Screwdriver and scrape? 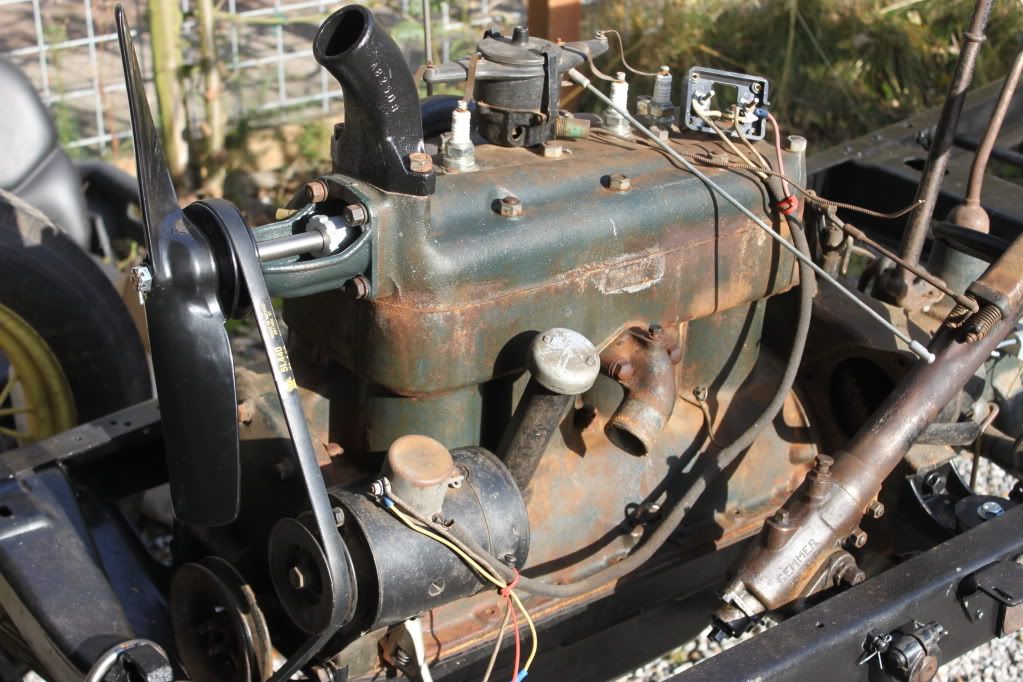 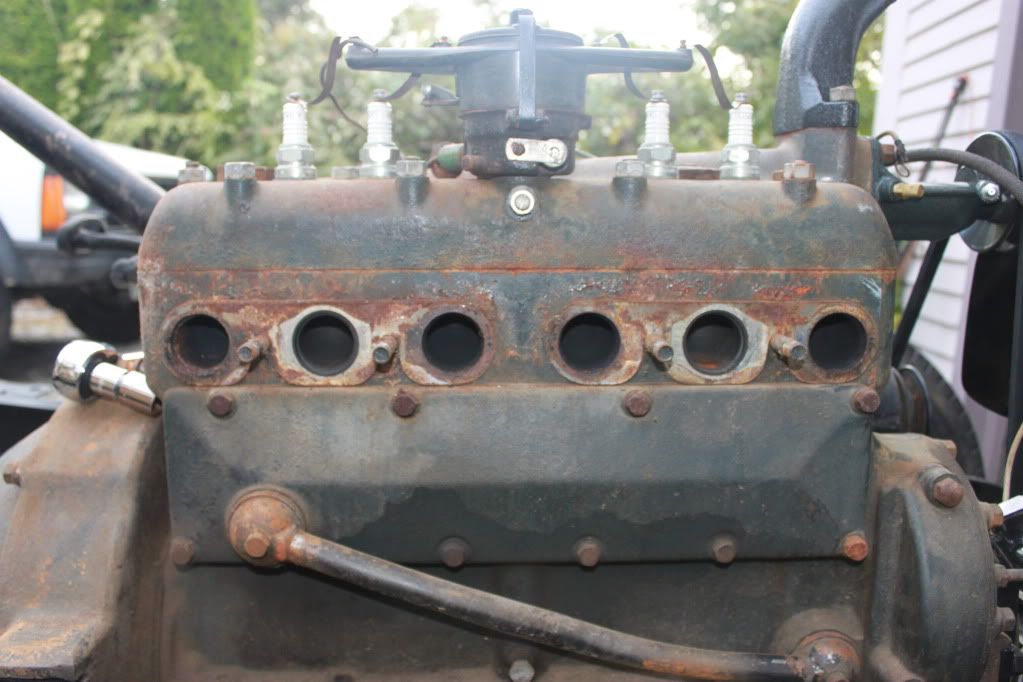 Freshly mounted starter... 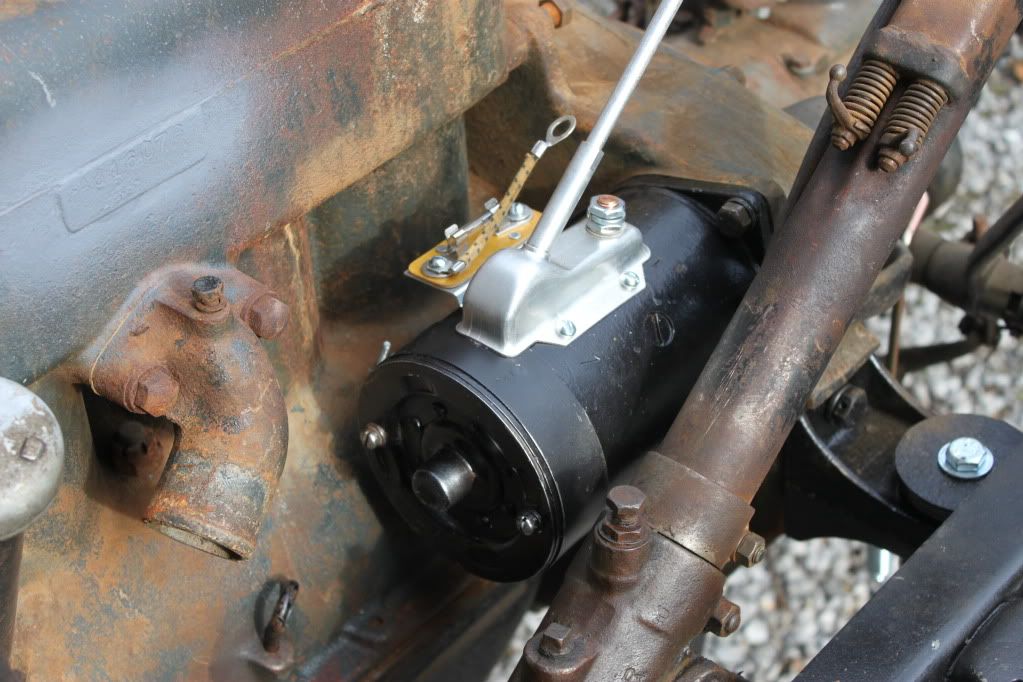 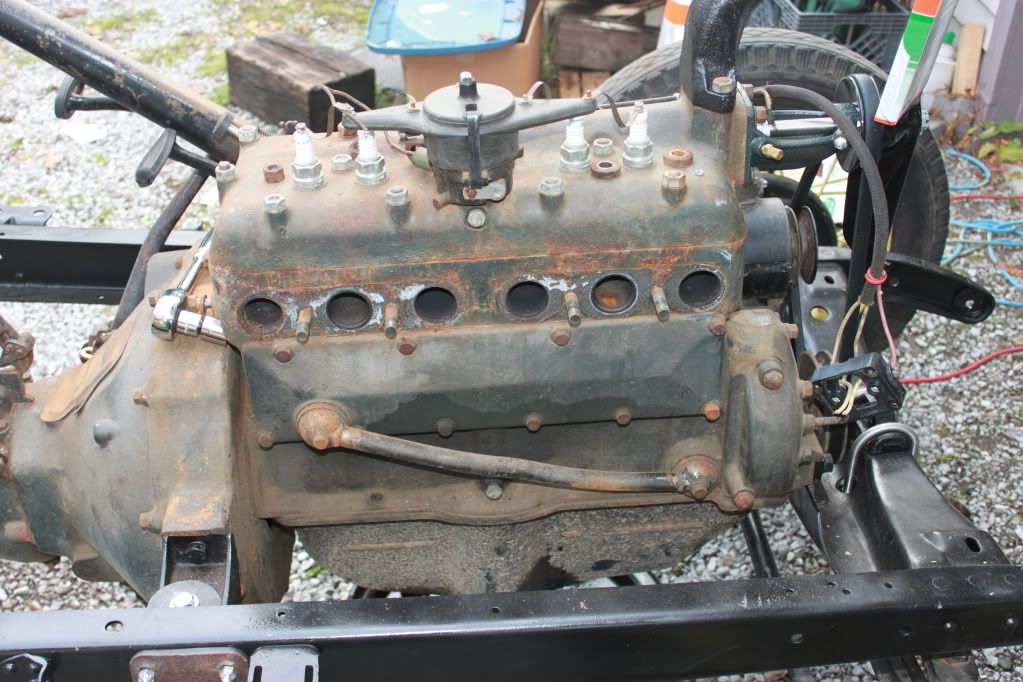 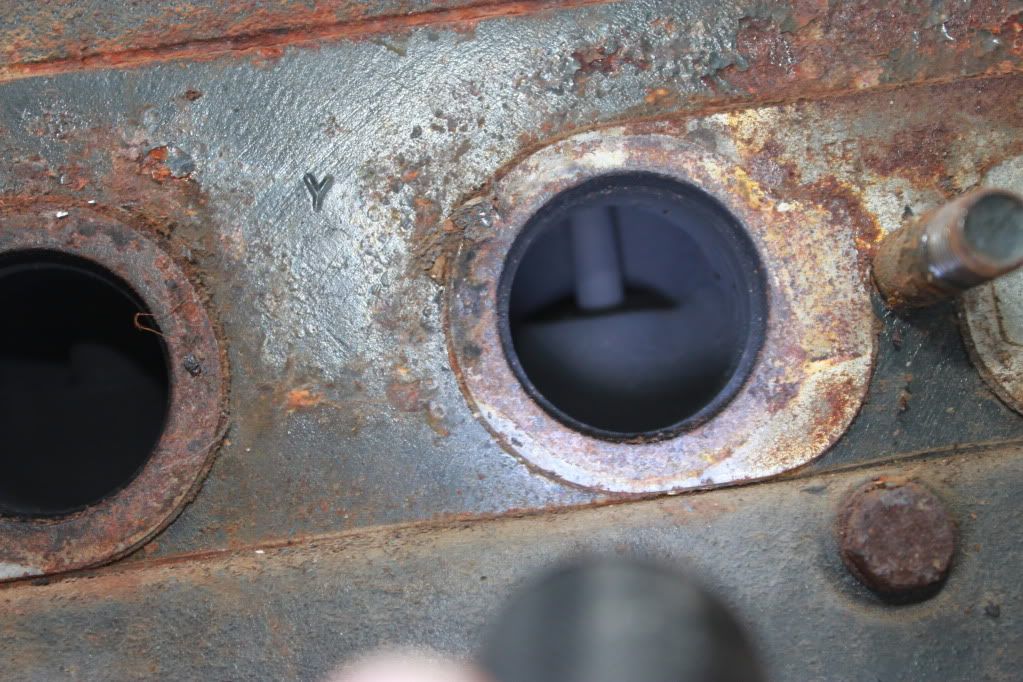 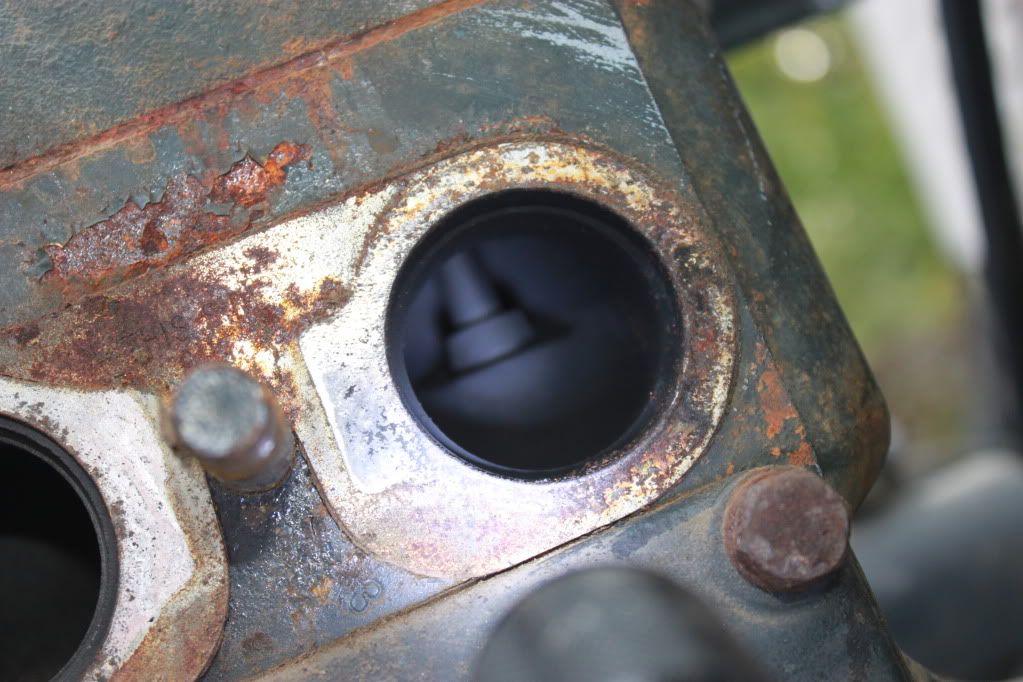  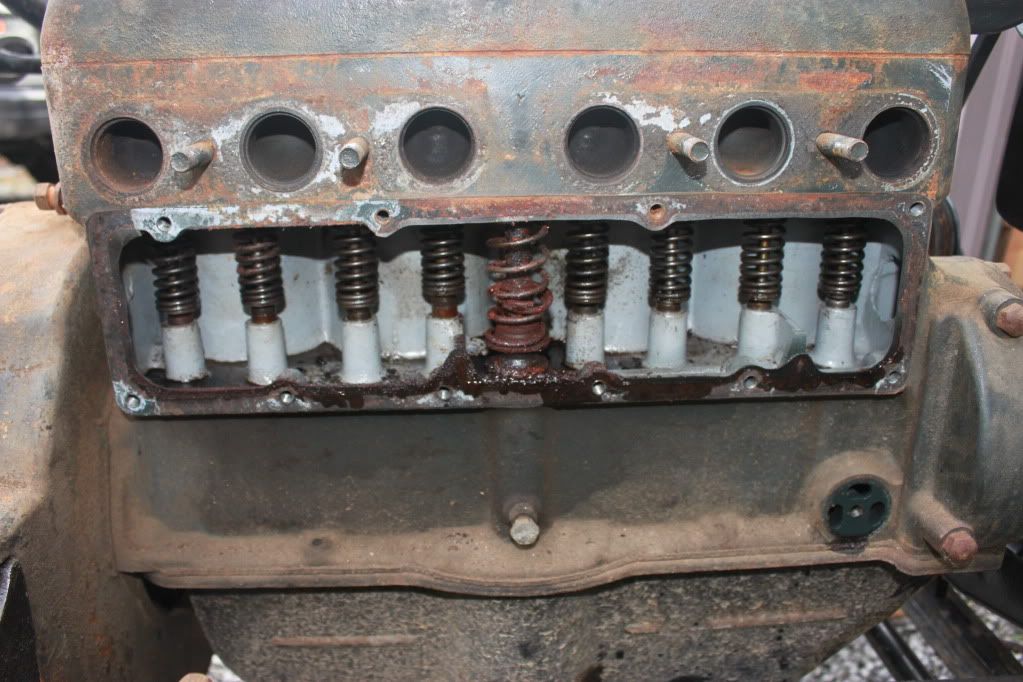 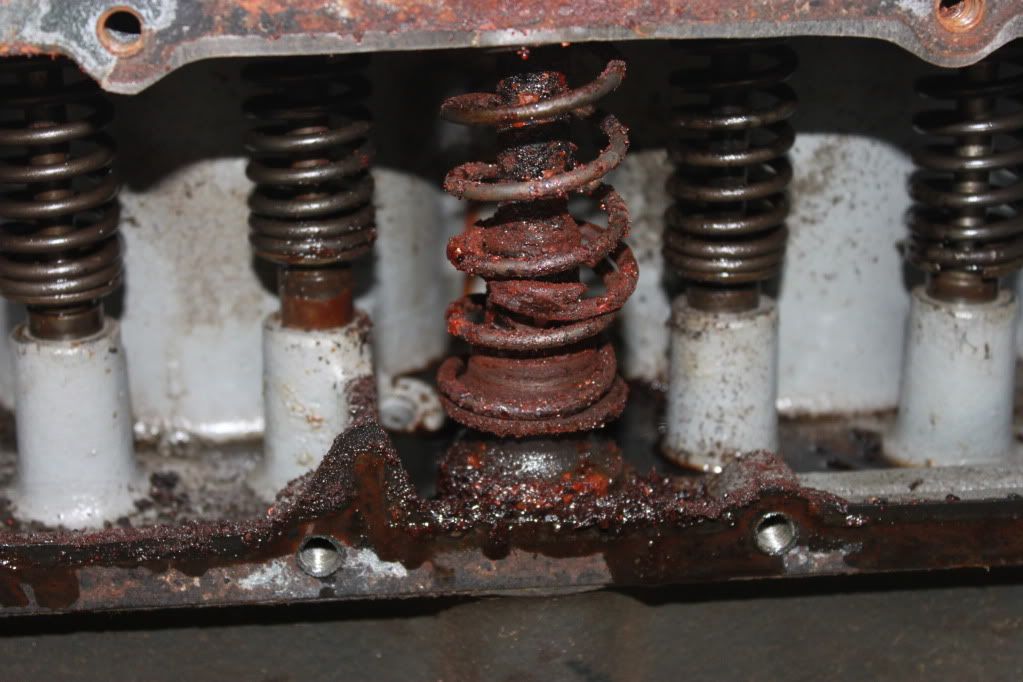 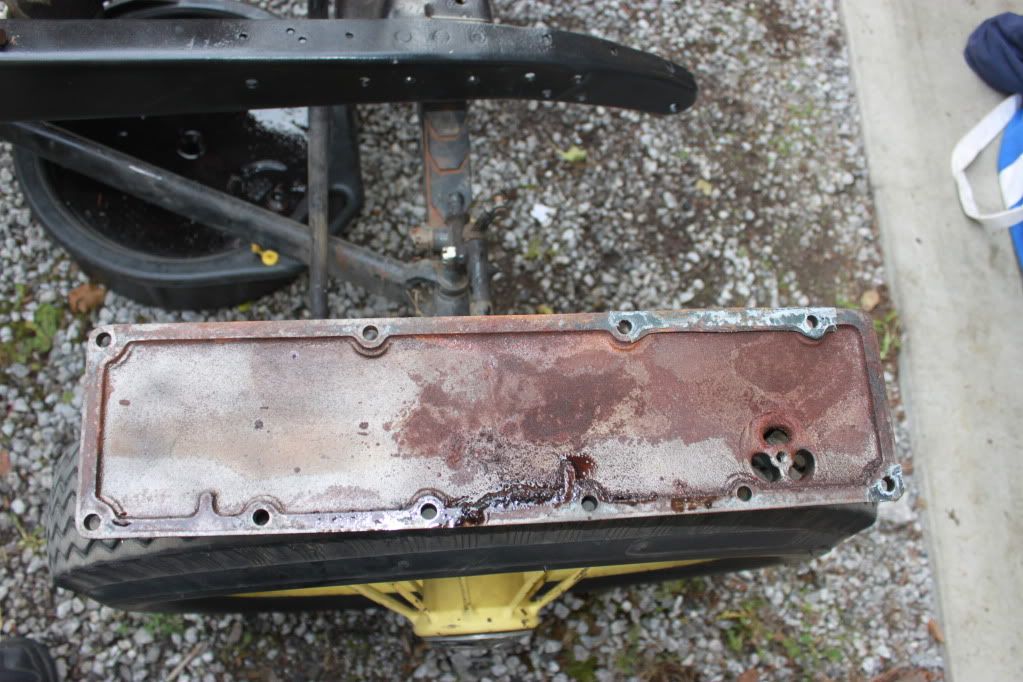
|
|
|
|
|
11-09-2011, 04:39 AM
|
#55 |
|
Senior Member
Join Date: May 2010
Location: Bellingham, Washington
Posts: 362
|
If you see something that I need to address, please tell me. I am just pulling the engine apart, so I am not really sure what I should be looking for. I know there is a bit of rust inside the valve cover...is that normal? Any special way I should clean it? I need to remove the distributor before I can get the head off, but that is turning out to be more difficult than I thought...
|
|
|
|
|
11-09-2011, 04:46 AM
|
#56 |
|
Senior Member
Join Date: May 2010
Location: Bellingham, Washington
Posts: 362
|
If I leave the oil pan off for a few days while I am painting it, will it develop rust inside?
|
|
|
|
|
11-09-2011, 04:59 AM
|
#57 |
|
Senior Member

Join Date: May 2010
Location: Iowa
Posts: 346
|
I don't see any cotter pins on the rod or the main nuts. Are they tight?
|
|
|
|
|
11-09-2011, 05:46 AM
|
#58 |
|
Senior Member

Join Date: May 2010
Location: Mpls, MN
Posts: 27,582
|
The spring for the oil pump/dist. drive gear is broken and needs to be replaced. Also be sure to replace the spring that holds the oil pump in place, if it has any rust or pits.
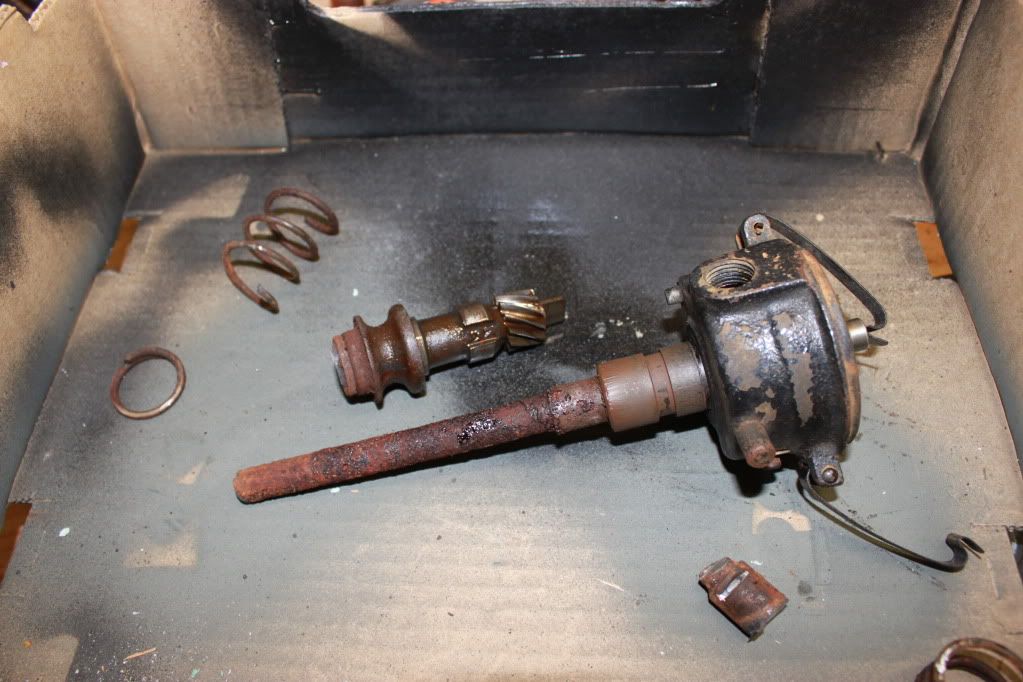
Make sure the rods have .001" to .002" clearance, then install the cotter pins. Sand or wire brush off the rust on the crank gear, so it doesn't wear the cam gear. The ports all look fine as far as the black you mentioned. I aways sandblast the inside of the oil pan and valve cover and paint them inside and out. Be sure to remove the dipper tray first, even if you are just cleaning the parts and not painting the inside. Spray some Kroil in the distributor lock bolt hole and around the part that slips into the head, as well as the lower shaft. It may be the lower shaft is rusted together and holding the distributor down. I've had this happen on a couple of engines I took apart. From what I can see it looks like a late 28 or early 29 engine. |
|
|
|
|
11-09-2011, 11:32 AM
|
#59 |
|
Senior Member

Join Date: Jun 2010
Location: SE Corner of WI
Posts: 169
|
Great project. I've spent my share of time looking for misplaced tools also. Now I buy tools with brightly colored handles and grips so I can spot them easier.
|
|
|
|
|
11-09-2011, 02:49 PM
|
#60 | |||
|
Senior Member
Join Date: May 2010
Location: Bellingham, Washington
Posts: 362
|
Quote:
Quote:
http://www.snydersantiqueauto.com/1459 Install cotter pins into end of the "rods". Any specific type? I found them on Snyder's site, but you have to buy the nut that goes with them, and they are $0.55 for a nut and pin. That makes it a little over $8 for all the cotter pins and then left over nuts...and measure the clearance-from end of bolt to where? I am not sure what this means. I'll remove the tray with the baffles, clean it and paint it with...primer and what kind of paint? High heat? Replace the drive spring with this one: http://www.snydersantiqueauto.com/1451 Quote:
Here is my new shopping list...am I missing anything? Drive Gear Spring (2) Oil Pump Screen Cover Gasket (2) Oil Return Pipe Gaskets (2 pair) Gear Cover Gasket (2) Oil Pressure Gauge Hookup Kit (1) I have the gauge already, but it came with plastic tubing... ") Oil Drain Plug Gasket (2) Retainer Spring (2) Oil Spring Retainer Clip (2) Wolf Whistle (just because Gotta whistle at the ladies!)Would anybody recommend this here over the rope seals? It is much more expensive...: http://www.snydersantiqueauto.com/1467 Am I missing anything below? What would be the best way to remove the rust from the inside of the valve area? Thanks everyone! 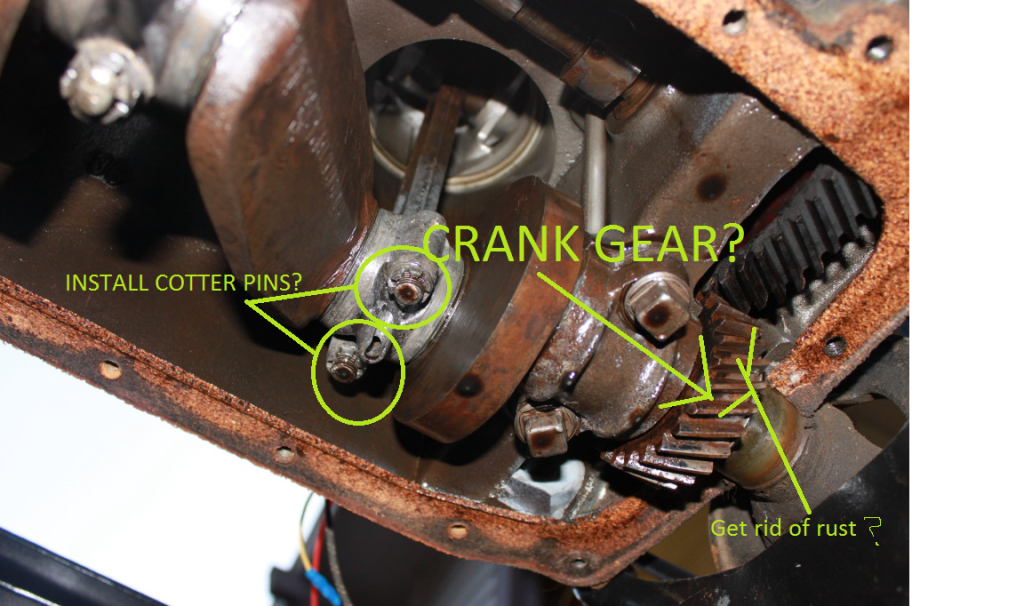 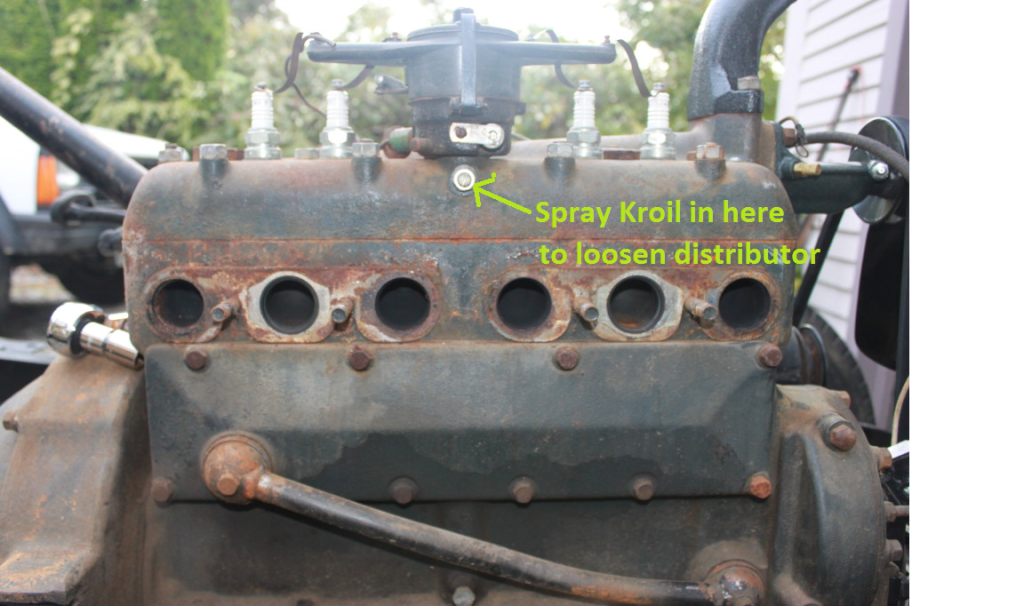 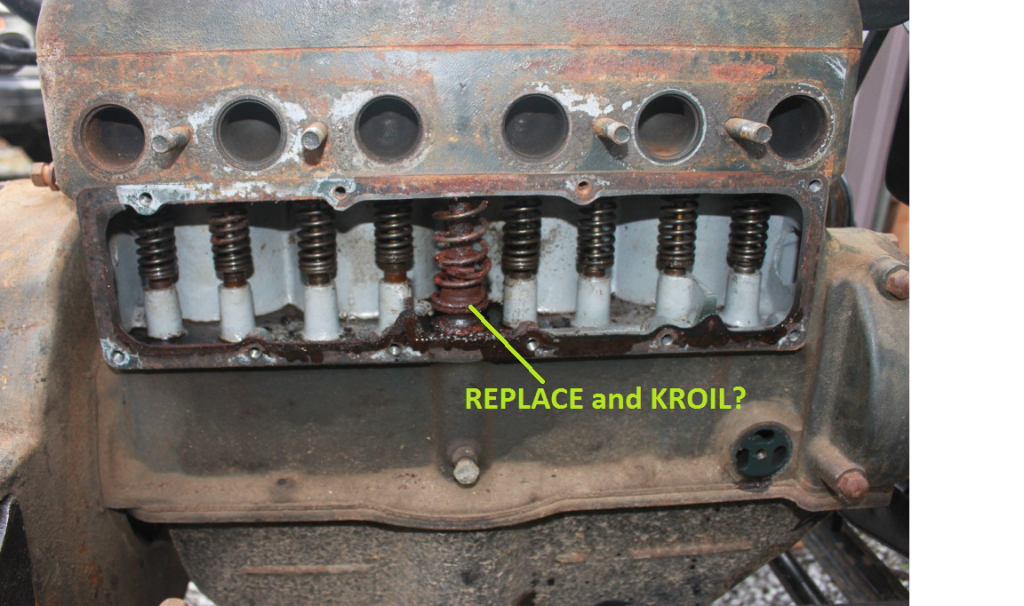
|
|||
|
|
|
|
11-09-2011, 03:07 PM
|
#61 |
|
Senior Member

Join Date: Jun 2011
Location: Dallas, Texas
Posts: 109
 |
Anybody else notice the 5 bearing camshaft? I didn't know you coud get away with that. As far as scraping the gaskets off, razor blades are the easiest thing for me to use and they always get all of the gasket off. The rods are also supposed to be torqued to a certain spec but I completely forgot how much. Another person will probably chime in and let you know how much they're supposed to be at. I would check them just to be safe, and when you do check them, when you torque it to that certain amount an old timer in my club told me not to over torque or under the bolts to get the cotter keys to line up. If they don't line up, take them back off and take some sand paper and wear the bottom off the bolts little by little until they line up right at that torque.
|
|
|
|
|
11-09-2011, 03:33 PM
|
#62 |
|
Senior Member
Join Date: May 2010
Location: Bellingham, Washington
Posts: 362
|
Also, what should I do about my distributor? Should I rebuild it or pay for a rebuilt one? How should I pop the shaft out to get the new spring in there? I just watched a video on youtube showing you can remove the head with the distributor in it still...I was thinking you had to remove the distributor first, then remove the head...
https://www.youtube.com/watch?v=5Fv3_Yfm0dM |
|
|
|
| Sponsored Links (Register now to hide all advertisements) |
|
|
|
11-09-2011, 04:38 PM
|
#63 |
|
Senior Member
Join Date: May 2010
Location: Mpls, MN
Posts: 27,582
|
I wouldn't remove the head unless you have a good reason to.
Is there someone nearby that can come over and show you how to check clearance on the rods? That is the space between the crank throw and the inside diameter of the big end of the connecting rod babbit. I would use the stock rope seal. |
|
|
|
|
11-09-2011, 04:48 PM
|
#64 | |
|
Senior Member
Join Date: May 2010
Location: Bellingham, Washington
Posts: 362
|
Quote:
As for someone in the area, I know one person. I don't know too many people who are into the engine part though, so I will have to ask him and find out. Rope seal-got it. Other than that, my checklist looks OK? Thanks again!
|
|
|
|
|
|
11-09-2011, 06:04 PM
|
#65 |
|
Senior Member

Join Date: May 2010
Location: Lynden, Wa
Posts: 3,552
|
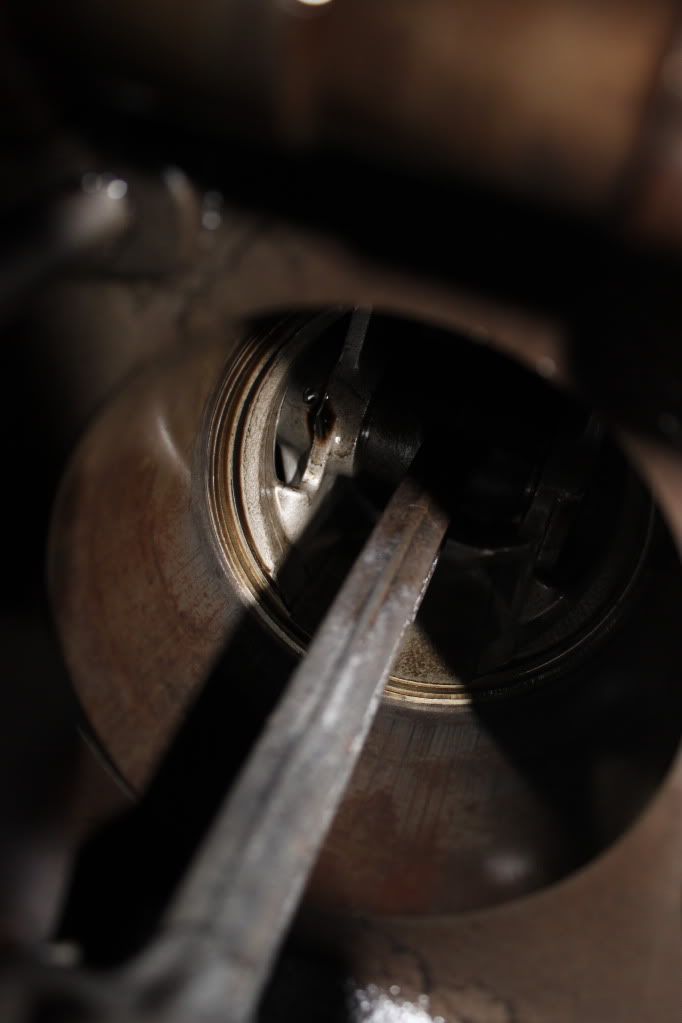
Just my 2 cents worth here....But I noticed the bottom of the cylinders looked either rusty or scored. The engine will run in this condition but not as well as one with honed walls. You may want to pop the pistons when you pull the head and do the rings.
Mike
__________________
1930 TownSedan (Briggs) 1957 Country Sedan |
|
|
|
|
11-10-2011, 03:42 AM
|
#66 | |
|
Senior Member
Join Date: May 2010
Location: Bellingham, Washington
Posts: 362
|
Sponsored Links (Register now to hide all advertisements)
Quote:
|
|
|
|
|
|
11-10-2011, 07:15 AM
|
#67 |
|
Senior Member

Join Date: May 2010
Location: Asheville,NC
Posts: 3,104
|
Next order you place should include a copy of Les Andrews book Model A Mechanics Handbook. It will answer many questions you may have.
|
|
|
|
|
11-10-2011, 12:26 PM
|
#68 | |
|
Senior Member
Join Date: May 2010
Location: Bellingham, Washington
Posts: 362
|
Quote:
As far as my questions go, I just want to replace the head gasket, get the distributor out, paint it and get it back together. The rings don't bother me, and the cotter pins don't bother me. Nor does the gapping. It ran before I got it, that's all I intend for it to do now. The Les Andrews book is nice, but it is hard to use sometimes. |
|
|
|
|
|
11-10-2011, 01:01 PM
|
#69 |
|
Senior Member
Join Date: May 2010
Location: Asheville,NC
Posts: 3,104
|
I think you are on the right track but I would put the cotters in. Any kind of cotters would be better than what you have. Go to the parts store and pick up a few and put them in. If the holes don't line up just tighten the nut to the next slot or if it is only half or less back to the one before it. I have used 2 screwdrivers to pry the dist up out of the head but you must take extreme care to pry the same on both sides at once. Your only other alternatives are to remove the head and get it out or get one of the pullers that is made for this purpose or just keep worrying it till it gives up by wiggling and trying to turn it. When you get the dist out, remove the spring in the valve chamber and get the dist drive out and clean all the rust up. You might want to rebuild this drive since it can make your timing not stay consistent.
Keep up the good work and take your time. |
|
|
|
|
11-10-2011, 01:55 PM
|
#70 |
|
Senior Member

Join Date: May 2010
Location: Sf bay area
Posts: 1,464
|
nice looking frame good luck w/your project!
__________________
"I believe God is managing affairs and that He doesn't need any advice from me. With God in Charge, I believe everything will work out for the best in the end. So what is there to worry about". Quote by Henry Ford |
|
|
|
|
11-10-2011, 02:01 PM
|
#71 |
|
Senior Member
Join Date: Jun 2011
Location: Dallas, Texas
Posts: 109
|
When me and my dad finally got our chassis last August we got it running (it didn't run very good, but the motor hadn't run in 30 years) and then took it out to examine it. We tried getting the distributor out while it was sitting on the engine stand. We had to of worked at it for nearly almost 2 straight hours, spraying everything we could find on it in the process. We even took a larger monkey wrench to it. (Part of the lower body was already cracked when we got it.) Finally we just decided to turn it over and take the pan off. Not even 5 seconds after we turned it upside down, the distributor fell out in the floor with no help what so ever. Don't ask me how, but it did. I'm not saying that this will work for you, but I would try to move on right now and come back to it later.
|
|
|
|
|
11-10-2011, 04:13 PM
|
#72 |
|
Senior Member
Join Date: May 2010
Location: Stayton, Oregon
Posts: 3,806
|
I think the advise to take your time on the distributor is good advise. Keep putting Kroil in the hole like mentioned above and keep trying to get it out. The screw driver idea sounds good also.
Before you put your manifolds back on, be sure you clean the holes. They look like they may have some rust and may leak if you don't. Keep at it. Looks like things are getting there.
__________________
Fred Kroon 1929 Std Coupe 1929 Huckster |
|
|
|
|
11-10-2011, 08:24 PM
|
#73 |
|
Senior Member
Join Date: May 2010
Location: Bellingham, Washington
Posts: 362
|
So, I got the distributor loose, but I can't get it out of the engine! I can lift up on it and it compresses the spring with the shaft that goes from it down through the valve chamber. What can I do to get it loose? The Les Andrews book does not say anything other than "remove the distributor"...well duh! But how? I got the head loose and all that is keeping me from removing it is the distributor, shaft and spring... >
|
|
|
|
|
11-10-2011, 09:57 PM
|
#74 |
|
Senior Member
Join Date: Jun 2011
Location: Dallas, Texas
Posts: 109
|
The head will come off with the distributor in it. It might even be easier to get the distributor out with the head off.
|
|
|
|
|
11-11-2011, 04:21 AM
|
#75 | |
|
Senior Member
Join Date: May 2010
Location: Bellingham, Washington
Posts: 362
|
Quote:
Should I keep spraying it with lubricant and just hope it penetrates it?
|
|
|
|
|
|
11-11-2011, 04:34 AM
|
#76 | |
|
Senior Member
Join Date: May 2010
Location: Mpls, MN
Posts: 27,582
|
Quote:
I had to do one just like yours a few years ago. The rust on the shaft joints can form quite a bond.
|
|
|
|
|
|
11-11-2011, 05:06 AM
|
#77 | |
|
Senior Member
Join Date: May 2010
Location: Bellingham, Washington
Posts: 362
|
Quote:
I can't lift the head far enough to get any wood between block and head. It is maybe two gasket thicknesses wide (the gap between the block and head). What is the best method to clean the grime out of the valve chamber?
|
|
|
|
|
|
11-11-2011, 08:34 AM
|
#78 |
|
Senior Member
Join Date: May 2010
Location: Mpls, MN
Posts: 27,582
|
Stick some pipe cleaners in the holes that feed oil to the main bearings, then you can scrape and blow the junk out. I use gas and a brush along with compressed air to clean it out. After it's done then pull the pipe cleaners out of the oil tubes.
If I remember right, it was your engine that had the broken oil pump drive gear retaining spring, so I'd just pull it out of there by grabbing the end with a vice grip and giving it a good yank. Wear leather gloves. |
|
|
|
|
11-11-2011, 09:19 AM
|
#79 |
|
Senior Member
Join Date: May 2010
Location: Iowa
Posts: 346
|
You can get wooden wedges used for shimming windows & doors at your local lumber yard/big box store for a couple of bucks. They start out at about 1/8 of an inch and taper to about 1/2 thick over 6 inches or so.
I would be careful hitting the shaft, if you miss you could damage the block. Use the kroil and be patient. Maybe a little heat after you clean out the valve chamber, a heat gun would be better than a torch. If you are going to replace the shafts ( I would) how about a vice grip on both shafts either side of the joint and rock them back and forth in opposite directions? |
|
|
|
|
11-13-2011, 05:38 AM
|
#80 |
|
Senior Member
Join Date: May 2010
Location: Bellingham, Washington
Posts: 362
|
Can I take an angle grinder to the shafts and cut them out? I can't find Kroil at the store I work at. Is it a specialty item? I figure I will just buy a rebuild distributor from Snyder's or something. Any ideas? It is only about $10 more to buy one rebuilt already than buying the rebuild kit...
|
|
|
|
|
11-13-2011, 05:59 AM
|
#81 |
|
Senior Member
Join Date: May 2010
Location: Mpls, MN
Posts: 27,582
|
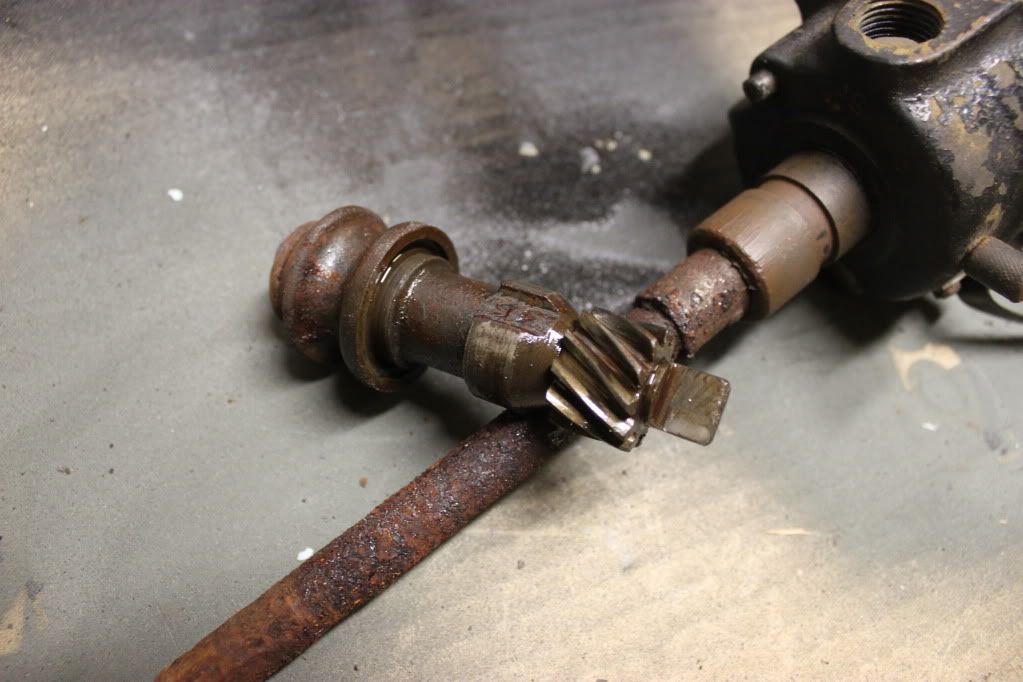
If you can't find Kroil, then use diesel, kerosene, or any penetrating fluid. Can you tell if the distributor has ONE long shaft to the drive gear, or does it have the correct TWO PIECE shaft? Either way you should be able to lift the head a bit and use a punch and hammer the drive gear down to try to free it from the shaft for the distributor.
|
|
|
|
|
11-13-2011, 09:29 AM
|
#82 |
|
Senior Member
Join Date: May 2010
Location: Iowa
Posts: 346
|
Kroil isn't available in retail stores. You can find it a www.kanolabs.com As far as the grinder goes, you could. You probably won't reuse the shafts anyway.
|
|
|
|
| Sponsored Links (Register now to hide all advertisements) |
|
|
|
11-13-2011, 10:16 AM
|
#83 |
|
Senior Member
Join Date: May 2010
Location: new britain,ct 06052
Posts: 9,390
|
Earlier this year when I had to remove my dist, it was "stuck". I tried acetone and ATF, no dice. I tried prying carefully with 2 screwdrivers, no dice. I was trying to save it as a core, but went and got 3 foot crowbar and inserted it underneath the pin area and "pow" out it came, no damage.
If you're not concerned with saving it get yourself a "bar" and try that method. Paul in CT |
|
|
|
|
11-13-2011, 05:48 PM
|
#84 |
|
Senior Member
Join Date: May 2010
Location: Stayton, Oregon
Posts: 3,806
|
I think there is a product like Kroil called "PC Blaster" that seems to work OK and I think you can buy it from a local parts store.
__________________
Fred Kroon 1929 Std Coupe 1929 Huckster |
|
|
|
|
11-14-2011, 05:32 AM
|
#85 |
|
Senior Member
Join Date: May 2010
Location: Bellingham, Washington
Posts: 362
|
Soooooo....I got the head off! What I ended up doing was cutting the shaft into three pieces (the first cut didn't let me pull the bottom piece out). So, the distributor is now out and the head is off!
The pistons, intake and exhaust valves look OK and I will post pictures hopefully in the morning. I think I will have to add to my previous shopping list...haha! I keep finding more and more pieces to add the further along I go. Anyway, I will probably rebuild my oil pump and buy a rebuilt distributor, so that I know it is done properly. |
|
|
|
|
11-14-2011, 06:01 AM
|
#86 |
|
Senior Member
Join Date: May 2010
Location: Mpls, MN
Posts: 27,582
|
Sponsored Links (Register now to hide all advertisements)
|
|
|
|
|
11-14-2011, 02:17 PM
|
#87 |
|
Senior Member
Join Date: May 2010
Location: Bellingham, Washington
Posts: 362
|
I am planning on washing out the valve chamber. I just planned on washing it down with a solvent of some sort and draining it through the hole where the distributor shaft was. I see the syphon sprayer is like what they use at a dentist's office, only heavier duty and for solvents?
Before I go and try to rip the oil pan apart, does the part that has the dimples for oil "pop" out or is there some other way I need to remove it? I would like to clean the inside and get it empty of the sludge. Here are some photos... 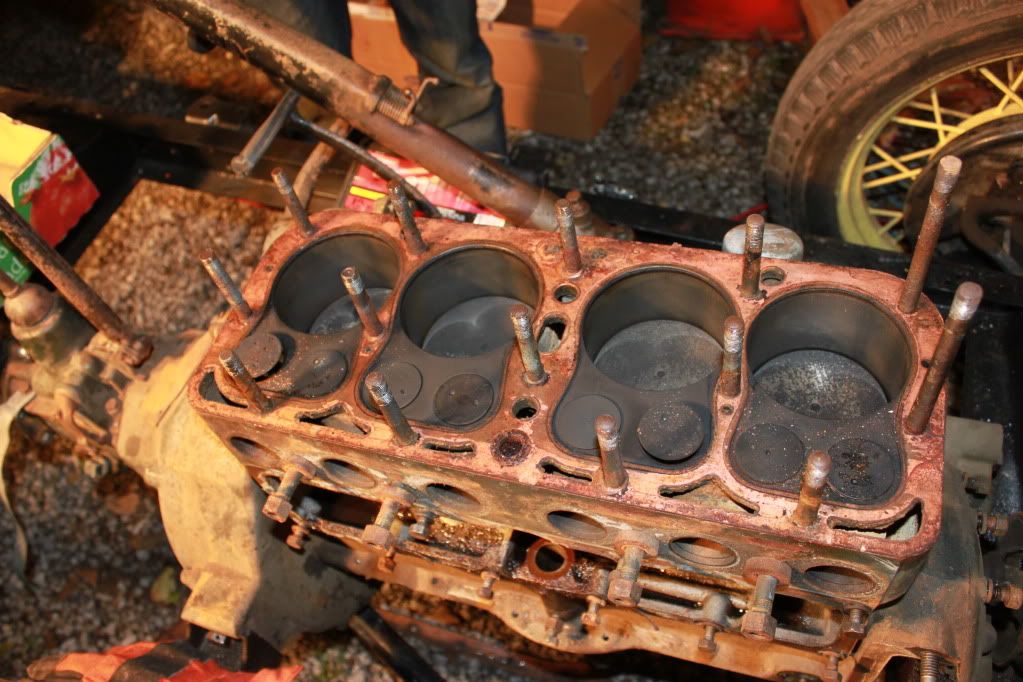 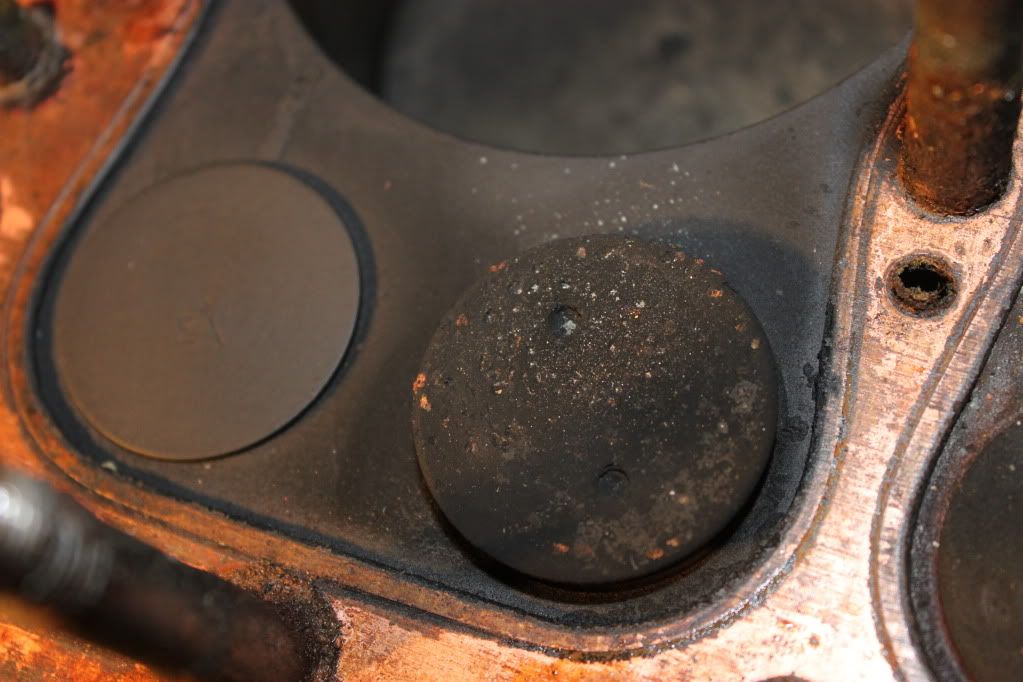 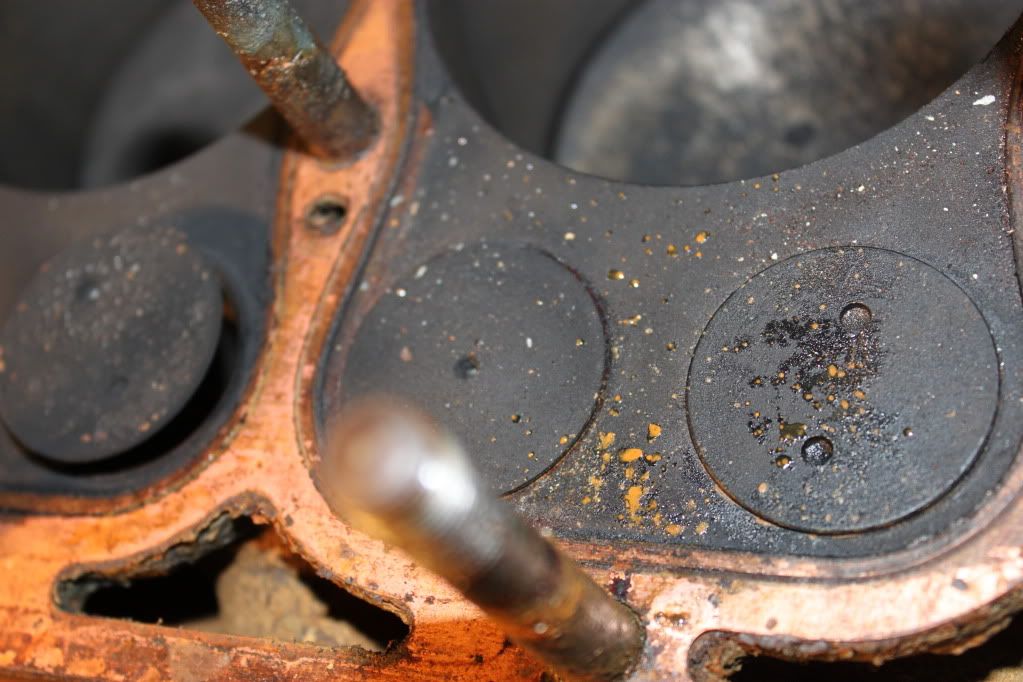 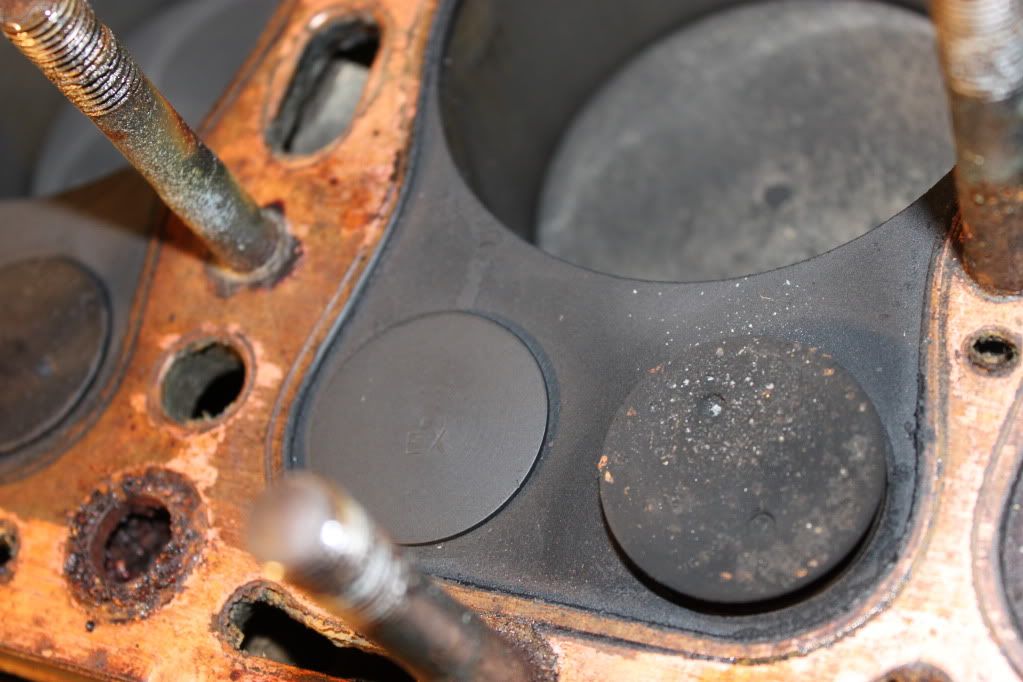 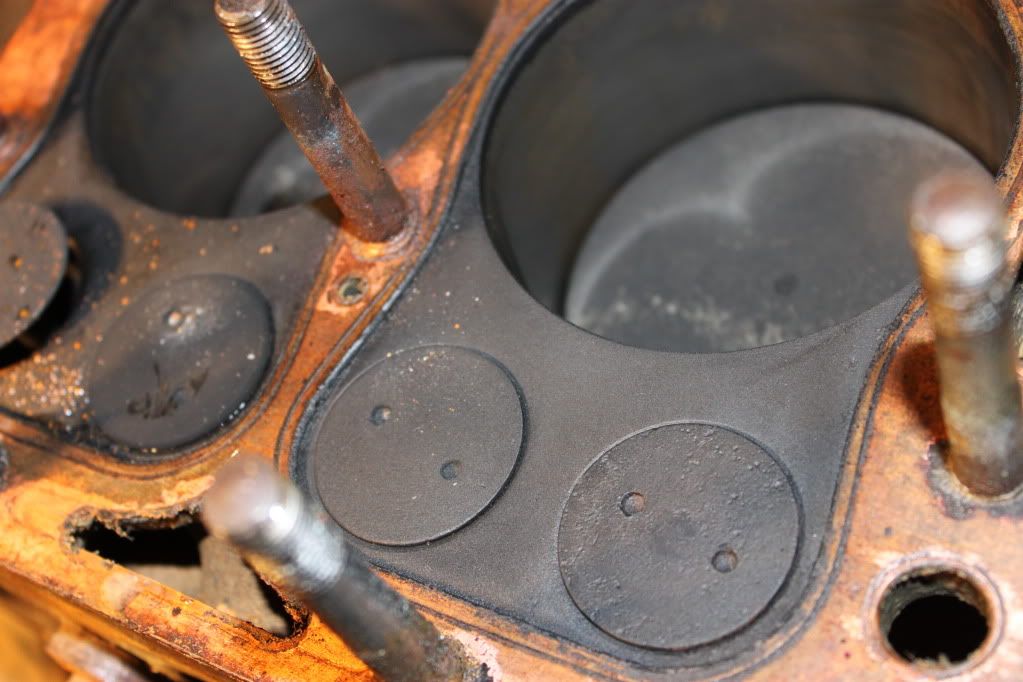 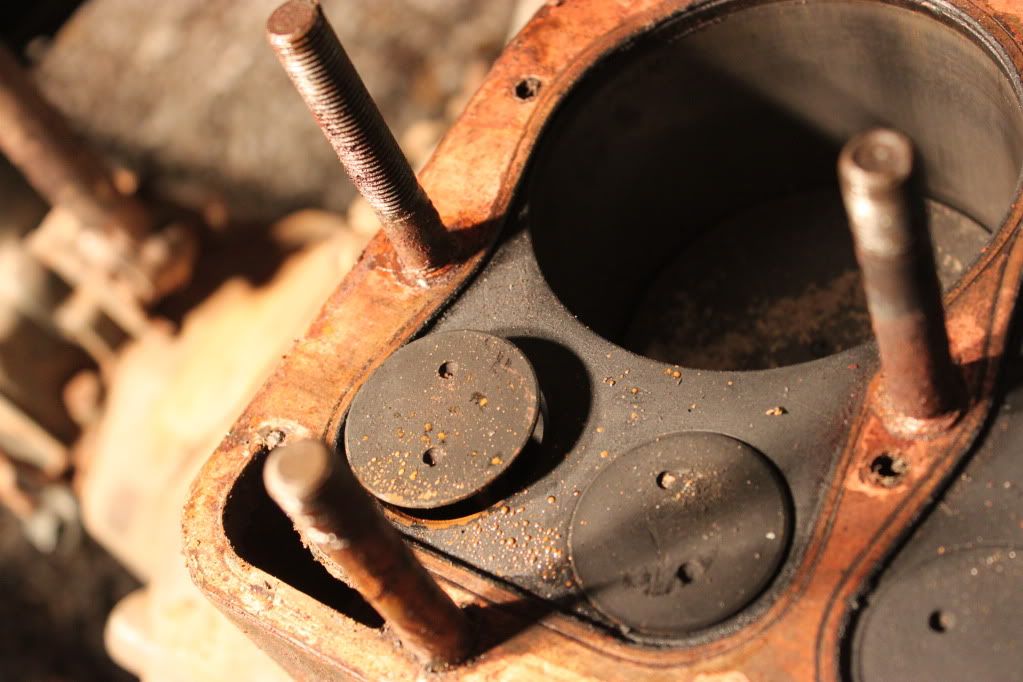 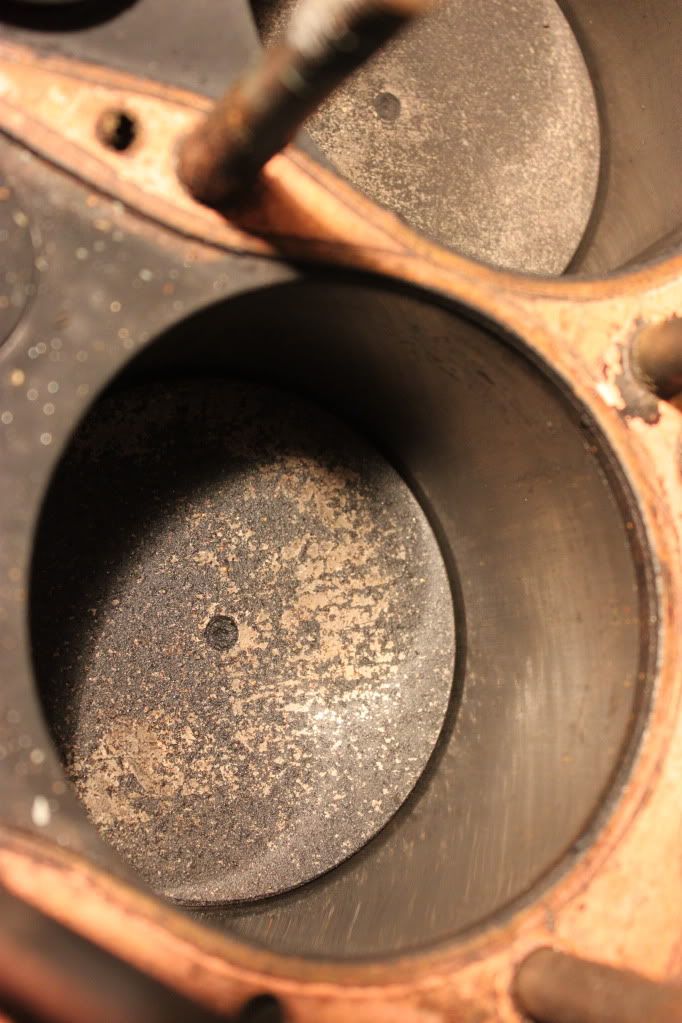 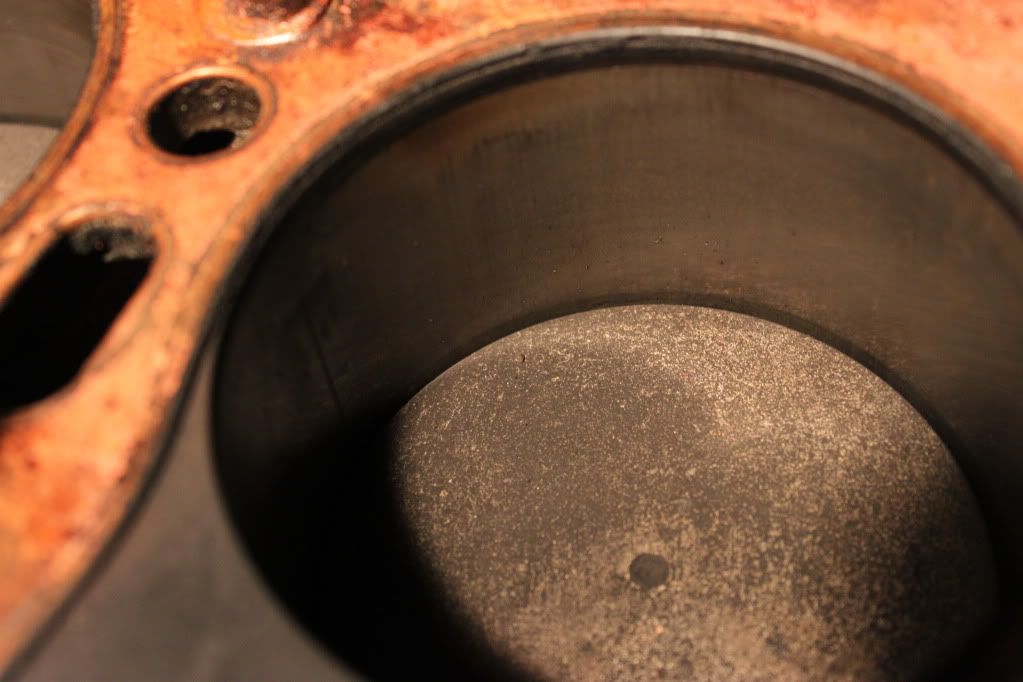 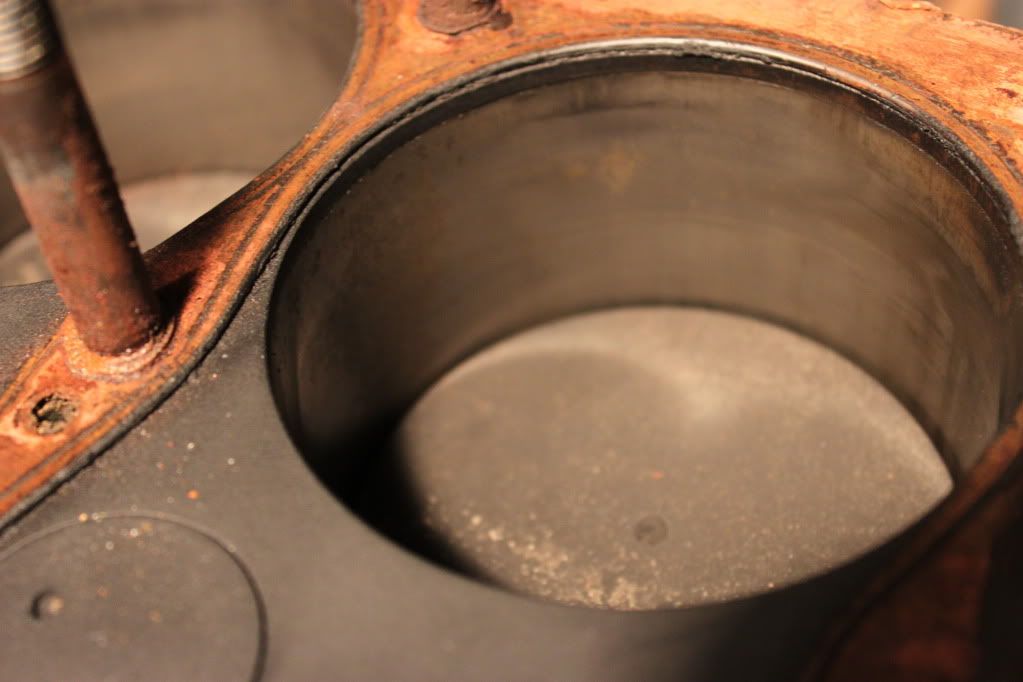
Last edited by Model A Fan; 11-14-2011 at 02:24 PM. |
|
|
|
|
11-14-2011, 02:18 PM
|
#88 |
|
Senior Member
Join Date: May 2010
Location: Bellingham, Washington
Posts: 362
|
|
|
|
|
|
11-14-2011, 02:21 PM
|
#89 |
|
Senior Member
Join Date: May 2010
Location: Bellingham, Washington
Posts: 362
|
|
|
|
|
|
11-14-2011, 02:23 PM
|
#90 |
|
Senior Member
Join Date: May 2010
Location: Bellingham, Washington
Posts: 362
|
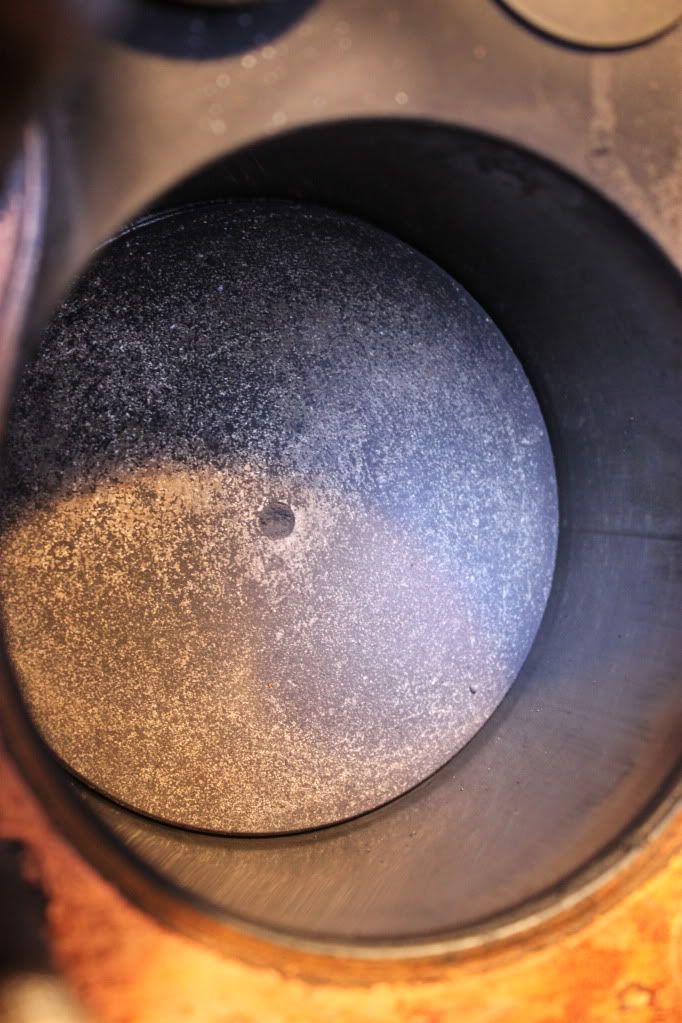
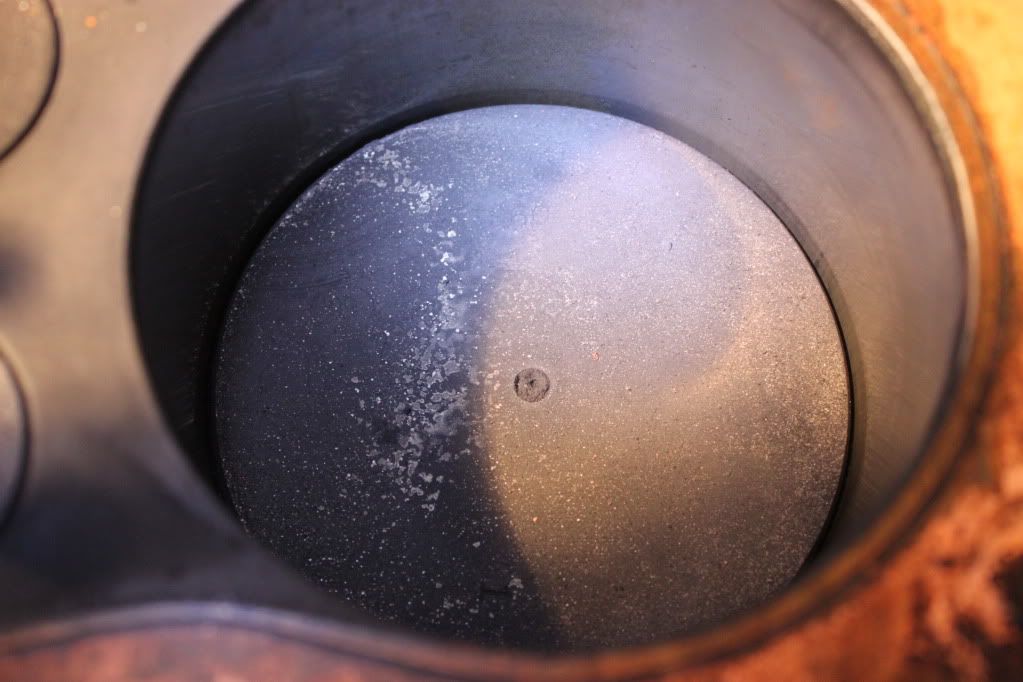
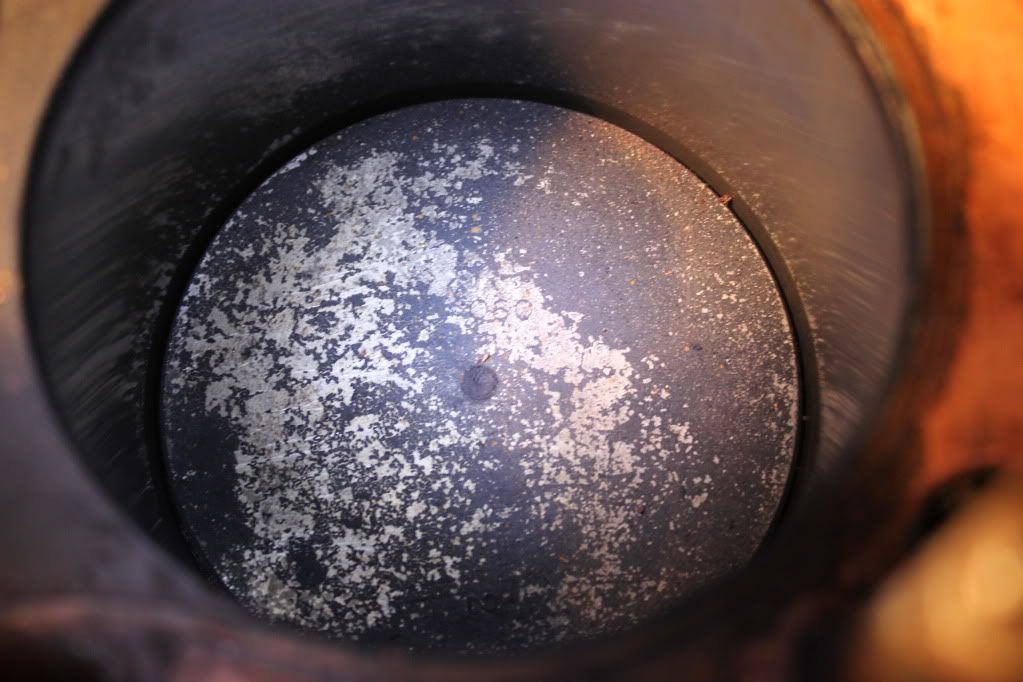
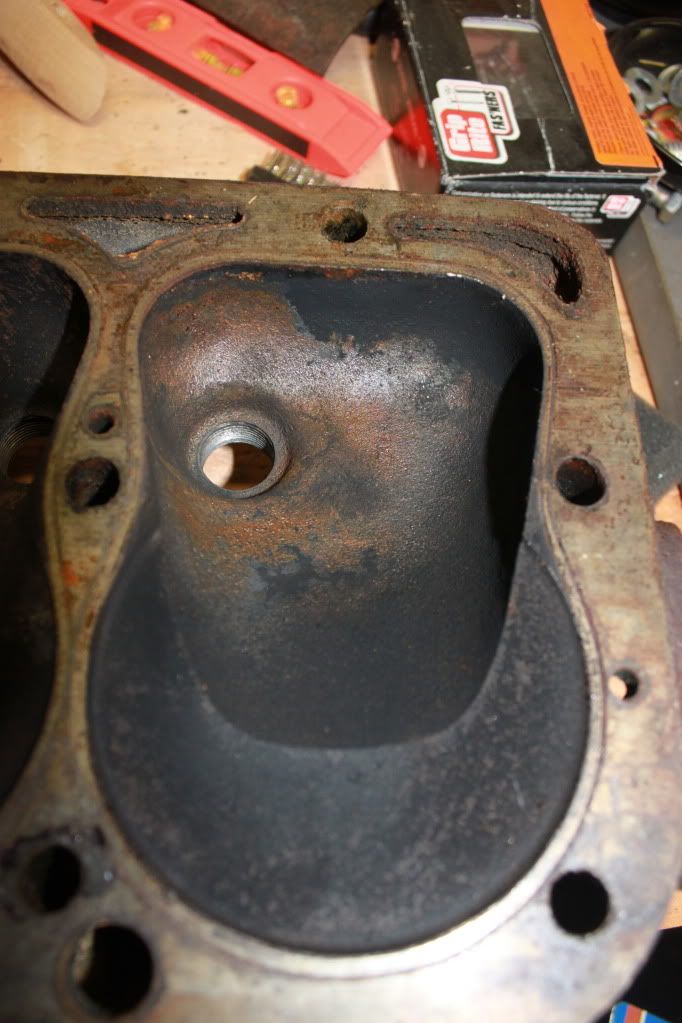
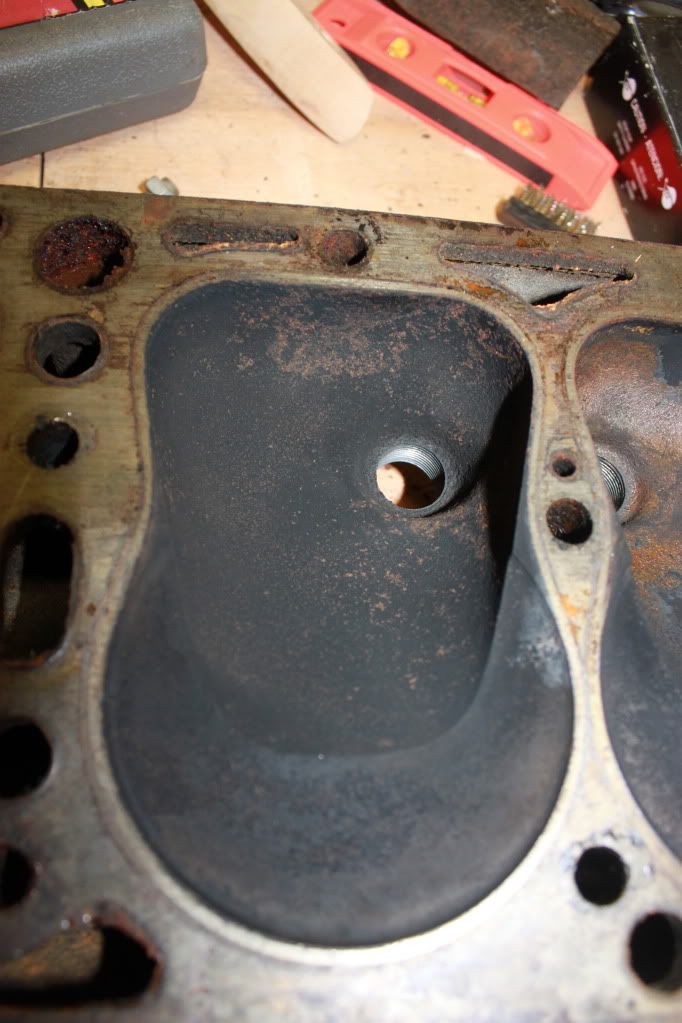
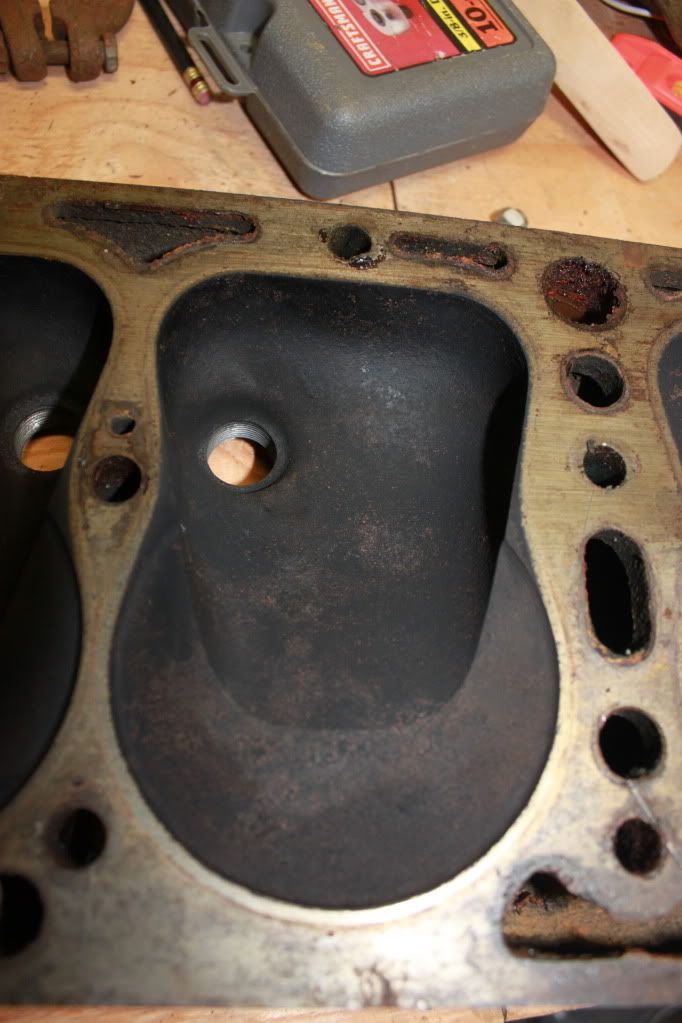
Cylinder 4
 Cylinder 3 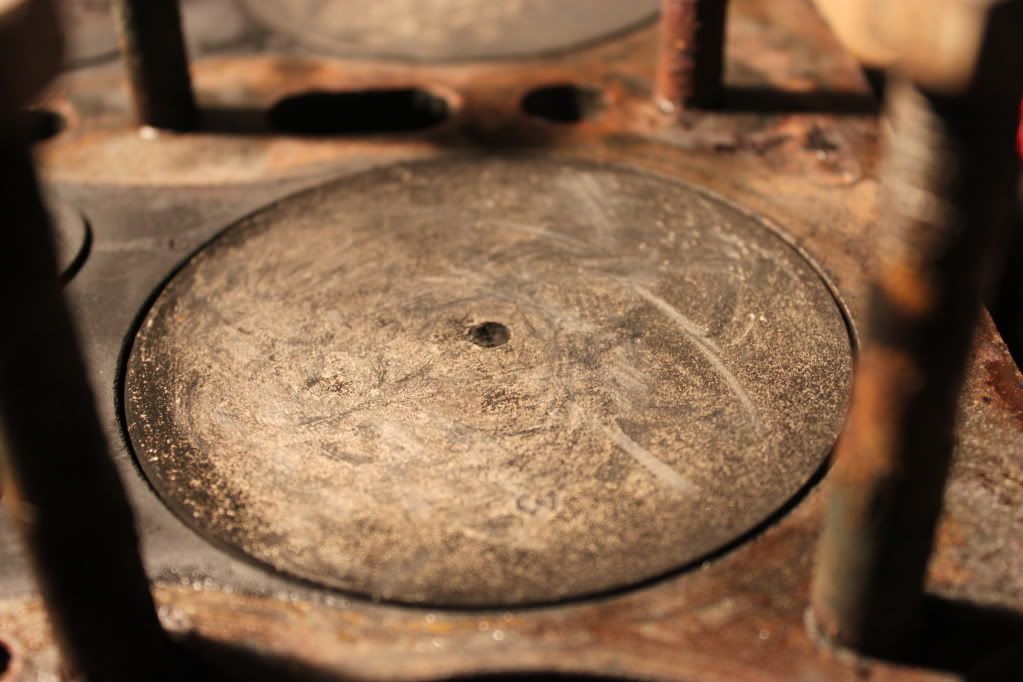 Cylinder 2 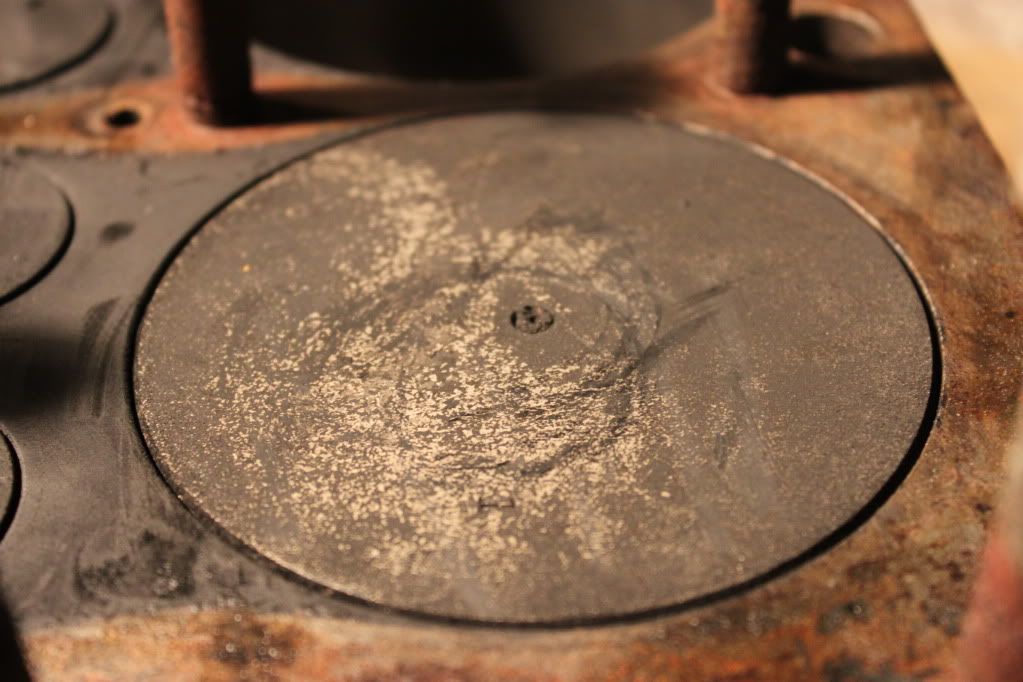 Cylinder 1 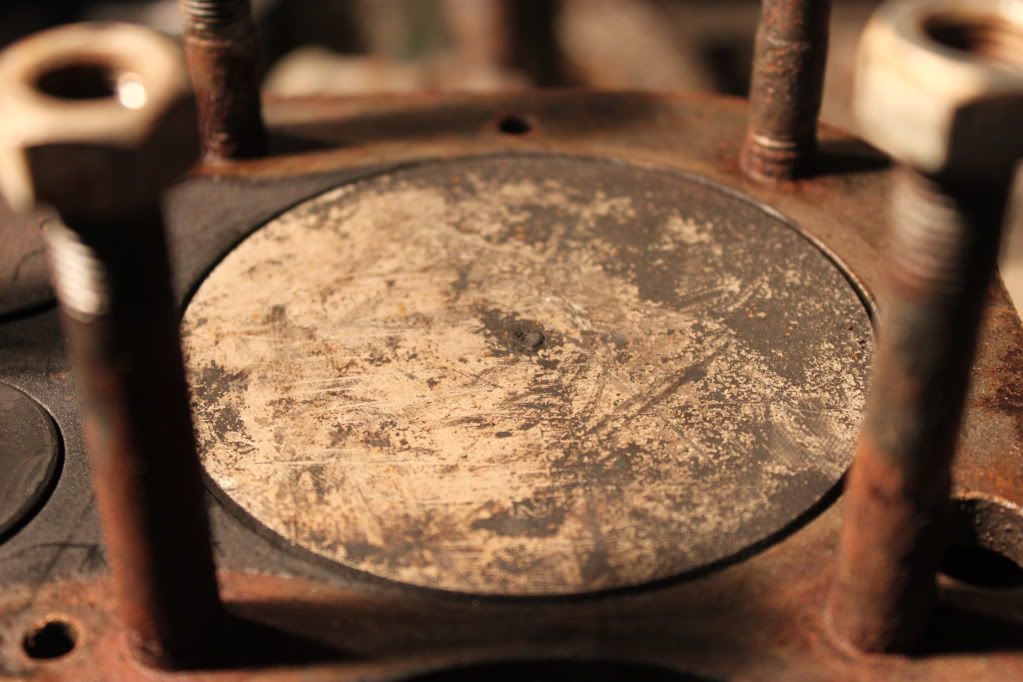 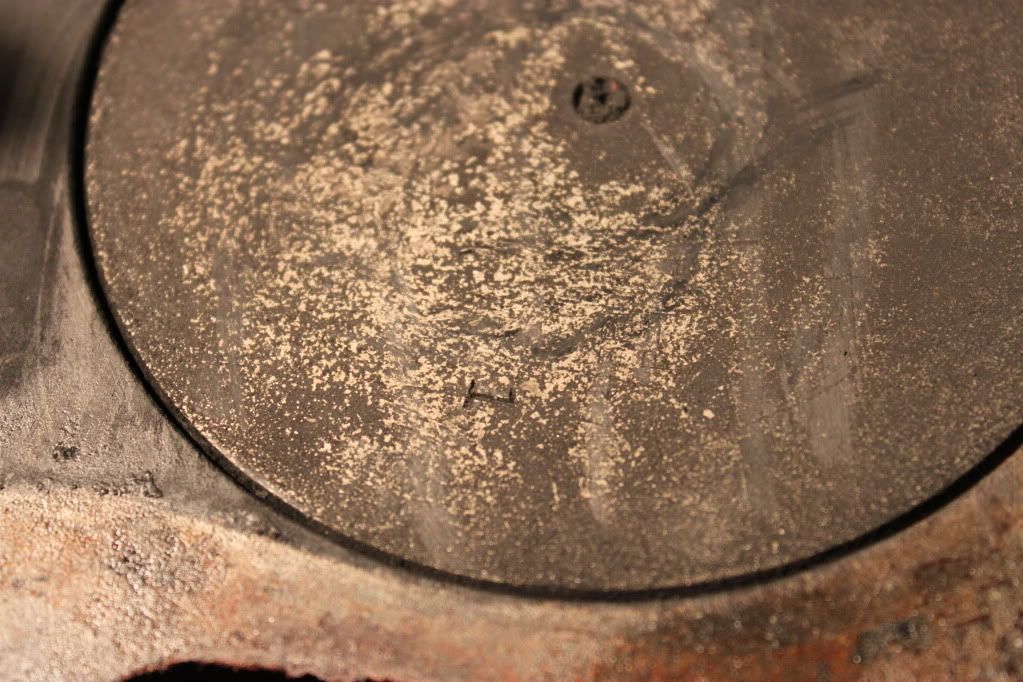 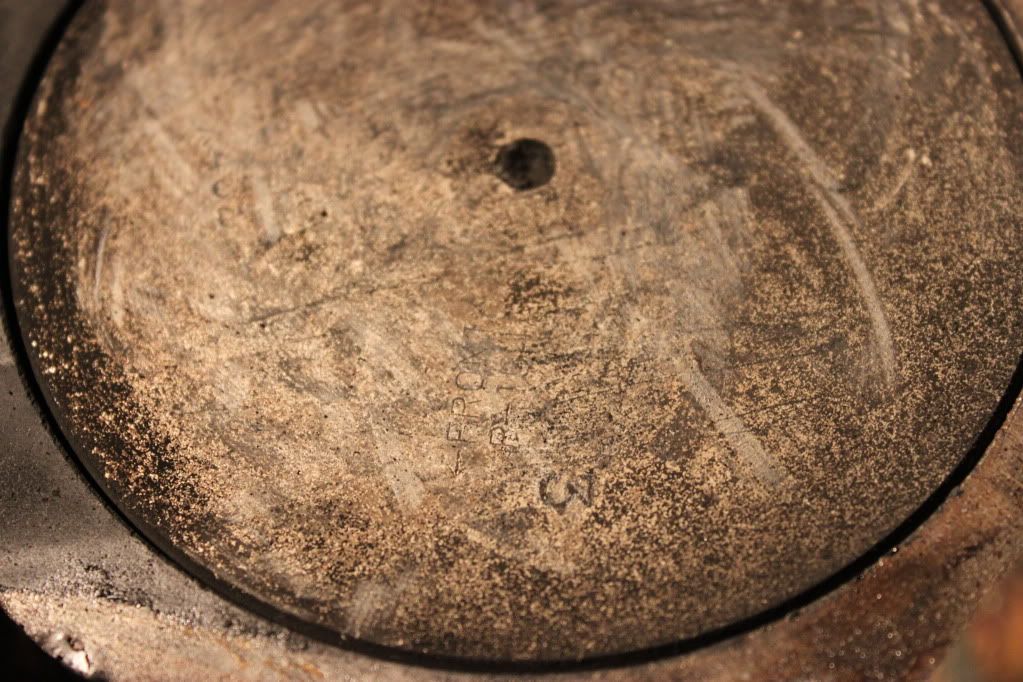 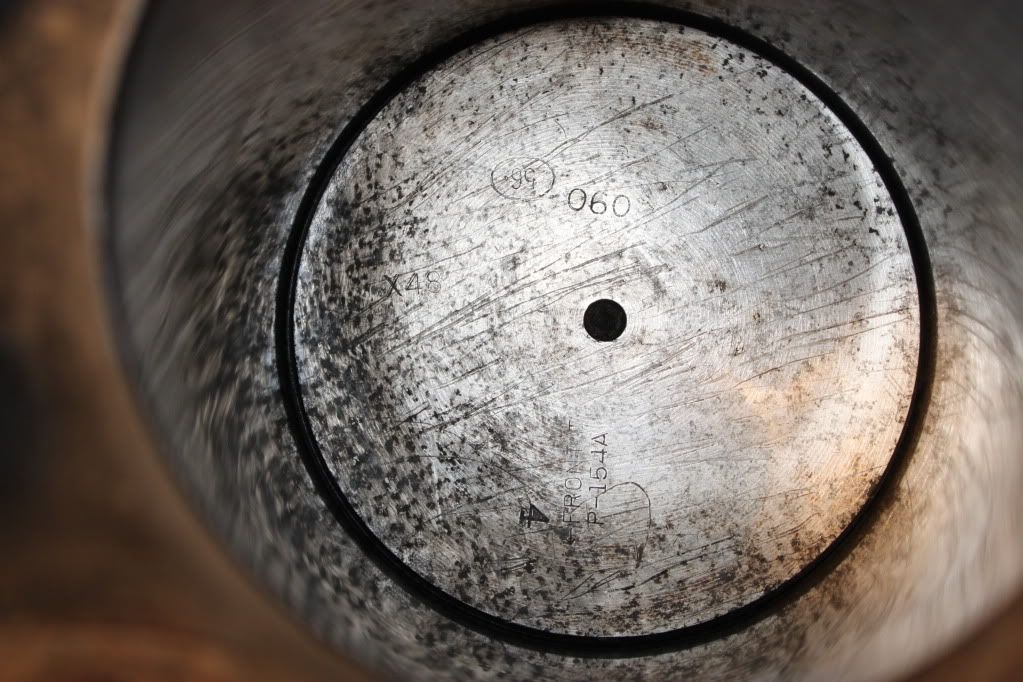 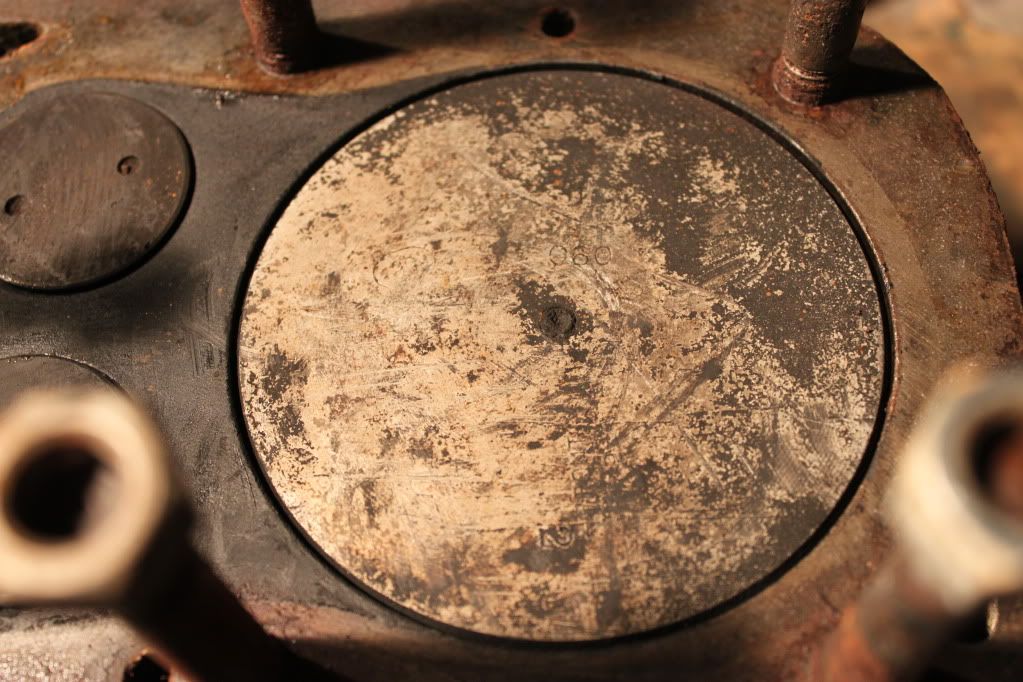 Grime in the oil pan: 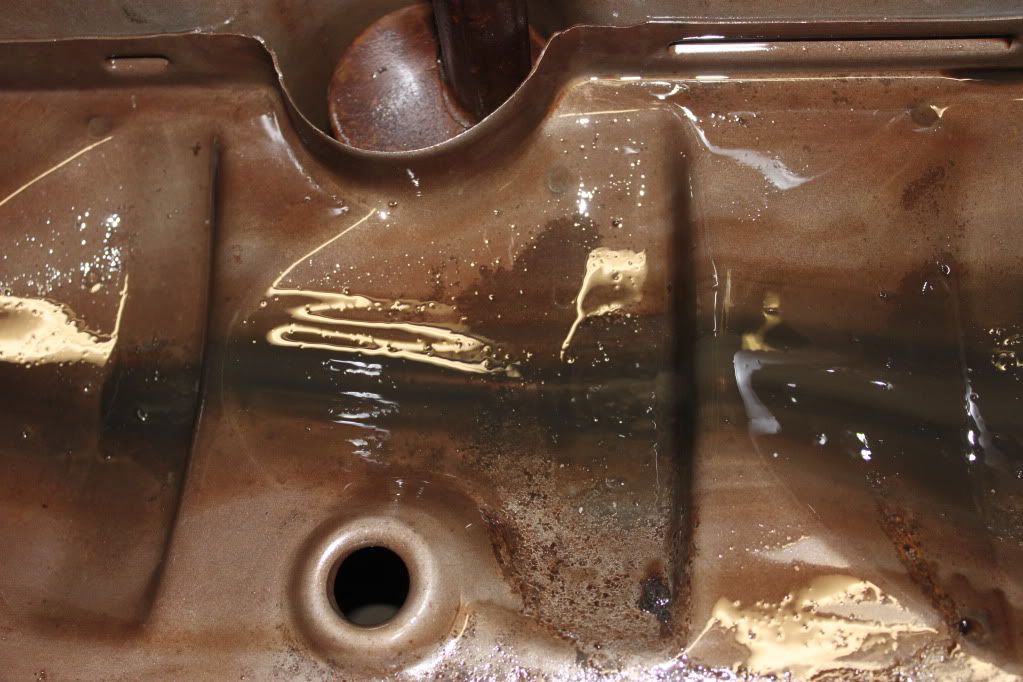 
|
|
|
|
|
11-14-2011, 03:28 PM
|
#91 |
|
Senior Member
Join Date: May 2010
Location: Iowa
Posts: 346
|
Your motor has been bored to .060 over. The distributor shaft looks like a one piece shaft and probably didn't help you get it out.
Take the oil pan and hold it upside down about waist high and drop it on the ground. The tray should pop out. |
|
|
|
|
11-14-2011, 04:29 PM
|
#92 | |
|
Senior Member
Join Date: May 2010
Location: Bellingham, Washington
Posts: 362
|
Quote:
I have heard that if I just pour solvent into the oil tray, I can just swirl it around and just dump it out after I've gotten it clean too. I don't want to damage it. Drop it onto...cement? Gravel? Grass? Cardboard? |
|
|
|
|
|
11-14-2011, 06:12 PM
|
#93 |
|
Senior Member
Join Date: May 2010
Location: new britain,ct 06052
Posts: 9,390
|
Grass.....
Paul in CT |
|
|
|
|
11-15-2011, 01:20 PM
|
#94 |
|
Senior Member
Join Date: May 2010
Location: Mpls, MN
Posts: 27,582
|
Drop or lightly throw the pan upside down onto grass as mentioned and the tray should pop out. Unless you have the engine upside down (head down in the engine stand) some grit can and will go down the main bearing oil feed tubes (not good). At this point I'd remove the pistons and crankshaft and give the block a thorough cleaning and check the pistons for wear and replace the rings. Check the babbit to see it it's OK. With the pistons in the block you can look down the top edge and see the ring gap on the top compression ring.
I don't know how much you plan to spend, or what your goals are for the engine, but at this point a honing, new rings, and thorough cleaning are in order, at the very least. |
|
|
|
|
11-15-2011, 05:00 PM
|
#95 | |
|
Senior Member
Join Date: May 2010
Location: Bellingham, Washington
Posts: 362
|
Quote:
I did not anticipate having to break my entire engine down to a block when I started as I did not want to get in over my head. Removing the crank and pistons isn't too big of a job, but one I would assume has to be done carefully. I'm just a little nervous about the complete disassembly of the engine. That's all...I assume it is relatively easy to put back together as long as I retain the pieces and put it back together in the order it came out. As far as the removal of the pistons and rings and crank-is there anything I need to be EXTRA careful of or is it just unbolt and go? Thanks. I don't want to mess this part up...
|
|
|
|
|
|
11-15-2011, 05:11 PM
|
#96 |
|
Senior Member
Join Date: May 2010
Location: Stayton, Oregon
Posts: 3,806
|
I think if I remember correctly, Andrews has some stuff in his book about how to do this. Guess this is all the advise I can give in that I have never done this type of thing.
It would seem like you might want to decide how far you want to go with your engine. Cleaning it is well worth the effort to get all the junk out of it. But then it would seem like you would have to decide how much further you want to go. If you have no problem about taking the engine in and out of your car, then you maybe could put it back together and go for it and see how it runs. I assume the problem here might be that if you had tore it completely down, you could have solved some little things now that might be bigger ones later on. Tom's advise is very good above but guess you need to decide which way you may want to go from here. Good luck and keep up the good work.
__________________
Fred Kroon 1929 Std Coupe 1929 Huckster |
|
|
|
|
11-15-2011, 07:07 PM
|
#97 |
|
Senior Member
Join Date: May 2010
Location: Mpls, MN
Posts: 27,582
|
Mark each rod and cap so you keep them together and in the same hole they came out of. It's common to mark the rods and caps on the side that faces the cam by using a center punch and making dots, one dot for number one rod, etc.
Pay attention to clearances and cleanliness. |
|
|
|
|
11-15-2011, 09:10 PM
|
#98 |
|
Senior Member
Join Date: Jun 2011
Location: Dallas, Texas
Posts: 109
|
Make sure not to knick the journals of the crank shaft in any way. If you want to be safe you can put tape around the rod bolts. Get some plastigauge to check the clearance of the rods and mains. When you put it all back together make sure all of the pistons are facing the direction they were when they came out and all the caps (rods and mains) are facing the same directions they were when they came out. I personally wouldn't of done this alone my first time. I think someone talked about getting in a local club and asking for some help. Especially if this is your first engine tear down.
|
|
|
|
|
11-15-2011, 10:24 PM
|
#99 |
|
Senior Member
Join Date: May 2010
Location: Stayton, Oregon
Posts: 3,806
|
Here is a distributor being sold on EBay. Don't know the condition but if price is right it may do.
http://www.ebay.com/itm/MODEL-FORD-D...sories&vxp=mtr
__________________
Fred Kroon 1929 Std Coupe 1929 Huckster |
|
|
|
|
11-15-2011, 11:03 PM
|
#100 |
|
Senior Member

Join Date: Nov 2010
Location: Argentina
Posts: 710
|
First would have take apart all the parts involved in the engine and clean to remove the rust from all parts in general...
The cylinder walls seem to have little wear, and the cylinder head surface is well, it seems, but take a look in the cooling ducts for some rust... Make a cleaning by a qualified professional with molasses to clean the block cooling ducts... Honing the cylinder walls to accept new rings, grinding the valves, set the crankshaft and connecting rods... Engine rebuild Items from Bentley's Complete disassembly and documentation Removal of all studs, rethreading of bolt holes Cooling passages sandblasted Engine parts professionally cleaned Magna fluxed and checked for cracks Head and block resurfaced Crankshaft ground and polished Cylinders bored and honed Cylinders Sleeved if needed New pistons and rings Rebuilt Connecting Rods Piston pins fitted. Hardened Valve seats installed New Valve Guides installed New Stainless Steel Valves Adjustable Tappets New valve springs and retainers Reground Cam New timing gear Flywheel resurfaced New flywheel ring gear installed Rebuilt pressure plate installed. New Clutch plate New pilot bearing Complete rotating assembly balanced New 4X Nickel Babbitt poured in block Crankshaft fitted to .0015” Rebuilt Oil pump Premium Gaskets used throughout New External Nuts and Bolts New Crankshaft pulley and ratchet nut Complete assembly and testing |
|
|
|
|
11-16-2011, 05:38 PM
|
#101 |
|
Senior Member
Join Date: May 2010
Location: Bellingham, Washington
Posts: 362
|
So...I think I am going to have to put a hold on this project, or at least major progress until I am finished with my schooling this quarter. I am about two weeks away from being done and finished with my teaching program. I also have the possibility of a new job, so I will also have more time to work on the A.
I will still be working on this in the meantime, just not as much. I am going to try to compile all of the parts I will need to get the job done properly, so that way when I have the time, it can all fall into place! Thank you guys very much for the advice and help. I appreciate it. |
|
|
|
|
12-12-2011, 02:35 AM
|
#102 |
|
Senior Member
Join Date: May 2010
Location: Bellingham, Washington
Posts: 362
|
OK, UPDATE TIME!
So, school is over and winter break is upon us. I decided to continue tearing down the engine, but the further I got into it, the more likely it seemed that it will need some more work done. So, what my friend and I did was do a compression check on the OTHER engine I have and it turns out that there is 50-52 lbs of pressure in EACH AND EVERY CYLINDER! It seems pretty fresh! We got it to turn over using some "creative" wiring and a 6 volt golf cart battery. The only downside to this engine is it looks like someone poured grease on it...and I have to replace the crank pulley and nut on the front. Something weird is on it currently. Anyway, I am pretty excited for this one. It seems to be a good'un! Given that this one actually turns over and seems to have good compression, what would a good next step be? I'm going to pull this one apart and paint it and then put in new seals and gaskets. If compression is good, should I bother with the valve springs or any of that stuff? I will tear it down also, but just want to know what I should do or don't actually have to do. Onward and upward (or at least down the road-ward!)! |
|
|
|
| Sponsored Links (Register now to hide all advertisements) |
|
|
|
12-12-2011, 09:20 AM
|
#103 |
|
Senior Member
Join Date: May 2010
Location: new britain,ct 06052
Posts: 9,390
|
Ck the babbit, inspect the valves/seats, maybe lap the valves, new gaskets, ck clutch, pilot brg, and gasket it. JMO
Paul in CT |
|
|
|
|
12-12-2011, 11:26 AM
|
#104 |
|
Senior Member

Join Date: May 2010
Location: Baxter, MN.
Posts: 120
|
Missing rear main oil return tube?
|
|
|
|
|
12-12-2011, 12:52 PM
|
#105 |
|
Senior Member
Join Date: May 2010
Location: Stayton, Oregon
Posts: 3,806
|
Could the weird thing where the crank pulley should be the remains of a two piece crank pulley? Is so just get it off (somehow) and put on a good one. Make sure the mice have stayed out of the oil pan.
Also check for cracks in the block, head, etc.
__________________
Fred Kroon 1929 Std Coupe 1929 Huckster |
|
|
|
|
12-12-2011, 08:46 PM
|
#106 |
|
Senior Member

Join Date: Apr 2011
Location: South pacific island
Posts: 1,724
|
Sponsored Links (Register now to hide all advertisements)
|
|
|
|
|
12-13-2011, 04:23 AM
|
#107 |
|
Senior Member
Join Date: May 2010
Location: Bellingham, Washington
Posts: 362
|
I thought so too, but a friend of mine who has more experience with engines was poking around on it and wiggled the pistons in the cylinders and he seemed to think that everything might be a little loose.
How much "play" should the pistons have in them when in the cylinders? If I pop the pistons out, can I just re-ring them and make sure everything is tight? How best would I convey to you (over the internet) how much wiggle room is in them and how much is OK? What would I need to do to verify that the pistons and rings seal tightly against the cylinders? Should I pop the rods off and check the babbit? On another note, I saw some "Speedster Shocks" in the Vintage Ford of Sacramento catalog. What is up with them? Are they any good for a full weight Model A? They look like they are lighter duty. http://vintageford.com/sect_search.c...ck%20Absorbers Thanks again!
Last edited by Model A Fan; 12-13-2011 at 05:58 AM. |
|
|
|
|
12-13-2011, 01:12 PM
|
#108 | |
|
Senior Member
Join Date: May 2010
Location: Stayton, Oregon
Posts: 3,806
|
Quote:
__________________
Fred Kroon 1929 Std Coupe 1929 Huckster |
|
|
|
|
|
06-07-2012, 03:26 AM
|
#109 |
|
Senior Member
Join Date: May 2010
Location: Bellingham, Washington
Posts: 362
|
So, almost six months later I have an update of sorts.
I decided that I really wanted to go with the traditional look instead of the chopped top pickup. It took a while to decide, but I liked the original look, and that is what drew me to the Model A. It pains me to sell it, but I would like something stock. In the time between the last update and now I have rearranged my garage, cleaned it up quite a bit, broken up with the girlfriend overseas, gotten a new one (who is much more supportive of our Model A...habit), acquired quite a few more tools (air compressor, sandblaster, parts washer and a bench grinder). I also got a new shop "helper". His name is Jupiter. I have also purchased two "new" engines to go with the three I had in my garage already, a new rear axle, head light bar and a few other bits and bobs here and there. I also bought a roadster cowl for a potential speedster in the future. The one pictured here is numbered *4870927*. The other doesn't have a number...any reason why? I've had a great time getting to know more of the Model A folks in the area. I appreciate you helping a younger Model A fan(atic) get into the hobby. It is nice to meet you. Now I just need to rewire the compressor to accept the 120v power running through the walls. Otherwise I will have to hire an electrician to rewire the wall . Hope you enjoy the update!    
|
|
|
|
|
06-07-2012, 06:59 AM
|
#110 |
|
Senior Member

Join Date: Sep 2011
Location: Meridian, ID
Posts: 568
|
Nice to hear an update from a fellow younger barner in western washington. I live in Tacoma but I fly bank freight in and out of Bellingham once in a while since my company has daily flights there. One of these days I'll post an update on all I have done on my coupe since acquireing it last fall. I'm hoping to have mine back on the road within a month or so.
I'll second the fact that there are a lot of model A guys around that are more than happy to lend a hand. I'm 31 and on somewhat of a limited budget and the local model A club in Tacoma has helped me out in spades, both in lending or selling their parts and tools and advice on how and where to get parts and make repairs. I would have had a much tougher time going at it alone and without their guidance and spent A LOT more money! Its kept me motivated and in the process I've done extensive work to my suspension, steering, braking, rear end etc. I've also had a lot of fun meeting the other guys in the club for breakfast weekly so this hobby has become much more than I imagined. Good luck on your project and finding the right body to go with your parts! Keep the updates coming!
__________________
Aaron in Tacoma (although still a Montana hillbilly at heart )
|
|
|
|
|
06-07-2012, 07:53 AM
|
#111 |
|
Senior Member
Join Date: May 2010
Location: new britain,ct 06052
Posts: 9,390
|
Thanks for the update, nice looking dog.
paul in CT |
|
|
|
|
06-07-2012, 03:23 PM
|
#112 |
|
Senior Member
Join Date: May 2010
Location: Stayton, Oregon
Posts: 3,806
|
Hello again. Looks like you are on you way again getting into the hobby and getting a car up and running.
Your "new" engine in your pictures looks much better than one of your original ones. If fact it looks (from the outside) like it could be in reasonable good shape-no oil leaks, limited rust, etc. But it is what is inside that counts. So good luck with your new stuff (girls, motors, dogs, etc.). Sounds like you are having fun.
__________________
Fred Kroon 1929 Std Coupe 1929 Huckster |
|
|
|
|
06-07-2012, 04:50 PM
|
#113 |
|
Senior Member

Join Date: Aug 2010
Location: Walkerton, Ont. Canada
Posts: 623
|
thanks for the update.. How did you make out with the other engine and getting it back together? Did you ever figure out the piston play and how much is allowed? Keep the updates coming bud!
__________________
_________________________________________ 1931 Ford Model A Tudor 1930 Ford Model A Deluxe Roadster 1930 Ford Original Rolling Chassis- Restoring |
|
|
|
|
06-07-2012, 08:48 PM
|
#114 |
|
Senior Member

Join Date: Feb 2011
Location: Chicopee, MA
Posts: 1,402
|
Dogs and Model A's, nothing better!
|
|
|
|
|
06-07-2012, 09:09 PM
|
#115 | |
|
BANNED
Join Date: May 2010
Location: Walla Walla, Washington USA
Posts: 6,066
|
Quote:
|
|
|
|
|
|
06-07-2012, 09:49 PM
|
#116 | |
|
Senior Member

Join Date: Jun 2010
Location: Huntsville, AL
Posts: 538
|
Quote:
|
|
|
|
|
|
06-07-2012, 09:57 PM
|
#117 | |
|
Senior Member
Join Date: Sep 2011
Location: Meridian, ID
Posts: 568
|
Quote:
__________________
Aaron in Tacoma (although still a Montana hillbilly at heart )
|
|
|
|
|
|
02-17-2015, 04:06 AM
|
#118 |
|
Senior Member

Join Date: Nov 2012
Location: West Berkshire, United Kingdom
Posts: 368
|
Great thread, subscribed and watching
__________________
Kevin Flood West Berkshire UK Member MAFCGB, VHRA, SAH, Brooklands Trust Sporadic progress on My 1929 Sport Coupe can be found here along with my blog http://automotiveamerican.com/ |
|
|
|
|
02-17-2015, 04:50 AM
|
#119 | |
|
Senior Member

Join Date: May 2010
Location: South Florida
Posts: 14,054
 |
Quote:
__________________
What's right about America is that although we have a mess of problems, we have great capacity - intellect and resources - to do some thing about them. - Henry Ford II |
|
|
|
|
|
02-17-2015, 07:19 AM
|
#120 |
|
BANNED
Join Date: May 2010
Location: Michigan / Ontario border, Sarnia, Ontario. 50 miles from Detroit and 150 from Toronto.
Posts: 5,800
|
Has this project been completed yet ? Obviously something more than Model A Fords and dogs have taken over this young man's life. Wayne
|
|
|
|
|
02-17-2015, 12:24 PM
|
#121 | |
|
Senior Member

Join Date: Jul 2014
Location: Danbury Ct
Posts: 1,254
|
Quote:
|
|
|
|
|
|
«
Previous Thread
|
Next Thread
»
 Linear Mode

|
|

| Sponsored Links (Register now to hide all advertisements) |
|
|
All times are GMT -5. The time now is 09:17 PM.