|
|||||||


| Sponsored Links (Register now to hide all advertisements) |
|
|
 |

|
Thread Tools | Display Modes |
 11-30-2011, 11:49 AM
|
#1 |
|
Junior Member

Join Date: Nov 2011
Location: Central FL
Posts: 15
|
Hello all,
I'm a new guy here and a new owner of a '29 Tudor. This seems like a great forum and I'm excited to participate. Using some design ideas from Gord's and Jason in TX's head pullers, I have fabricated a working head puller plate and will be adding provisions for engine lifting. I will be using two lift points along the length of the plate that will allow me to level the engine front to back, but I'm wondering about your experiences with the side to side balance during engine installation and removal. Most importantly, where is the side to side COG of a stock Model A engine? I'm assuming the carb and manifolds are still attached.  This common head puller / engine lift plate appears to put the side to side balance point on the driver's side of the middle head studs. Anyone have an opinion on how well placed it is? Thanks in advance for any input. Brent (I happen to be from TN, but I'm not the long time member from 10-uh-C) |

|

|
|
11-30-2011, 12:13 PM
|
#2 |
|
Senior Member

Join Date: May 2010
Location: new britain,ct 06052
Posts: 9,390
|
Many years ago, I used 2 sparkplugs with eye bolts thry them, small chain to connect them to a 1/2 ton chain hoist suspended from a kids swing set. That swing set was at somebody else's (several) house almost every weekend.
Paul in CT |
|
|
|
| Sponsored Links (Register now to hide all advertisements) |
|
|
|
11-30-2011, 03:25 PM
|
#3 |
|
Junior Member
Join Date: Nov 2011
Location: Central FL
Posts: 15
|
Thanks for the reply, Paul. I cannibalized the old plugs to anchor the head plate, and see they would be easy to adapt as a lift point. These seem like a a decent, low cost solution as well:
 However, based on the lift point position of the commercial head puller/lift plate in my first post, I assume lifting directly from the spark plug holes would rotate the engine clockwise a little (viewed from the front). Probably not a problem for engine removal, but would require a little finagling to line up bell housing bolts during installation. I'm betting Mr. Ford's engineers came up with a really slick solution to slide the powerplants into place with the fewest possible steps. After all, they did it millions of times. Anybody have a detailed picture of the factory workers installing the engine? |
|
|
|
|
11-30-2011, 03:42 PM
|
#4 |
|
Senior Member

Join Date: May 2010
Location: Tucson, Arizona
Posts: 374
|
I use a homemade lift bar (angle iron with two gutted spark plug bases plus bolts) and it lifts slightly off center which seems to be your concern. However, it has never been a problem with or without the transmission attached.
What I do is drop an ear of the flywheel housing (the driver side, which is the lower side) onto the rear motor mount. Then I use a large C-clamp and a few wood scraps to pull the other ear into the other rear mount with a few wiggles, shoves, and further lowering - no frame spreader or other contrivance is necessary. This method is so simple that I can get 'er in in minutes and in fact I had one engine+transmission in and out three times in one evening (due to U-joint problems, don't ask!). I would like to credit the person who first came up with the method but I suspect it was first used in 1928... |
|
|
|
|
11-30-2011, 03:45 PM
|
#5 |
|
Senior Member

Join Date: Oct 2010
Location: Scarborough, Yorkshire
Posts: 119
|
I wouldn't get too excited about fine tuning the engine lift / refit process as I assume you're not planning on doing it frequently.
I used very crude gear and chains on my first and only out and in job during restoration (single handed). I've since bought two sparkplug rings to lift next time round if I have to. I don't think anything more expensive is needed. I wouldn't worry too much about side to side balance - as there is a lot of room and no side panels to bash, I would find it more satisfying to fit the engine block (? + head) and then fit the manifolds, generator, starter and carb after. I would prefer to fit the engine into a rolling chassis. I would probably not fit the rear engine mounts at all until the transmission / engine was mated (based on my experience with Float-a-Motors not original mounts). I would then use the available side to side 'swing' of the block to offer up the rear engine mounts, loosely bolt up and then ease off the engine hoist. |
|
|
|
|
11-30-2011, 03:48 PM
|
#6 |
|
Senior Member

Join Date: May 2010
Location: Windy City
Posts: 2,919
|
Sponsored Links (Register now to hide all advertisements)
 but it works. but it works.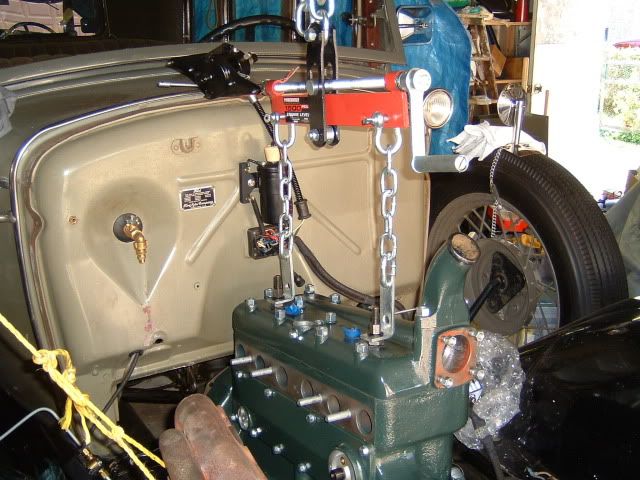
|
|
|
|
|
11-30-2011, 04:41 PM
|
#7 |
|
Senior Member

Join Date: May 2010
Location: Cape Cod
Posts: 1,128
|
With Regard to using two spark plug holes to lift the motor,
When I change the spark plugs on my motor, I have noticed that the two outside plugs go in and out with more resistance due to the threads being slightly damaged from lifting the motor that way. Marc |
|
|
|
|
11-30-2011, 05:00 PM
|
#8 | |
|
Senior Member

Join Date: May 2010
Location: Bellingham, Washington
Posts: 362
|
Quote:
 I would imagine that the engines were installed before the body was put on, so that probably made it easier. That way they didn't have to worry about dinging the cowls when installing the engine. |
|
|
|
|

|
11-30-2011, 05:12 PM
|
#9 |
|
Member
Join Date: May 2010
Location: Maryland
Posts: 51
|
I have used the adjustable bar in MikeK's post several times on A's and Jeeps. Really nice since you can change the angle as you ease the engine in.
|
|
|
|
|
11-30-2011, 06:09 PM
|
#10 |
|
Senior Member

Join Date: May 2010
Location: Wichita, Kansas
Posts: 710
|
This is what I made. Works just fine.
|
|
|
|
|
11-30-2011, 06:25 PM
|
#11 | |||
|
Junior Member
Join Date: Nov 2011
Location: Central FL
Posts: 15
|
Thanks for sharing your experiences everyone. It's really helpful to a guy who is trying to put together a tool for a job he hasn't done before!
Quote:
Quote:
Quote:
Out of paranoia and a preference to build heavy, I made the head puller to use all four plugs: 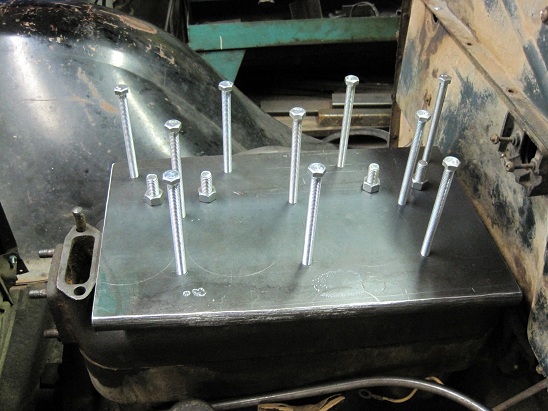 Hopefully the plate would take the brunt of the dynamic load from shifting, leaving the plugs to simply hold the engine. I'm thinking it will be advantageous to use shorter bolts on the studs, and leave them in place to minimize flexing of the spark plug bolts. |
|||
|
|
|
|
11-30-2011, 06:59 PM
|
#12 | |
|
Junior Member
Join Date: Nov 2011
Location: Central FL
Posts: 15
|
Quote:
|
|
|
|
|
|
11-30-2011, 08:34 PM
|
#13 |
|
Senior Member

Join Date: May 2010
Location: Jordan, MN
Posts: 1,411
|
[QUOTE=Tin Lizard;316084]Hello all,
This common head puller / engine lift plate appears to put the side to side balance point on the driver's side of the middle head studs. Anyone have an opinion on how well placed it is? To answer your question: The balance on this engine lift is about as good as you can get. I've installed around 20 engines in the past three years and it helps greatly in the process to have the flywheel housing meeting the rear motor mounts correctly. |
|
|
|
|
11-30-2011, 09:01 PM
|
#14 | |
|
Junior Member
Join Date: Nov 2011
Location: Central FL
Posts: 15
|
Quote:
Great stuff, Dave. That's the heart of it. Thanks! Are the dimensions what they appear to be?... meaning; the upright plate is about 3/8" to the right of the front middle and rear middle head studs? |
|
|
|
|
|
11-30-2011, 10:33 PM
|
#15 |
|
Senior Member

Join Date: May 2010
Location: Littleton, Colorado
Posts: 241
|
I pulled the engine and clutch out of my coupe (left tranny in car) with one eye bolt in number three spark plug hole. This worked like a champ without damaging any threads and I didn't have to muscle too much to get it back in the car. I wouldn't worry too much about the balance as this engine does not weigh that much and a person can man handle it pretty easily, certainly not like dropping a V-8 in a modern car.
p.s. Do yourself a favor and get the frame spreader as it can be a real pain in the neck without it
__________________
"Betsy doesn't leak oil - she just marks her spot" Last edited by Colorado Greg; 11-30-2011 at 11:00 PM. Reason: added p.s. |
|
|
|
|
11-30-2011, 11:10 PM
|
#16 |
|
Senior Member
Join Date: May 2010
Location: Cape Cod
Posts: 1,128
|
A question was raised about the damage to the spark plug threads using the "Two Plug Lifter" method.
My head is just a stock head with normal compression. The damage is real and the threads do "bind" some when a plug goes in. A better method must exhist to lift up the motor ? Marc |
|
|
|
|
11-30-2011, 11:15 PM
|
#17 | |
|
Senior Member
Join Date: May 2010
Location: Littleton, Colorado
Posts: 241
|
Quote:
__________________
"Betsy doesn't leak oil - she just marks her spot" Last edited by Colorado Greg; 11-30-2011 at 11:20 PM. |
|
|
|
|
|
11-30-2011, 11:26 PM
|
#18 |
|
Senior Member
Join Date: May 2010
Location: Cape Cod
Posts: 1,128
|
Colorado Greg (At this time of year, I wish I had stayed in Colorado!)
I don't know the details of just how the tools were used on my engine, but the threads only on the outside plugs were damaged some. Marc P.S. Could you point me to how the 2000 number was calculated ? |
|
|
|
|
11-30-2011, 11:48 PM
|
#19 | |
|
Senior Member
Join Date: May 2010
Location: Littleton, Colorado
Posts: 241
|
Quote:
I used an online calculator (can't seem to find it right now) and entered bolt size, thread type, length of engaugement etc and it came out 2500+ lifting strength for loose fitting threads and the worst metal on their list. I did this on the recommendation of Phil at Berts but checked it out on the calculator before I did it. Engine was pretty level and it went in and out without a hitch. The #3 spark plug hole is fine! Are you positive the damage to the spark plug holes was done by lifting or was it caused by using incorrect or cross threaded plugs? p.s. Its supposed to snow here tonight and tomorrow but I know the winters in MN are alot worse. At least it melts here. I found this in a previous Ford Barn post thanks to MikeK in the Windy City O.K. let's use a bit of simple engineering math to address your concern: GIVEN: 1) The peak combustion pressure in a low compression model A is about 10,000 psi. (It's near 50,000 in a racing engine) 2) The plugthread is 7/8" in diameter. A little MATH: Surface area of 7/8" circle = 0.597 sq. in. 0.597 sq. in. x 10,000 lbs/ sq. in. = 5,970 lbs. (sq.in. cancels sq.in.) CONCLUSION: The threads in each plug hole must easily hold 5,970 lbs, way over 10x the weight of an engine and tranny. ONE eye bolt with a working load rating exceeding the lift weight is sufficient, two is overkill, useful only for balance control. ADVICE: The weak link here is the load rating of the eye itself, not the 7/8 plugthread hole. NEVER use one of those junk rod-formed eyes from the hardware store Chinese isle of shame. Use only forged alloy eyes certified for lifting.
__________________
"Betsy doesn't leak oil - she just marks her spot" Last edited by Colorado Greg; 12-01-2011 at 12:34 AM. Reason: added previous post from Mike K |
|
|
|
|
|
12-01-2011, 10:25 AM
|
#20 |
|
Senior Member
Join Date: May 2010
Location: Cape Cod
Posts: 1,128
|
Colorado Greg,
Well, to be honest, I am assuming some things about the threads. Prior to my ownership of the car, the previous owners had removed the engine more than one time. The engine was lifted by the outer two spark plug threads. The outer two threads are now damaged slightly, so that the plug has noticeable resistance to being threaded in. The two inner ones have no trouble. Hence, my conclusion....although since I wasn't present, I do not know if good tools/methods were used. In my humble opinion, I would use all four spark plug holes to lift up the engine in the future.....or, I would lift with one sparkplug hole and when the engine is back in the car, put on a new hi compression head ! Marc p.s. My trips to Bert's were always fun. A wealth of knowledge at that store. |
|
|
|
|
«
Previous Thread
|
Next Thread
»
 Linear Mode

|
|

| Sponsored Links (Register now to hide all advertisements) |
|
|
All times are GMT -5. The time now is 09:34 PM.