|
|||||||


| Sponsored Links (Register now to hide all advertisements) |
|
|
 |

|
Thread Tools | Display Modes |
|
|
 01-31-2017, 03:34 PM
|
#1 |
|
Senior Member
Join Date: May 2010
Location: Moncks Corner, SC
Posts: 439
|
The last 2 Model A engines that I had inserted the rear main bearing failed due to lack of lubrication. The bearing spun cutting the oil flow. The insert shell actually welded onto the crank journal. A big mess. Has this happened to you? The first engine the bearing failed at 1000 miles and the second engine the bearing failed after 10 minutes of running in the garage. I believe inserts are not designed with a gravity flow oil system. Why is it the center main and forward main not effected? Now the first engine has been repaired with new inserts and this engine is running fine for the past 2 thousand miles. The second engine is being repaired, so I will have to wait the outcome.
Last edited by oldredford; 02-02-2017 at 05:09 AM. |

|

|
|
01-31-2017, 03:41 PM
|
#2 | |
|
Senior Member

Join Date: May 2010
Location: Eastern Tennessee
Posts: 11,537
|
Quote:
|
|
|
|
|

 )
)| Sponsored Links (Register now to hide all advertisements) |
|
|
|
01-31-2017, 04:02 PM
|
#3 |
|
Senior Member

Join Date: May 2010
Location: Jordan, MN
Posts: 1,411
|
Yes, it has happened to me. The correction to this is that additional oil clearance needs to be achieved.
You say the bearing spun and cut the oil flow...I disagree. The bearing to shaft clearance was likely too little and it was the lack of oil that heated up the surfaces to the point of rubbing and melted the bearing material to the crankshaft The spinning of the insert in the block housing bore was the last thing that occurred as the engine locked up. The manufacturer of the bearings I use stated .00175" as the correct clearance for the main bearings. That clearance did not work well for me when he switched the final surface of his insert shells from Babbitt to bearing grade aluminum. I find that the aluminum lined rear main insert should have .002" to .0022" to be reliable, (means no lock-up) and leak free. The front and center mains can finish at .00175" and not be an issue with running tight. JMO: The best clearance for all three journals is .002". I have a Sunnen precision honing machine with the proper sized mandrels to hone the aluminum insert bearing shells for the proper clearance. The Sunnen rep. advised me as to the correct stones and hone oil to use for the aluminum. I built a fixture to clamp and hold the bearing shells at the same tension (crush) they are installed from two rear main caps. The final fitting of the mains requires about 10-30 minutes depending on how many need to be adjusted but the precise clearance is worth the time. The description you give about the insert shells welding themselves to the crankshaft is a very real occurrence. The inserts, I use with an aluminum bearing surface, are prone to this happening if there is inadequate clearance. I discovered the lock up issue when breaking the engines in on a dyno at full operating loads and high rpm after an extended session of operation. How to save your crankshaft if this happens: I discovered that the aluminum bearing material can be removed from the crankshaft journal by careful use of muriatic acid. Be careful when using this stuff, it is nasty. Goggles, gloves and a well ventilated area (best outside and stand upwind of the acid bath). Carefully knock the shell from the journal by using a chisel at a low angle on the seams. They will pop off. Next, submerge the end of the crank in muriatic acid for 5 minutes, remove and scrub with a bronze wire brush. Repeat until it is all removed and rinse well with water. Do not leave the end of the crank submerged for an extended period of time or it will ruin the surface of the journal (believe me...don't ask!) Some may suggest you neutralize the acid with baking soda, I did not bit washing it with a slurry of baking soda and water would do so. After all the aluminum is removed, polish the journal and you are ready to fit the new bearing. I am sorry for your trouble...it is frustrating. Inserts have been a good product for me when they are installed with the correct oil clearance. I have over 150 of them operating very well with insert bearings. PM me if you need more info or help. Good Day! www.durableperformance.net Last edited by Dave in MN; 02-03-2017 at 09:33 AM. |
|
|
|
|
02-06-2017, 09:12 AM
|
#4 |
|
Senior Member
Join Date: May 2010
Location: Jordan, MN
Posts: 1,411
|
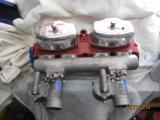
Here are some photos of the fixture I built to hone the aluminum lined insert bearing shells.
The fixture is bored .00015" below the maximum block housing bore specified by the bearing manufacturer. Note there are a split dowels, like I use on all the mains, to hold position between cap and block incorporated into the fixture. The insert shown is either the center or front main insert. The rear main insert fills the entire fixture end to end. Note the radial oil delivery groove in the insert. Last edited by Dave in MN; 02-07-2017 at 10:51 AM. |
|
|
|
|
02-06-2017, 03:06 PM
|
#5 | |
|
Senior Member
Join Date: May 2010
Location: South California
Posts: 6,188
|
Quote:
Very nice ingenious setup ! Inserts look to be ONE piece. Who supplies these one piece ? Do you ever use TWO piece bearings per main ? |
|
|
|
|
|
01-31-2017, 06:56 PM
|
#6 |
|
Senior Member

Join Date: Sep 2010
Location: michigan
Posts: 1,126
|
Sponsored Links (Register now to hide all advertisements)
|
|
|
|
|
01-31-2017, 07:12 PM
|
#7 |
|
Senior Member

Join Date: May 2010
Location: NC
Posts: 2,975
|
One problem is it is a long ways for the oil to get to the back of the bearing with out pressure oiling. The way I fix the problem is a oil groove in the upper bearing.
|
|
|
|
|
02-03-2017, 09:10 AM
|
#8 | |
|
Senior Member
Join Date: May 2010
Location: Jordan, MN
Posts: 1,411
|
Quote:
It was at this point, I invested in a Sunnen precision honing machine and increased the clearances. No problems since. FYI: This experimental engine had a Burlington crank, Lion Speed head III delivering north of 80 hp at 3000 rpm. So the temps and pressures were beyond normal Model A. A wisp of smoke was coming from the bellhousing as I finished the first pull and when I cut the throttle, the rear main locked up. (Strike Two!) The rear journal cleaned up, using muriatic acid, with no damage. Last edited by Dave in MN; 02-03-2017 at 03:27 PM. |
|
|
|
|
|
02-03-2017, 11:49 AM
|
#9 |
|
Senior Member
Join Date: May 2010
Location: NC
Posts: 2,975
|
You need to start the groove at the top front of insert at the pass side of the oil well, and end it at the driver side oil well at the rear of the insert. Then the oil will be forced under the bottom insert with hyd wedge. The oil getting into the bearing at the front is the wrong place. the oil should be interring at the center of the bearing.
|
|
|
|
|
02-03-2017, 12:49 PM
|
#10 |
|
Senior Member
Join Date: Nov 2011
Location: Sonoma, CA.
Posts: 1,498
|
Have you guys talked to the manufacturer about doing this process to future bearings?
|
|
|
|
|
01-31-2017, 08:58 PM
|
#11 |
|
Senior Member

Join Date: Mar 2013
Location: San Antonio
Posts: 177
|
I had it happen to me. Granted not sure if it was really due to lack oil in my case...had a blown head gasket and also the crank pulley broke on me so the water pump wasn't turning. I got lucky somehow and was able to turn the crank and swap the inserts and all was well...that was a few thousand miles ago...hate to hear it happened to you but I am building another engine now and will be doing inserts again...
|
|
|
|
|
01-31-2017, 09:12 PM
|
#12 |
|
Senior Member

Join Date: Mar 2016
Location: Lynden, WA
Posts: 1,564
|
Dang... I hate to hear this, was thinking going this direction on a rebuild. I wonder how wide spread a problem this is?
|
|
|
|
|
01-31-2017, 10:01 PM
|
#13 |
|
Senior Member

Join Date: May 2010
Location: Asheville,NC
Posts: 3,104
|
This is the exact reason I quit doing inserts. Like most modern "improvements", these engines are not designed to work with them. Babbitt only.
__________________
http://www.model-a-ford-4bangers.com/ |
|
|
|
|
01-31-2017, 10:34 PM
|
#14 |
|
Senior Member

Join Date: May 2010
Location: Northport, NY
Posts: 1,597
|
I have enjoyed my Inserted Bearing Engine from Antique Engine Rebuilders in Skokie, IL for about five years and 10,000 trouble free miles. I would say many others share my experiences with Inserts.
|
|
|
|
|
01-31-2017, 10:46 PM
|
#15 |
|
Senior Member

Join Date: Nov 2010
Location: Anchorage, Alaska
Posts: 9,117
|
I have close to 2,000 miles on my inserted engin. No complaints.
__________________
Alaskan A's Antique Auto Mushers of Alaska Model A Ford Club of America Model A Restorers Club Antique Automobile Club of America Mullins Owner's Club |
|
|
|
|
01-31-2017, 10:58 PM
|
#16 |
|
Senior Member

Join Date: May 2010
Location: Hebron, CT
Posts: 435
|
I have to ask Dave from MN a question. Is it possible the machinist preparing the block for the inserts didn't install the proper dimensions for a good fit for the OD of the inserts?Taking this possibility into consideration along with a tight bearing fit initially and also maybe the engine wasn't dynamically balanced properly could have all contributed to the failure. If this did happen it had nothing to do with the inserts.
|
|
|
|
|
02-01-2017, 05:58 AM
|
#17 | |
|
Senior Member
Join Date: May 2010
Location: Eastern Tennessee
Posts: 11,537
|
Quote:
|
|
|
|
|
|
02-01-2017, 11:53 AM
|
#18 | |
|
Senior Member
Join Date: May 2010
Location: Jordan, MN
Posts: 1,411
|
Quote:
The main point I was trying to make is that the clearances for insert bearings are a narrow range and very much less forgiving than Babbitt bearings. When line boring the Model A block for inserts, we find that the impurities in the cast iron are very abrasive to the tooling. Another complication to the process is that the front, center and some of the rear caps are steel. This requires tooling that will work well with both materials. We have found that if you are not using a tool that can stand up to the rigors of these materials, the bit will wear and the resulting bore is significantly tapered. Always tight near the end of the cuts. We also note spots in the cast iron and caps that are hard and deflect the boring bar slightly. These small areas create hot spots in the bearing fit due to reduced clearances as the insert is distorted over these "bumps". We have found the most durable tooling is manufactured by: Micro 100 Tool Corporation The tooling we use: M100 series AL-6 Bit. (5/16") C5 Grade. The tooling is available in sizing to fit most boring bars. When starting to assemble an engine, the first thing I do is carefully measure the line boring of the block. I have cylindrical ring gauges that are equal to the maximum block housing bore suggested by the bearing manufacturer. This gauge allows me to quickly calibrate my bore gauge and accurately measure the housing bores. I often find that a bore may be slightly cone shaped due to bit/tooling wear on the last pass of the line boring machine. I also detect the occasional small spot that deflected the boring bar. I have Sunnen portable hones set up for "A" and "B" line bores and I adjust/straighten the bores to the upper limit with very coarse stones. This honing step along with specifying a mid-range journal sizing on the crankshaft results in good bearing fit with little final honing of the insert shells necessary. Even with this extra work and tight grinding spec, about 50% of the assemblies require a light honing of the rear main inserts. I usually open them up about .0003" and they are perfect. When assembling, if one is tight, I could ask the crank grinder to take a few tenths off the journal diameters but that takes time and running. I purchased a Sunnen precision honing machine and built a fixture that holds the inserts, with proper crush, to be able to adjust the final clearances. With the honing machine in my shop, the process takes just under 10 minutes per journal to complete the fitting. It is usually only the rear main that needs this adjustment. I have not had a bearing failure since I increased the clearance to .002" from .00175" on the rear main. As I stated earlier, I set the clearance between .002" and .0022" for the rear main. If the front and center Plastigage out to .00175", I do not adjust them. Side note: Inserts, when installed correctly, offer excellent service. I have over 90,000 miles on my inserted engine in my Phaeton. I have never had the pan off the engine since assembling it! I do not "baby" this engine and it has always made it home. Summary: JMO: If you are not able to complete this final adjustment to the clearances, you are probably better off using Babbitt instead of inserts. Good Day Guys! www.durableperformance.net Last edited by Dave in MN; 02-03-2017 at 09:43 AM. |
|
|
|
|
|
02-01-2017, 01:54 AM
|
#19 |
|
Senior Member
Join Date: Nov 2011
Location: Sonoma, CA.
Posts: 1,498
|
Dave in MN,
I have seen this problem with modern engines also that have aluminum bearings in them, they don't seem to be a forgiving as the old type clevitte 77 bearings. The problem is mostly on the rods. It must be from some sort of temporary lack of oil. I haven't inserted any motors yet but will take your advise when I do. |
|
|
|
|
02-01-2017, 07:41 AM
|
#20 |
|
Senior Member

Join Date: May 2010
Location: Kalamazoo, MI USA
Posts: 166
|
So my take from this is if the inserts need to be fit by machining then the advantage of having inserts so they can be changed out quickly just got thrown out the window.
__________________
John - Kalamazoo, MI |
|
|
|
|
«
Previous Thread
|
Next Thread
»

 Hybrid Mode
|
|

| Sponsored Links (Register now to hide all advertisements) |
|
|
All times are GMT -5. The time now is 07:11 PM.