|
|||||||


| Sponsored Links (Register now to hide all advertisements) |
|
|
 |

|
Thread Tools | Display Modes |
 12-31-2012, 01:20 PM
|
#1 |
|
Senior Member

Join Date: Jan 2012
Location: South Carolina
Posts: 240
|
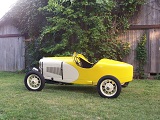
Thought you might want to see my about finished '31 speedster.
It has a model A frame, model B inserted engine, Lion dual plug head, dual downdraft '81's and a 340 cam with a T5 transmission. Still struggling a little getting the Datsun 8 plug distributor working, having trouble getting the total advance where I want it. Plan on taking it to Lincoln this summer for the speedster re-union and hill climb. |

|

|
|
12-31-2012, 01:46 PM
|
#2 |
|
Senior Member

Join Date: May 2010
Location: Richland Mi.
Posts: 1,172
|
Looks nice. If you could put that pic and others in an album then we could see them in a larger size than your Avitar.
|
|
|
|
| Sponsored Links (Register now to hide all advertisements) |
|
|
|
12-31-2012, 02:02 PM
|
#3 |
|
Senior Member
Join Date: Jan 2012
Location: South Carolina
Posts: 240
|
Addes a few pictures to an album.
|
|
|
|
|
12-31-2012, 03:22 PM
|
#4 |
|
Senior Member
Join Date: May 2010
Location: Richland Mi.
Posts: 1,172
|
Very nice. How did you form the metal for the boattail?
|
|
|
|
|
12-31-2012, 04:29 PM
|
#5 |
|
Senior Member
Join Date: Jan 2012
Location: South Carolina
Posts: 240
|
A guy in Oak Grove, Missouri built the body. He has built several over the past few years.
I attached a couple of pictures of the body in process. If interested I can give you his phone number. Ed |
|
|
|
|
12-31-2012, 04:52 PM
|
#6 |
|
Senior Member

Join Date: Jul 2010
Location: Wichita Falls, Texas
Posts: 983
|
Sponsored Links (Register now to hide all advertisements)
|
|
|
|
|
12-31-2012, 06:12 PM
|
#7 |
|
Member

Join Date: May 2010
Location: Long Island "The weiner of New York State"
Posts: 41
|
Nice work. The whole package has a great look to it.
Best of luck and enjoy the drives! I do have a question though, where were you able to get those windshields? I haven't had any luck tracking them down. |
|
|
|
|
12-31-2012, 06:19 PM
|
#8 |
|
Senior Member
Join Date: Jan 2012
Location: South Carolina
Posts: 240
|
Thanks.
They are for I believe it was an older Austin Healy. I'm on vacation for the next few days, but when I get home I'll look it up and let you know. Ed |
|
|
|
|
01-01-2013, 02:24 PM
|
#9 |
|
Senior Member
Join Date: Jun 2010
Location: Temecula, CA
Posts: 4,089
|
Nice! See you in Lincoln.
|
|
|
|
|
01-01-2013, 03:47 PM
|
#10 |
|
Senior Member

Join Date: May 2010
Location: Colorado
Posts: 235
|
Very Nice. We will miss Lincoln this year, we will be in the Great Race that starts the same time.
|
|
|
|
|
01-01-2013, 04:01 PM
|
#11 |
|
Senior Member
Join Date: May 2010
Posts: 361
|
The source for those folding racing windshields is SPEEDSTERS in Oak Grove, MO 816 690 8464
|
|
|
|
|
01-01-2013, 08:50 PM
|
#12 | |
|
Member
Join Date: May 2010
Location: Long Island "The weiner of New York State"
Posts: 41
|
Quote:
 I'll give a call later this week Thanks again |
|
|
|
|

|
01-02-2013, 10:58 AM
|
#13 |
|
Senior Member

Join Date: Aug 2010
Location: Kansas City
Posts: 202
|
Did you have to modify the frame at all for this body? I'm also working on a speedster, the engine is done, working on the frame now and was considering a Rootlieb body.
|
|
|
|
|
01-02-2013, 01:03 PM
|
#14 |
|
Senior Member
Join Date: Jan 2012
Location: South Carolina
Posts: 240
|
No real modifications to the frame. Drilled a few new holes for the body mounts and welded a coupe of tabs on the rear cross member for the rear body mounts. Had to move the steering box back about six inches so there was a new hole also drilled for it.
I did cut the crossmember just a little to install the t5 transmission, but I used a AA bellhousing which is shorter then the stock model A, so very little had to be cut out. Also welded beefed up trailing arms to the outside of the frame to the rear hubs. This was also due to the transmission change. If you are looking for someone to build you a speedster body I would recommend Jim Huesby in Oak Gove, MO. As you can see he does a quality job. |
|
|
|
|
01-03-2013, 10:42 AM
|
#15 |
|
Junior Member
Join Date: Dec 2012
Posts: 6
|
Is that the stock hood?
|
|
|
|
|
01-03-2013, 11:55 AM
|
#16 |
|
Senior Member
Join Date: Jan 2012
Location: South Carolina
Posts: 240
|
No, it was hand made. Its about 8" longer then the stock hood. Top is hinged, but the sides are pinned in and removable without taking the hood top off. Works out good for working on the engine most of the time.
Between the fire wall (in the stock location) and the end of the hood is a storeage compartment about 8" inches wide, 6" deep and goes clear accross the cowl. Room for the battery and few other little things. The entire driver cockpit is moved toward the rear of the car about 8". On vacation right now but if you wanted some pictures I could get some next week. |
|
|
|
|
01-03-2013, 12:36 PM
|
#17 |
|
Senior Member

Join Date: May 2010
Location: Innisfil, Ontario Canada
Posts: 1,174
|
The Speedster windshields are usually from a British Sports Car. Moss Motors (Moss.com) has them in California as a kit. I can't remember the price but I don't think it's out of line.
The Old Tinbasher |
|
|
|
|
01-03-2013, 12:56 PM
|
#18 |
|
Junior Member
Join Date: Dec 2012
Posts: 6
|
I would love to see how you moved the steering box back. I am in the begining stages of building a speedster similar to yours. I have pretty much everything figured out except the steering box.
|
|
|
|
|
01-03-2013, 02:07 PM
|
#19 |
|
Senior Member
Join Date: Jan 2012
Location: South Carolina
Posts: 240
|
Really pretty simple, we just drilled the holes in the frame back about 6", used a shorten pitman arm and put an extension on the drag link. You need to watch where you put the new location as it comes close and can interfere with the mounting bolts because of the starter. We then welded the old holes up and ground them smooth.
It will also change the angle of the steering column and you'll have to make a column mount hooked to under the dash area. We used one that swivled so it would accomadate almost any angle. You want to be sure that the drag link is pretty much parallel with the wish bones, that is why we went with the shorter drag link. It also makes it steer easier. |
|
|
|
|
01-06-2013, 12:17 PM
|
#20 |
|
Junior Member
Join Date: Dec 2012
Posts: 6
|
Could you send me a picture of how you mounted tha steering box? If you moved it 6" back looks like it would interfer with the motor mount bracket.
|
|
|
|
|
«
Previous Thread
|
Next Thread
»
 Linear Mode

|
|

| Sponsored Links (Register now to hide all advertisements) |
|
|
All times are GMT -5. The time now is 07:44 AM.