|
|||||||


| Sponsored Links (Register now to hide all advertisements) |
|
|
 |

|
Thread Tools | Display Modes |
 02-09-2013, 08:09 PM
|
#1 |
|
Senior Member

Join Date: Jun 2012
Location: SouthEast Ohio
Posts: 125
|
Hi, this is Martin in Ohio.
Getting ready to install my newly rebuilt watertpump. Used parts from A&L, including a new shaft and washers. Noticed that the old w/p impeller was 2 1/8" at the widest point. The new impeller is 2 1/4" and looks like it will not fit in the head port. Also, the new impeller has an extended piece at the back end, which the old one did not, and a cursory measurement indicates that this will hit the back of the port opening inside the head. My question is: Is it OK to trim a little off the end of the impeller shaft? Is this a standard procedure with a new impeller? Should it not touch the head internal boss at all? Also, is it standard to trim down the circumference of the impeller, to get a clean fit through the port? The cylinder head is a Ford "service replacement" head. The pump is an early small hole type. Both impellers shafts are exactly the same from the front threaded end through the impeller. The new one has the extension on the back, which does not seem to serve a purpose? The good news is that the pump is fastened with cap bolts, not studs. Can take this up with A&L next week, but thought to ask FB first. Please let me know any advice or comments. Regards, Martin Mindling Watertown, Ohio [email protected] |

|

|
|
02-09-2013, 08:25 PM
|
#2 |
|
Senior Member

Join Date: Jul 2010
Location: Cow Hampshire
Posts: 4,188
|
I suspect you're having issues with the replacement head.
There have been reports of some water pump impellers being made a bit large. If this the case I would say that cutting it down WOULD be the proper solution, providing A&L doesn't want to make it right at their cost. You may have no option but to cut the impeller down to make your head work. The pump is of larger than required pumping capacity so don't be afraid to go this way if A&L can't help. You say the impeller has an "extended piece" at the back end. I think this is normal since this shaft extension is supposed to bump up against the cast in "wear spot" on the inside of the head just behind the water pump. (you can see this if you look in the hole.) Some folks with older heads find this wear spot to be worn in too far. Various solutions include using a longer pump shaft (this available from the parts houses) or a modification to the pump shaft to include tapping the end out and installing a brass bolt to take up the space (this can be made optimally adjustable! High-tech for 1930!) You need (IIRC) about 0.005 to 0.010 free motion between front/back on the pump shaft. AND you need it to spin freely. The earlier mentioned diameter issue results in a pump shaft that is frozen in place when everything is bolted together. If you assemble everything and CAN'T turn the fan, then you know something is not right. I suspect your head is your issue. And that A&L won't be able to help you. Hopefully you have a lathe? Joe K
__________________
Shudda kept the horse. |
|
|
|
| Sponsored Links (Register now to hide all advertisements) |
|
|
|
02-09-2013, 09:48 PM
|
#3 |
|
Senior Member

Join Date: May 2010
Location: Mpls, MN
Posts: 27,582
|
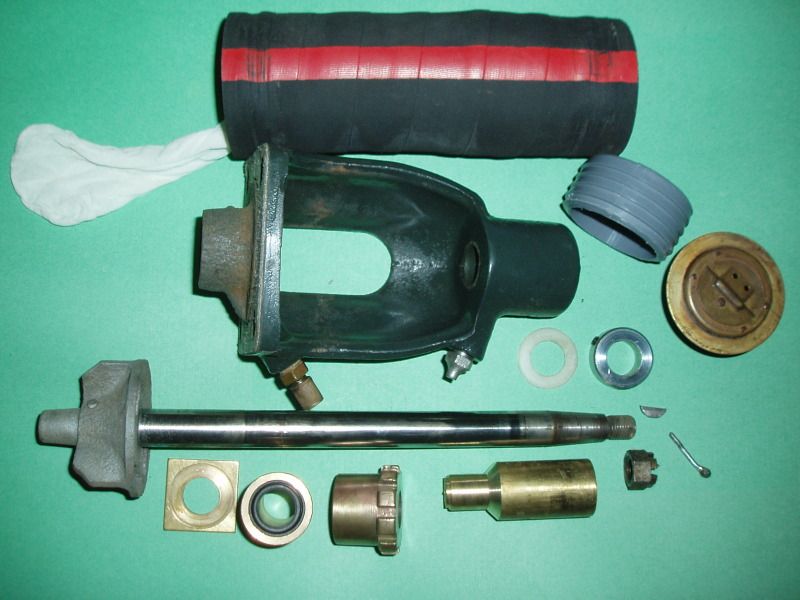 I like to rebuild the pumps as original, except I like the locking collar to control end play, and I like the seal at the rear of the rear bushing. I always use the square brass thrust washer that fits into the impellor pockets. Many shafts are 1/4" extra long to make up for the wear inside the head, where the shaft touches the cast. I'd cut off any excess and just use the locking collar. Have you tried to install the pump yet, or are you just thinking it might not fit? Be sure to use grease on the lead packing rings, or you may have a slow drip that won't go away. Also notice I add a thermostat and nylon drier vent filter to the top hose. |
|
|
|
|
02-09-2013, 11:52 PM
|
#4 |
|
Senior Member
Join Date: May 2010
Location: Mpls, MN
Posts: 27,582
|
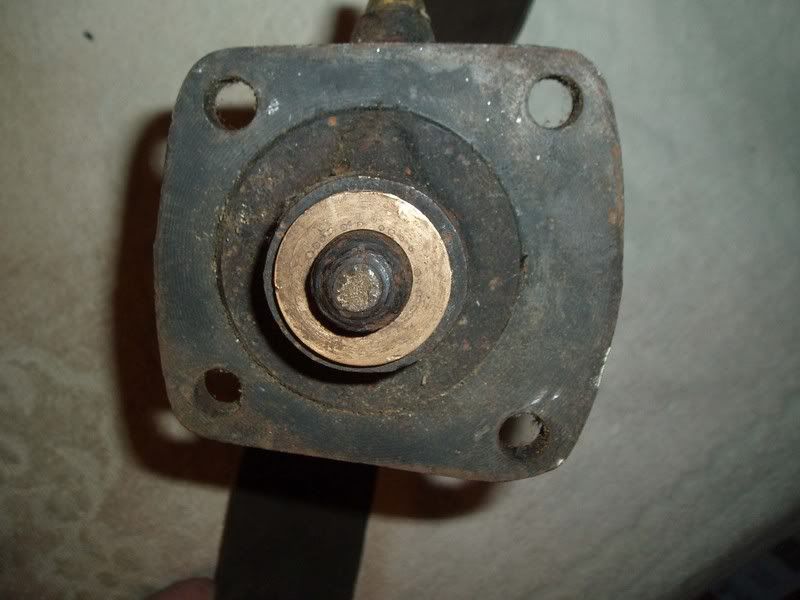 BTW, this damage happened when the freeplay was too much and the thrust washer spun around on the shaft until it cut off the impellor. Now, there is nothing to hold the fan from moving forward into the radiator. 
|
|
|
|
|
02-10-2013, 10:38 AM
|
#5 |
|
Senior Member
Join Date: Jun 2012
Location: SouthEast Ohio
Posts: 125
|
Hi, thanks for the advice.
This is my plan at this time, with regard to fitting the rebuilt w/pump: *Use a dremel to clean up the port for the waterpump. Possibly, this will help to slide it in place. There is some minor corrosion around the port. Doing the fitting of the pump as a test, without the fan mounted on the shaft at this point. *If the above step works, the next item is the fit of the extended shaft where it touches the boss in the cylinder head. Will remove the water outlet gooseneck to see how the shaft fits inside the head, and use a feeler gauge for the end distance measurement. *Will use a collar with set screw on the front of the shaft, because it seems like a good idea. *If the pump won't go into the head, then I'll take it to the machine shop to turn down the impeller width (now 2 1/4" at widest). This could be two trips to Marietta Machine, one for the impeller and a second for the shaft adjustment. Don't have a lathe or proper tools in my garage to do the work. Sound reasonable?? Thanks, Martin Watertown, Ohio [email protected] |
|
|
|
|
02-10-2013, 11:18 AM
|
#6 |
|
Senior Member
Join Date: May 2010
Location: Mpls, MN
Posts: 27,582
|
Sponsored Links (Register now to hide all advertisements)
|
|
|
|
|
02-12-2013, 02:51 PM
|
#7 |
|
Senior Member
Join Date: Jun 2012
Location: SouthEast Ohio
Posts: 125
|
Thanks to FBer's for the advice.
Attached is a pic of the rebuilt pump, installed as a test. After a lot of maneuvering, the pump went through the head port. Also, with the cap bolts tightened, the shaft turns without binding. So a happy ending to this part. Next, I'll take the pump out and install the fan. Will probably remove the radiator shroud to make this a little easier. Regards, Martin Mindling Watertown, Ohio [email protected] |
|
|
|
|
02-12-2013, 04:02 PM
|
#8 |
|
Senior Member

Join Date: May 2010
Location: Fresno, Ca.
Posts: 3,636
|
I know you have redone parts of your car too make it more "correct", and that's
great! I do, how ever, question the bolts holding the water pump too the head. Did you replace the studs, or did the car come this way? I did do some research (very quickly) before posting this question. There is one very bad photo that I did find, but wouldn't consider it gospel! I did look at Dean Drenzek A, which is over 11,000 cars earlier than yours...and it has studs. |
|
|
|
|
02-12-2013, 06:42 PM
|
#9 |
|
Senior Member

Join Date: May 2010
Location: new britain,ct 06052
Posts: 9,393
|
Those look like regular bolts to me. Most vendors have bolts that "mimic" the look of the orig studs. FWIW
Paul in CT |
|
|
|
|
02-12-2013, 07:27 PM
|
#10 |
|
Senior Member
Join Date: Jun 2012
Location: SouthEast Ohio
Posts: 125
|
To: DJ and Flamingo;
Your posts caused me to look into the matter of cap bolts vs. studs to fasten the water pump. Found in JS, Revised 1997, Section Early 1928's, page A-7: "Area 7, Cooling System - some water pumps were attached by dome-headed bolts (cap screws) like the timing cover bolts" The good news is that cap bolts make it much easier to remove and install a water pump without moving the radiator (although it helps to remove the shroud). I just did this procedure with a little bit of maneuvering. The bad news, for my particular car, is that the cylinder head is a Ford script "service replacement" head so not the original early 28. Although it had the cap bolts for the water pump when I acquired this car ten years ago, they are certainly not original to the head. For the moment, I will be satisfied to find early head nuts (3/8 vs 7/16 tall) to be correct for the year and for the shorter studs. Looking for the head nuts now. I'll leave the cylinder head for another time because finding a genuine early 28 head will be problematic. Thanks for your interest in my car. Regards, Martin Mindling Watertown, Ohio [email protected] |
|
|
|
|
02-12-2013, 07:31 PM
|
#11 |
|
Senior Member
Join Date: Jun 2012
Location: SouthEast Ohio
Posts: 125
|
Correction page A-3 of JS 1997.
My Bad. |
|
|
|
|
02-12-2013, 09:04 PM
|
#12 |
|
Senior Member
Join Date: Jul 2010
Location: Cow Hampshire
Posts: 4,188
|
The bolts are preferable if you feel you may have a problem with the pump. Removing all the bolts allows one to "swing" the pump out of the hole with fan in place and change it out without removing the radiator.
BUT - for most the studs/nuts are original setup. Joe K
__________________
Shudda kept the horse. |
|
|
|
|
«
Previous Thread
|
Next Thread
»
 Linear Mode

|
|

| Sponsored Links (Register now to hide all advertisements) |
|
|
All times are GMT -5. The time now is 09:12 AM.