|
|||||||
| Sponsored Links (Register now to hide all advertisements) |
|
|
 |

|
Thread Tools | Display Modes |
|
|
#1 |
|
Senior Member
Join Date: Jul 2011
Location: Oakland County, Michigan
Posts: 562
|
Hey guys,
Maybe this is old news but here’s an idea for a cheap and relatively easy way to make a spring spreader. All it takes is some 1-inch black pipe (24-inches long), a couple end caps, a bit of ˝-by-20 running stock and some steel blocks. Here's what my concoction of iron looks like: 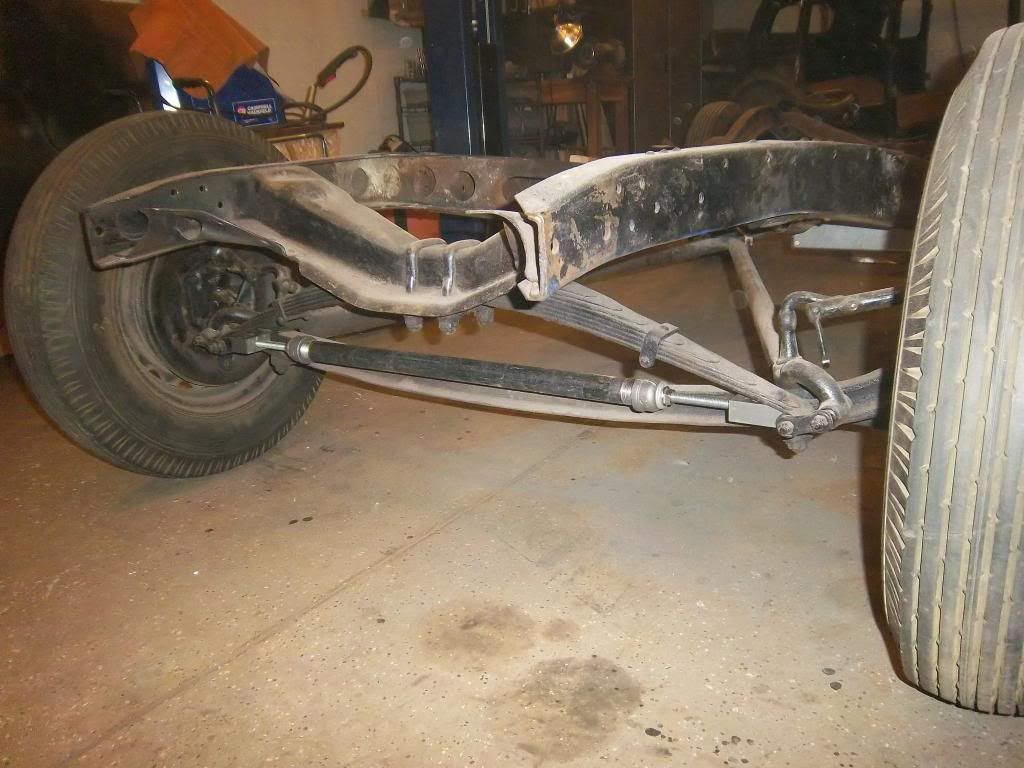 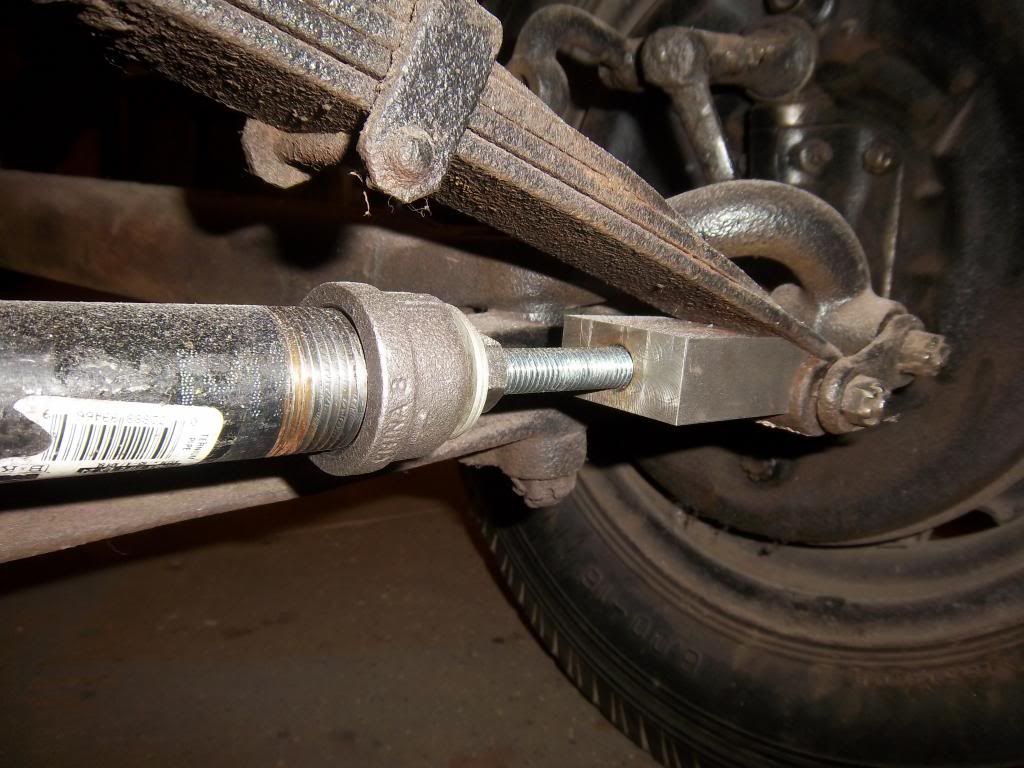 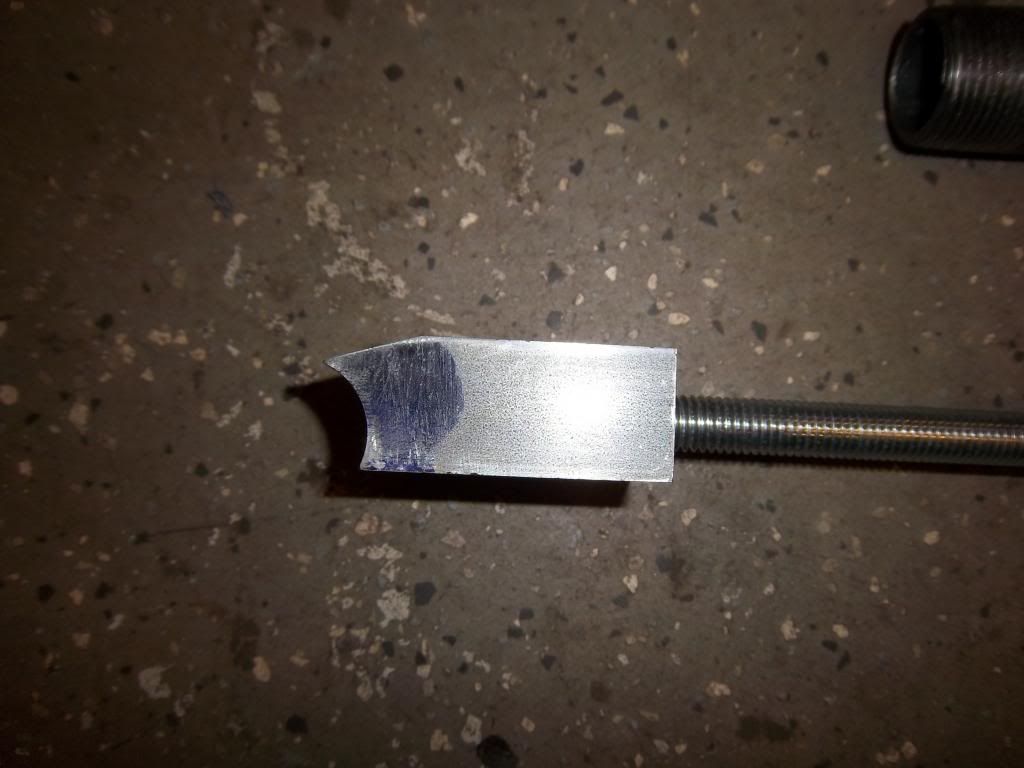 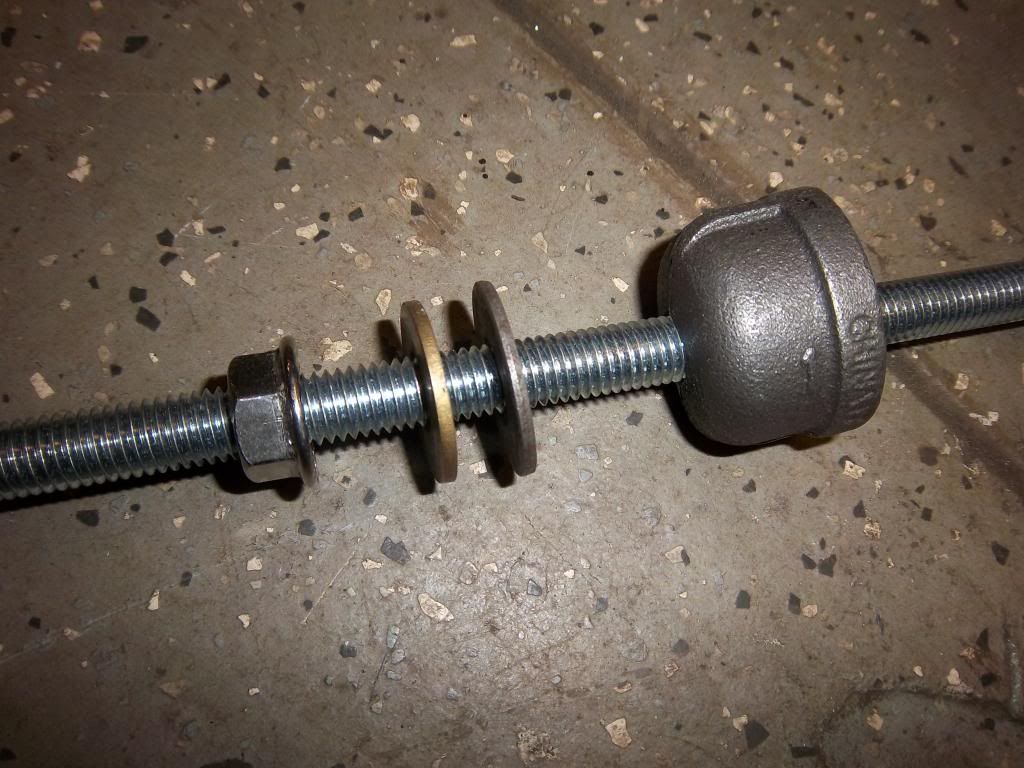 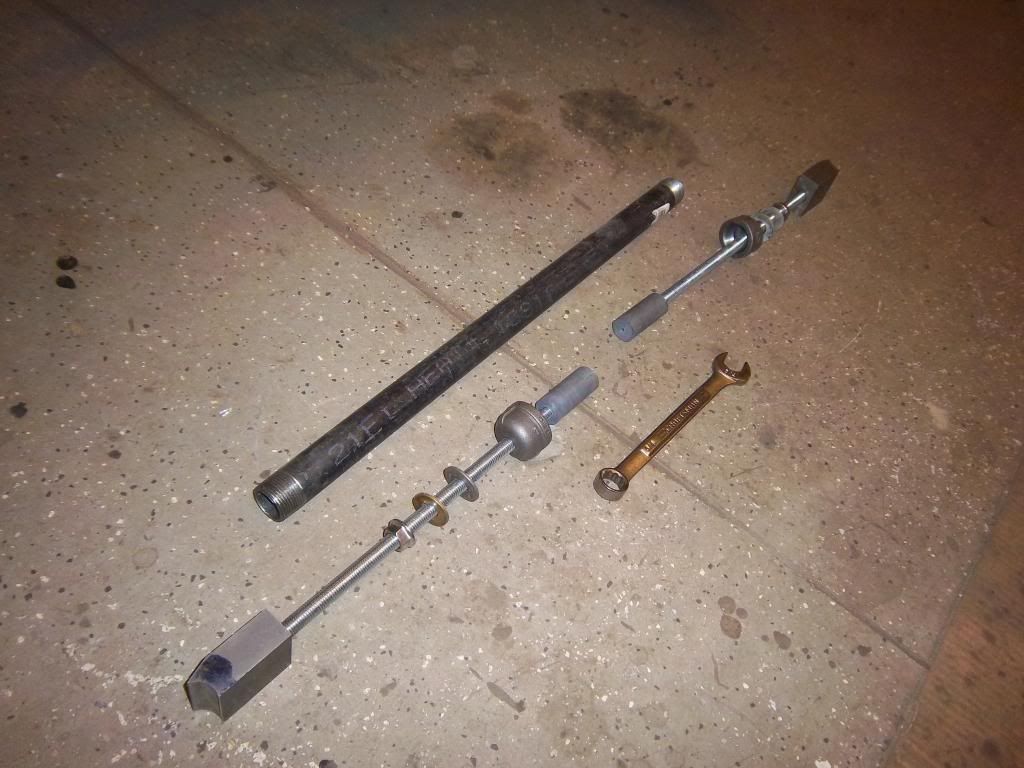 Just tighten the nut down on either side and the spreader gets wider. Loosen them to make it shorter. The hardest part is machining the end blocks that match up with the eyes of the spring, but you could just bring them to a point and fit them above the curved portion of the eye if you wanted. The gray PVC cylinders on the ends of the running stock are to keep them from flopping around. They're machined to fit neatly inside the black pipe. I've also made some safety blocks that bolt around the spring so when I remove the U-bolts and/or the center bolt there are no unwanted surprises... and by that I mean exploding spring leaves! |
|
|

|
|
|
#2 |
|
Senior Member
Join Date: Oct 2011
Location: Shelton, WA
Posts: 3,800
|
Well, that is a novel design. I would be VERY concerned about the cast Chinese pipe caps. I just spread a 14 leaf wagon spring and I can imagine those cast iron caps giving up with the amount of force that would be put on them. How about a machined steel cap instead of a cast one?
|
|
|

|
| Sponsored Links (Register now to hide all advertisements) |
|
|
|
|
#3 |
|
Senior Member
|
Nice job,
|
|
|

|
|
|
#4 |
|
Senior Member
Join Date: May 2010
Location: Florence Ma.
Posts: 2,404
|
Admiral;
I don't see any reason why it should not work. Can you please post pictures of the safety Blocks. THANKS |
|
|

|
|
|
#5 |
|
Senior Member
Join Date: Jul 2011
Location: SF Bay Area
Posts: 6,645
|
I've made and used a spreader using 1" all thread, and have been concerned about the possibility of it bending. I wouldn't want to be within a city block of a spreader using 1/2" all thread, sorry. The overextension of that length of thread stock is just too close to disaster for me.
__________________
Alan |
|
|

|
|
|
#6 |
|
Senior Member
Join Date: Aug 2010
Location: Oregon
Posts: 311
|
Sponsored Links (Register now to hide all advertisements)
Last edited by klicker; 06-04-2013 at 03:46 AM. Reason: typo |
|
|

|
|
|
#7 |
|
Senior Member
Join Date: May 2010
Location: Near Rising Sun, Maryland
Posts: 10,858
|
Admiral, the basic concept looks good but that 1/2" all thread is not going to take the load. I made one using 3/4" water pipe and 3/4" all thread. The 3/4" all thread bowed under the load of a rear '35 sedan spring. 1" pipe and all thread would have been better but not even sure it would have withstude the load. I would also worry about those threaded pipe caps as someone else mentioned. I know you are proud of what you have made but be very careful using that one. Spreading those springs can be very dangerous....please take caution!!
__________________
John "Never give up on what you really want to do. The person with big dreams is more powerful than one with all the facts". Albert Einstein |
|
|

|
|
|
#8 |
|
Senior Member
Join Date: May 2010
Location: Georgia
Posts: 611
|
just take the spring apart and use all thread to put it back together that is the way I did mine.Don't even like to use spring compressor on coil springs either these things can beat you to death
|
|
|

|
|
|
#9 |
|
Member Emeritus
Join Date: May 2010
Location: Fitzgerald, Georgia
Posts: 2,204
|
JM 35 and others are absolutely correct!! The 1/2" rod will fold and become a source for safety concerns. My "spreader" uses 1 inch diameter threads and is not as rigid as I might like to see.
|
|
|

|
|
|
#10 |
|
Senior Member
Join Date: May 2010
Location: Sydney, Australia
Posts: 949
|
I like the design, which is simple and effective. The engineering is in my opinion adequate as are the materials, with the exception of the Allthread rod.
The pipe appears to be of reasonable capacity and adequate to the task. The end caps appear to be pressure designated and therefore would be made of Ductile or Nodular Iron which should be sufficient for the task, especially as a nut and washer are used to lock the thread against the cap and reinforce the connection regarding applied force. (To efficiently use this device without the screw action binding, the end cap should not be threaded and should be used as a Bolster.) The use of a steel nut and a rolled thread on the threaded rod is encouraging. This arrangment while (in my opinion) is underated, would nevertheless probably prove effective due to the short length of the active or working length of the threaded rod. The steel engaging blocks appear more than adequate to the task. In my opinion a locking nut should be applied to this connection. My only reservation on this device is the sizing of the Allthread. As others have commented a 1" rod would alleviate many concerns. It's twice the diameter but many times more stronger in compression. To return to the Endcap; should this cap not be of a rated capacity it could be readily replaced with a Scheduled Fitting. Or a large 1" nut welded to the pipe ends. |
|
|

|
|
|
#11 |
|
Senior Member
Join Date: May 2010
Location: Wisconsin, USA
Posts: 9,007
|
All-thread ® is not designed to take any loads from the side. I see spreaders like this and wonder just when it breaks, how bad the subsequent injury will be.
yeah, yeah, I know... "it worked for me"... those stories we all hear, all the time. How many do we NOT hear about the thing bending / breaking / someone getting hurt?
__________________
"I can explain it for you. However, I can't understand it for you". |
|
|

|
|
|
#12 |
|
Senior Member
Join Date: Jul 2011
Location: Oakland County, Michigan
Posts: 562
|
Thanks for the feedback, guys. I haven't put any real pressure on the assembly yet so I don't know how it'll perform but when I do get ready to pull the springs I'll use CAUTION. If I see ANY flexing, which there probably will be, I'll go back and get some larger running stock and machine up some tougher end caps. Stay tuned...
|
|
|

|
|
|
#13 |
|
Senior Member
Join Date: May 2010
Location: Coral Springs FL
Posts: 10,949
|
Here's one made using a super big turnbuckle. Works great and won't flex.

Last edited by 19Fordy; 06-04-2013 at 10:20 AM. |
|
|

|
|
|
#14 |
|
Senior Member
Join Date: Dec 2010
Location: North of sandy ago, CA.
Posts: 2,064
|
Most all thread rod is grade 3 or less, made to use with pipe hangers for the plumbing and fire protection industry.
Mcmaster carr and other suppliers offer grade 8 all thread rod. I agree 1/2" dia. all thread rod is too weak for this application. Bruce Works good Lasts long time |
|
|

|
|
|
#15 | |
|
Senior Member
Join Date: May 2010
Location: Wisconsin, USA
Posts: 9,007
|
Quote:
__________________
"I can explain it for you. However, I can't understand it for you". |
|
|
|

|
|
|
#16 |
|
Senior Member
Join Date: May 2010
Location: Daytona Beach, Fl & Spencer, W. Va,
Posts: 4,442
|
Here are photos of a home-made spring-spreader, that I had submitted to the "V8 TIMES", many years ago.
It was inexpensive, easy to make, easy to use, but it only worked on the front. I think that the second time that I used it, the All-Thread did bend a little bit. MIKE  CLICK ON PHOTOS TO ENLARGE - Twice Last edited by FL&WVMIKE; 06-10-2013 at 01:00 PM. |
|
|

|
|
|
#17 | ||
|
Senior Member
Join Date: Jul 2011
Location: Oakland County, Michigan
Posts: 562
|
Quote:
Quote:
 I don't think I've ever seen a turnbuckle that big before! I don't think I've ever seen a turnbuckle that big before!
|
||
|
|

|
|
|
#18 |
|
Senior Member
Join Date: May 2010
Location: pittsfield, MA
Posts: 2,086
|
Kube has some posts on these homemade spreaders and I agree some are not safe. Maybe Kube will post a picture of his spreader.
John |
|
|

|
|
|
#19 |
|
Senior Member
Join Date: Jul 2011
Location: Alvaton, Kentucky, USA
Posts: 955
|
|
|
|

|
|
|
#20 |
|
Senior Member
Join Date: Apr 2011
Location: Glenmoore Pa
Posts: 1,644
|
I use a Model A rear spring spreader. It has fit every Ford spring Ive tried it on.
|
|
|

|
|
|
#21 |
|
Senior Member
Join Date: Jul 2011
Location: Mountain Home, AR
Posts: 106
|
Admiral, I like the ingenuity & engineering of your spreader! Never having used one I'll leave all comments RE:safety & practicality to Barners that have. Looks good!
|
|
|

|
|
|
#22 |
|
Senior Member
Join Date: May 2010
Location: charlottesville, Va.
Posts: 589
|
The best one is a porta power. They work great.
|
|
|

|
| Sponsored Links (Register now to hide all advertisements) |
|
|
|
|
#23 | |
|
Senior Member
Join Date: May 2010
Location: Sydney, Australia
Posts: 949
|
Quote:
I used the threaded pieces (rolled threads for strength)that came with the Turnbuckle and welded and sleeved them to the main bar. |
|
|
|

|
|
|
#24 |
|
Senior Member
Join Date: May 2010
Location: pittsfield, MA
Posts: 2,086
|
Wow, now after all these years spending extra $ for grade 8 bolts for their strength , I find out Kube says they are too "brittle". I can't wait till he posts a picture of his spreader.
John |
|
|

|
|
|
#25 | |
|
Senior Member
Join Date: May 2010
Location: Wisconsin, USA
Posts: 9,007
|
Quote:
I will dig out my spreaders tomorrow and photograph them.
__________________
"I can explain it for you. However, I can't understand it for you". |
|
|
|

|
|
|
#26 |
|
Member
Join Date: Oct 2011
Posts: 45
|
Sponsored Links (Register now to hide all advertisements)
Just as Kube said, just because you haven't had one of these fly apart on you, doesn't mean it's not about to happen. And, remember, "watching for bending" and backing off before things get hairy may not be such a good safety plan, as these failures happen fast and you could end up with a face full of shrapnel before you know what happened. You will NOT be able to get out of the way fast enough. Trust me. I'm not attempting to come across as any kind of know-it-all here, just spread some industry knowledge I have on machine design, metallurgy and working safely - all of which are required in my business on a daily basis. |
|
|

|
|
|
#27 |
|
Senior Member
Join Date: May 2010
Location: Gerrardstown, WV
Posts: 2,266
|
Here's a pic of the one our club owns, although it is a poor pic. Sorry for that.
|
|
|

|
|
|
#28 |
|
Senior Member
Join Date: Jul 2011
Location: Oakland County, Michigan
Posts: 562
|
|
|
|

|
|
|
#29 |
|
Senior Member
Join Date: Nov 2010
Location: Lambsburg Va
Posts: 296
|
I know this is not home made but, thought you might want to see an old Snap On spreader
|
|
|

|
|
|
#30 | |
|
Senior Member
Join Date: May 2010
Location: Wisconsin, USA
Posts: 9,007
|
Quote:
The yellow one is a SnapOn brand spreader. All steel, you can easily see it is heavy and built well. The threaded portion is a full 1" diameter. The "skinny" one is KD, another early production tool. It is also all steel. Threaded portion is 7/8" diameter. I like the way the ends are shaped on this one. Lastly is the one I made. The threaded portion was made from one piece of StressProof® steel. It is 1" diameter. I cut #8 (pitch) threads in it. The outer sleeve is thick wall steel tube. It is not rolled and welded but rather a formed piece which is much stronger. I have a number of sleeves that can be added to this as needed for various widths of springs.
__________________
"I can explain it for you. However, I can't understand it for you". |
|
|
|

|
|
|
#31 |
|
Senior Member
Join Date: Jul 2010
Location: Ventura, CA
Posts: 2,464
|
OK, I'll add my comments to this thread..
Attached is a pix of a spring spreader that I made many years ago... I made it from memory of the one we had at a Ford garage I worked at in the early '50's.. I used 3/4" threaded rod and 1" pipe.. The design I used requires only simple shop tools and a welder to weld on the ends. In reality, the spreader only has to expand a very short distance to relieve the tension on the shackles.. It should be noted that I "concave ground" the ends of my engaging blocks to capture the spring eye, the blocks can not disengage from the spring eye, once pressure is applied to the spreader..
__________________
Bill.... 36 5 win cpe |
|
|

|
|
|
#32 | |
|
Senior Member
Join Date: Jul 2011
Location: Oakland County, Michigan
Posts: 562
|
Quote:
|
|
|
|

|
|
|
#33 |
|
Senior Member
Join Date: May 2010
Location: pittsfield, MA
Posts: 2,086
|
Yes, I agree, Kube's tools sure look sturdy.
John |
|
|

|
|
|
#34 |
|
Senior Member
Join Date: May 2010
Location: MN
Posts: 7,053
|
Since we are posting spreaders... I picked this one up a while back for a fair price. Does anyone know what make it is or seen one like it?
|
|
|

|
|
|
#35 |
|
Senior Member
Join Date: Oct 2011
Location: Shelton, WA
Posts: 3,800
|
Interesting, you must be one strong dude to work that with the short handle on the wrench! (I know, you probably have a pipe cheater bar to slip over the handle)
I thought for sure Kube would have a KR Wilson spreader. Another thought on the home made ones, the threaded part should extend as far as possible into the hollow part so when in use it will minimize any tendency to flex/bend. |
|
|

|
|
|
#36 | |
|
Senior Member
Join Date: May 2010
Location: Wisconsin, USA
Posts: 9,007
|
Quote:
 I do own a KRW spreader. I couldn't get to it this morning. The basic difference between the KRW tool and the one I made is the KRW tool has chains integral on each end that were intended to be wrapped around the spring. Kind of a safety thing... The spreader that I'd made has numerous sleeves that can be added as required. i add them to the smooth end, that is the end that has no threads. In that way, I need only the minimal amount of threads protruding from the outer sleeve as necessary to spread the spring. Even utilizing 1" diameter stock, the end with threads will always be inherently weaker than the end that remains smooth.
__________________
"I can explain it for you. However, I can't understand it for you". |
|
|
|

|
|
|
#37 |
|
Senior Member
Join Date: May 2010
Location: MN
Posts: 7,053
|
The cast wrench was broke when I got it. Still works well and a pipe / torque amplifier can be used. Or just a bigger wrench...
|
|
|

|
|
|
#38 |
|
Senior Member
Join Date: May 2010
Location: Wisconsin, USA
Posts: 9,007
|
I like this one for the 34 rear springs.
__________________
"I can explain it for you. However, I can't understand it for you". |
|
|

|
|
|
#39 |
|
Senior Member
Join Date: Oct 2011
Location: Shelton, WA
Posts: 3,800
|
I think I need to hang a "torque amplifier" up with my tools and label it as such! Thanks!
|
|
|

|
|
|
#40 |
|
Senior Member
Join Date: Nov 2010
Posts: 260
|
I pretty much copied the one illustrated in the V8 Times. I used 3/4" all-thread and kept goofing with it until I had the maximium amount of all thread captured within the black iron pipe. Worked and worked well, however it still deflected a small amount. 1/2" all thread has no chance...
|
|
|

|
|
|
#41 |
|
Senior Member
Join Date: May 2010
Location: Australia
Posts: 362
|
This one was for sale on ebay a while back. It looks about 2" dia.
|
|
|

|
|
|
#42 |
|
Senior Member
Join Date: May 2010
Location: Wisconsin, USA
Posts: 9,007
|
Yikes! Either that dog is really small or that wrench is huge!
__________________
"I can explain it for you. However, I can't understand it for you". |
|
|

|
| Sponsored Links (Register now to hide all advertisements) |
|
|
|
|
#43 |
|
Senior Member
Join Date: May 2010
Location: Sydney, Australia
Posts: 949
|
|
|
|

|
|
|
#44 |
|
Senior Member
Join Date: May 2010
Location: Homelook Sweden
Posts: 178
|
Has been posted before ........ a different design, and I like that it can not slide off.
/Jorgen |
|
|

|
|
|
#45 |
|
Senior Member
Join Date: Dec 2010
Location: North of sandy ago, CA.
Posts: 2,064
|
Jorgen's spreader looks well thought out. If we can accept the turnbuckle, what bolts would be our choice for the clevis pins? Grade3, 5, 8, or a forged clevis pin.
It would be useful to know the amount of pressure it would take to extend the spring 4 to 5 inches. If someone had access to a testing company a spring could be anchored on one end and the amount of pull from the other end could be recorded to extend to the length required to remove one shackle pin. Bruce Works good Lasts long time |
|
|

|
|
|
#46 |
|
Senior Member
Join Date: May 2010
Location: Coral Springs FL
Posts: 10,949
|
Sponsored Links (Register now to hide all advertisements)
I wonder if a porta-power with a gauge would work? |
|
|

|
|
|
#47 |
|
Senior Member
Join Date: May 2010
Location: (Not far enough...) Outside of DC
Posts: 3,387
|
I was looking at some photos that Frank Miller is posting on his cross country drive to Tahoe. He stopped at the EFV8 Foundation museum and I spied these two in a photo of his.
-VT/Jeff |
|
|

|
|
|
#48 | |
|
Senior Member
Join Date: May 2010
Location: Sydney, Australia
Posts: 949
|
Quote:
|
|
|
|

|
|
|
#49 |
|
Senior Member
Join Date: May 2010
Location: MN
Posts: 7,053
|
|
|
|

|
|
|
#50 |
|
Senior Member
Join Date: May 2010
Location: Sydney, Australia
Posts: 949
|
Rat rod bumper is a brilliant idea. I may consider using one of my big flogging spanners on the rear of my 36' pickup (I have some around 4-5' tall that we used on the forging hammers).
|
|
|

|
|
|
#51 |
|
Senior Member
Join Date: May 2010
Location: MN
Posts: 7,053
|
Ya it might be a good idea. It was adverstised that way. Guess the orginal bumpers grew on me.
|
|
|

|
 |
«
Previous Thread
|
Next Thread
»
|
|
| Sponsored Links (Register now to hide all advertisements) |
|
|
All times are GMT -5. The time now is 04:57 PM.


 Linear Mode

