|
|||||||


| Sponsored Links (Register now to hide all advertisements) |
|
|
 |

|
Thread Tools | Display Modes |
 12-14-2010, 03:11 PM
|
#1 |
|
Senior Member

Join Date: May 2010
Location: Pittsburgh Pa
Posts: 188
|
Just wondering if there is anyway I could get a drawing with measurements to make my own rear spring spreader. I'm reluctent to buy a pricey tool that would only be used once in a blue moon. I made one for the front, which was easy but the back one would be totally different.
|

|

|
|
12-14-2010, 03:50 PM
|
#2 |
|
Senior Member
Join Date: Oct 2010
Location: gordonville mo
Posts: 519
|
back one is just as easy just one side at a time use one bolt head on banjo with one end make other end like front works great
|
|
|
|
| Sponsored Links (Register now to hide all advertisements) |
|
|
|
12-14-2010, 05:12 PM
|
#3 |
|
Senior Member
Join Date: May 2010
Location: Spokane, WA.
Posts: 496
|
__________________
Larry Seemann |
|
|
|
|
12-14-2010, 06:58 PM
|
#4 |
|
Senior Member
Join Date: May 2010
Location: South East NJ
Posts: 3,398
|
I built the one in the link. Couple of notes.
You do not need the torrington bearing. Lots of lube will do the job. The ends really should be strong I used a heavy steel and it did bend a little. I also did not use the U channel. I used some very heavy box section I had laying around. Do not fool around with the welds. They have to be good and everything has to be well braced It really has some force on it. |
|
|
|
|
12-14-2010, 07:07 PM
|
#5 |
|
Senior Member
Join Date: May 2010
Location: Pittsburgh Pa
Posts: 188
|
thanks guys. Good information. Joe
|
|
|
|
|
12-14-2010, 08:08 PM
|
#6 |
|
Senior Member

Join Date: May 2010
Location: Southern California
Posts: 3,131
|
Sponsored Links (Register now to hide all advertisements)
I also have a home made one similar to the one in the posted web site. By the time I obtained all the material and had it welded it cost as much as a ready made one. Whatever the price, a quality made rear spring spreader is cheap insurance. Whatever you do, please do not attempt to use a pipe and an all-thread against a banjo bolt, it is extremely dangerous and a good way to get yourself killed. If the pipe slips off the bolt head it will launch like a medieval cross bow. Anyone who owns a Model A and does most of their own work should own a quality rear spring spreader. You will find you will use it more than once. Tom Endy |

|
|
|
12-14-2010, 10:24 PM
|
#7 |
|
Senior Member

Join Date: May 2010
Location: Mpls, MN
Posts: 27,582
|
I made mine just like the one Tom Endy posted above, except I used 1" square tubing that the 3/4" threaded rods could just fit into. As Kevin said, I use lots of grease and no bearing.
|
|
|
|
|
12-15-2010, 09:45 AM
|
#8 |
|
Senior Member

Join Date: May 2010
Location: Pitt Meadows BC
Posts: 1,003
|
I also made one from scraps and I learned two things while testing it:
1. Don't make the frame ends too wide, as some rear springs will curl closed enough to keep the spreader captive once unshackled. 2. When tightening or loosening the rig it would be nice to have a handle off the top of the spreader to back you up. I am going to add a short pice of pipe that can be unthreaded from the spreader. when installed it will bump up against the spring or rear cross member(either side) and prevent the spreader from rotating while in use. |
|
|
|
|
12-15-2010, 10:32 AM
|
#9 | |
|
Senior Member

Join Date: Aug 2010
Location: Winchester VA
Posts: 154
|
Quote:
I didn't know what to expect from this process and figured that I wasn't going to take any chances. turned out to be overkill but I didn't know what to expect. I watched Dad get hurt by an old Split Rim truck tire ring in our garage at home when I was a kid and I remember the energy it had so I have a very healthy respect for springs and the like. I wouldn't tackle it alone in case something goes wrong, but thats just me.. |
|
|
|
|

|
12-15-2010, 02:12 PM
|
#10 |
|
Senior Member
Join Date: Aug 2010
Location: Lead. South Dakota
Posts: 963
|
Here is a spring spreader that I fabricated. There is no way the energy of the spring can be accidentally released. It will work on regular springs and reversed eye springs. I do not like the store bought spring spreaders because the spring energy is not completely capsulized and they can slip off the eyes. I usually remove the axle from the vehicle when changing shackles and springs because it is safer and it is not that much effort.
__________________
IF IT CAN NOT BE FIXED WITH BLASTING WIRE, JB WELD OR DUCT TAPE ---IT CAN NOT BE FIXED Do not get me started on the stupidity of ethanol. I think one of the monitors is from Iowa and he will delete the thread. Last edited by sturgis 39; 12-15-2010 at 02:22 PM. |
|
|
|
|
12-15-2010, 03:28 PM
|
#11 |
|
Senior Member
Join Date: May 2010
Location: brentwood, ca
Posts: 4,247
|
sturgis, great design. Bob
|
|
|
|
|
12-15-2010, 04:16 PM
|
#12 | |
|
Senior Member

Join Date: May 2010
Location: South California
Posts: 6,188
|
Quote:
Someone here not long ago said NOT to do this as the 'center' bolt can/may let go/break and cause severe damage! Is this not true? |
|
|
|
|
|
12-15-2010, 04:19 PM
|
#13 |
|
Senior Member

Join Date: May 2010
Location: Daytona Beach, Fl & Spencer, W. Va,
Posts: 4,442
|
sturgis39 .......................
I have never seen that design. I believe that is about the best that I have seen. Thanks ! MIKE 
|
|
|
|
|
12-15-2010, 04:45 PM
|
#14 |
|
Senior Member
Join Date: May 2010
Location: Lakeville, MN
Posts: 5,165
|
Sturgis 39,
What keeps the spreader from scratching up the bottom of the lower leaf? It seems like as the spreader is tightened (and loosened), it would make 1" or 2" scratches in the paint as the spring compresses or relaxes. |
|
|
|
|
12-16-2010, 01:42 AM
|
#15 |
|
Senior Member
Join Date: May 2010
Location: Southern California
Posts: 3,131
|
Mr. Sturgis:
I don't mean to belittle your design, but it appears the only way you can attach your spreader is by unbolting the u-bolt assemblies from the frame and pulling the rear end out with the spring still attached at the shackles. This puts a tremendous amount of strain on the center bolt that is holding all the leaves together. This single bolt was never ment to hold that much tension. If the head of the bolt should pop off, as it could be 80 years old and rusted, the leaves will fly 20 feet in the air and maybe do so just as you are leaning over it to attach the spreader. The spreader in the photo is really the best bet. The feet securely grab around the shackle bosses and spreads the sping so that you can remove the shackle bolts and remove the rear end from the car leaving the spring safely in place under the car with the frame section holding it securely. You can leave the spreader in place for any length of time until you are ready to reinstall the rear end. With this method you do not have to unbolt the two u-bolt assemblies and fight the problem of getting the spring back in place with the center bolt head through the alignment hole in the frame section. I have a cottage industry rebuilding Model A drive line elements and have rebuilt several hundred rear ends in the last 22 years. I have had several customers tell me horror stories about how they tangled with that deadly rear spring. I can't enphisize enough how caution should be exercised when dealing with a Model A rear spring. Tom Endy |
|
|
|
|
12-16-2010, 02:23 AM
|
#16 |
|
Senior Member

Join Date: Sep 2010
Location: South Coast NSW Australia
Posts: 2,596
|
How many inches does the spreader have to move to take shackles off and release fully from spring?
|
|
|
|
|
12-16-2010, 02:43 AM
|
#17 |
|
Senior Member
Join Date: Aug 2010
Location: Lead. South Dakota
Posts: 963
|
Tom Endy
You have a good point about the center bolt. Working on springs is dangerous. pooch I think each nut was tightened about an inch or so. It did not seem like too much. It has been about six years since I have used it wrndin. You are correct but if you saw my car you would know another couple of paint flaws are not a big deal. I use POR-15 and can touch stuff up with a brush.
__________________
IF IT CAN NOT BE FIXED WITH BLASTING WIRE, JB WELD OR DUCT TAPE ---IT CAN NOT BE FIXED Do not get me started on the stupidity of ethanol. I think one of the monitors is from Iowa and he will delete the thread. Last edited by sturgis 39; 12-16-2010 at 02:59 AM. |
|
|
|
|
12-16-2010, 02:49 AM
|
#18 |
|
Senior Member
Join Date: May 2010
Location: Southern California
Posts: 3,131
|
The spring doesn't really spread that much after you install the spreader. It depends on the weight of the car and how many leaves are in the spring. If the car has the axle housings sitting on jack stands and the weight of the car is on the spring, the spreader moves only slightly to capture the tension of the spring and remove the tension on the shackle bolts so they can be easily tapped out with a punch.
Once the rear end has been removed the spreader can remain in place on the spring until you are ready to reinstall the rear end. If part of the work is to also restore the spring, you then collapse the spreader and remove it before you unbolt the two u-bolt assemblies. There are quite a few inches involved when this is done I am not sure how much that is, but it is a lot. The collapsed spring then almost has the shape of a horse shoe rather than a bow (as in bow and arrow). It is amazing how far that spring can be spread from its point of rest. It gives you some idea of how much tension is being packed into it when fully spread to reach the rear end shackle bosses. The spring spreaders on the market, as shown in my photo have the capability of handleling the full travel distance. Tom Endy |
|
|
|
|
12-16-2010, 02:57 AM
|
#19 |
|
Senior Member
Join Date: Sep 2010
Location: South Coast NSW Australia
Posts: 2,596
|
Maybe someone could post the distance of a spring out of car.
Then I could measure mine in car and add 2 inches. |
|
|
|
|
12-16-2010, 05:43 AM
|
#20 | |
|
Senior Member
Join Date: May 2010
Location: Mpls, MN
Posts: 27,582
|
Quote:
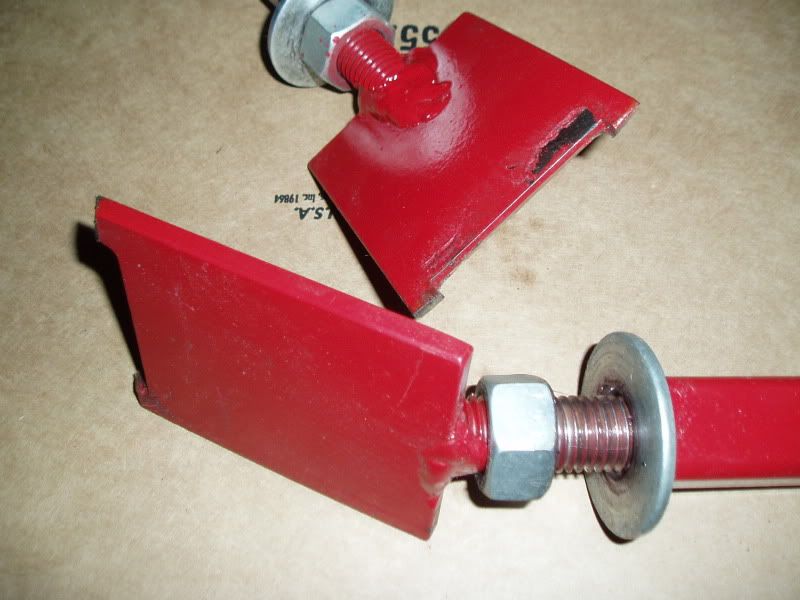 My spare rear spring is buried in my plastic garage that caved in from the snowstorm the other day, but here are some measurments of the spring spreader I made. Remember, it looks just like the one Tom Endy pictured, except I used 1" square tubing. The 1" square tubing is 30" long with a 12" brace welded across the middle. Each threaded rod is 12" long and cut at an angle for welding to the steel plates. The steel plates measure 3" wide and 3 3/4" long with about another 3/8" stub left at the corners to lock into the sides of the spring. Notice how I ground the ends of the plate and stubs at an angle to fit the spring. The 30" square tubing was heated red hot in the center and bent to a 30* angle. The 12" brace is cut at a steep angle on each end to fit against the 30" bent tubing. If I pull a string tight to the bottom of the ends of the bent 30" square tubing and measure up to the bottom of the 12" brace I get 2 3/8". The string measures 28" from one end to the other end of the bent tube. The 12" threaded rods are cut at an angle and the steel plates are welded to them at a 27* angle. Installed in the square tubing, with the nuts all the way collapsed the end to end measurement is 38". It took some time to measure and figure the angles to make sure the spring spreader would fit the installed spring, then collapse enough to be removed when off the car. Hope this is enough information so you can make one. If you need more information or pictures, just ask. |
|
|
|
|
|
12-16-2010, 12:57 PM
|
#21 | |
|
Senior Member
Join Date: Aug 2010
Location: Lead. South Dakota
Posts: 963
|
Quote:
pooch I measured the spring in post 10 and the distance c to c was 40" (spring eye to spring eye). This spring is from a 29 roadster pickup.
__________________
IF IT CAN NOT BE FIXED WITH BLASTING WIRE, JB WELD OR DUCT TAPE ---IT CAN NOT BE FIXED Do not get me started on the stupidity of ethanol. I think one of the monitors is from Iowa and he will delete the thread. |
|
|
|
|
|
12-16-2010, 01:43 PM
|
#22 |
|
Senior Member
Join Date: Sep 2010
Location: South Coast NSW Australia
Posts: 2,596
|
Sturgis, ..40 inches, when it becomes dawn, I will measure my in car spring and check against Tom's figures and save post in my Model A folder for if or when I need to remove spring.
thanks. |
|
|
|
| Sponsored Links (Register now to hide all advertisements) |
|
|
|
12-16-2010, 05:35 PM
|
#23 |
|
Senior Member
Join Date: May 2010
Location: Mpls, MN
Posts: 27,582
|
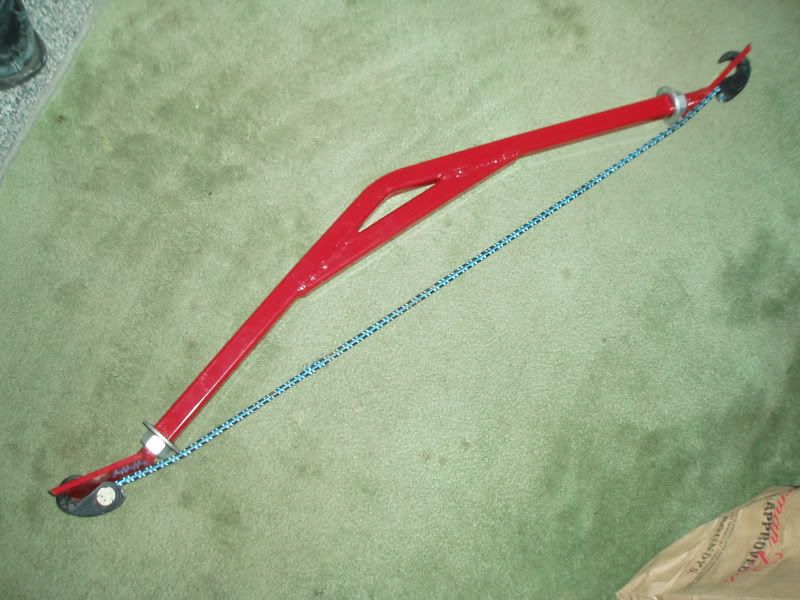 Here's a picture of the complete spring spreader I made. Sometime I plan to use a screen door spring inside the square tubing to hold the two threaded rods in place. In the meantime I'll just use a bungee cord. Last edited by Tom Wesenberg; 11-05-2011 at 01:00 AM. |
|
|
|
|
12-16-2010, 06:00 PM
|
#24 | ||
|
Member

Join Date: May 2010
Location: Plymouth NH
Posts: 70
|
Quote:
design tensile strength= 20.7 kips design shear strength= 11.0 kips (where kips is 1000 pounds) Quote:
What I did was not use a spreader at all. I took the pack apart. Installed just the mainleaf with the shackles, then installed all the component leaves with 2-6" C-clamps. |
||
|
|
|
|
12-16-2010, 06:14 PM
|
#25 |
|
Senior Member

Join Date: May 2010
Location: new britain,ct 06052
Posts: 9,390
|
ditto: but without c-clamps if my memory works. I must have been lucky back in the 60's. Always had either front or rear end out, 32 coupe, olds eng. Trying to make the "rake better.600/15-820/15, then a 3" block on top of rear spring. Then a few leaves out of front spring. Then the trend was to "gasser: look, add a block to front on top of spring, longer shackles (they didn't work). Never gave a thought to spring "exploding.
Paul in CT |
|
|
|
|
12-16-2010, 11:10 PM
|
#26 |
|
Senior Member
Join Date: Sep 2010
Location: South Coast NSW Australia
Posts: 2,596
|
Sponsored Links (Register now to hide all advertisements)
So, If I allowed for 1 inch out either side and 3 1/2 inches in each side to release, that would make 4 1/2 inches of thread each side. Does this sound right? (49 to 40 inches total). |
|
|
|
|
12-17-2010, 12:11 AM
|
#27 |
|
Senior Member
Join Date: May 2010
Location: Kansas City KS
Posts: 255
|
I have my coupe torn apart for restoration and am currently working on the rearend. I have 10 springs that in the relaxed position is 15 1/2 inches tall to the bottom of the stack, it is 40 inches from center of bolt hole to center of bolt hole.
|
|
|
|
|
12-17-2010, 03:21 PM
|
#28 | |
|
Senior Member
Join Date: May 2010
Location: Mpls, MN
Posts: 27,582
|
Quote:

|
|
|
|
|
|
12-17-2010, 03:28 PM
|
#29 |
|
Senior Member
Join Date: Sep 2010
Location: South Coast NSW Australia
Posts: 2,596
|
OK, 49 to 38 it is.
|
|
|
|
|
12-18-2010, 01:44 PM
|
#30 |
|
Member

Join Date: Jul 2010
Location: New Zealand
Posts: 66
|
I followed the instructions as per: http://www.icehouse.net/overland/springspreader.html and it worked perfectly, plenty of grease to lubricate the moving sections.
|
|
|
|
|
02-05-2011, 02:35 PM
|
#31 |
|
Senior Member
Join Date: Aug 2010
Location: Lead. South Dakota
Posts: 963
|
btt
__________________
IF IT CAN NOT BE FIXED WITH BLASTING WIRE, JB WELD OR DUCT TAPE ---IT CAN NOT BE FIXED Do not get me started on the stupidity of ethanol. I think one of the monitors is from Iowa and he will delete the thread. |
|
|
|
|
02-06-2011, 02:24 AM
|
#32 |
|
Senior Member
Join Date: Aug 2010
Location: Lead. South Dakota
Posts: 963
|
btt
__________________
IF IT CAN NOT BE FIXED WITH BLASTING WIRE, JB WELD OR DUCT TAPE ---IT CAN NOT BE FIXED Do not get me started on the stupidity of ethanol. I think one of the monitors is from Iowa and he will delete the thread. |
|
|
|
|
02-14-2011, 12:13 PM
|
#33 | |
|
Senior Member
Join Date: Oct 2010
Location: gordonville mo
Posts: 519
|
Quote:
|
|
|
|
|
|
02-14-2011, 12:55 PM
|
#34 |
|
Senior Member
Join Date: May 2010
Location: Wisconsin
Posts: 186
|
The Restorer club magazine Vol 23-4 Nov. Dec. 1978 has an excellent article on how to build a rear spring spreader. I built one and it is a real good one. Email me and I can send pictures and the plans. [email protected] Dick Hansen
|
|
|
|
|
02-14-2011, 08:06 PM
|
#35 |
|
Senior Member
Join Date: May 2010
Location: Penticton British Columbia Canada
Posts: 244
|
Just measured a spare 8 leaf rear spring.It is 41 1/4" center to center Hope this helps
|
|
|
|
|
02-14-2011, 09:35 PM
|
#36 |
|
Senior Member

Join Date: May 2010
Posts: 619
|
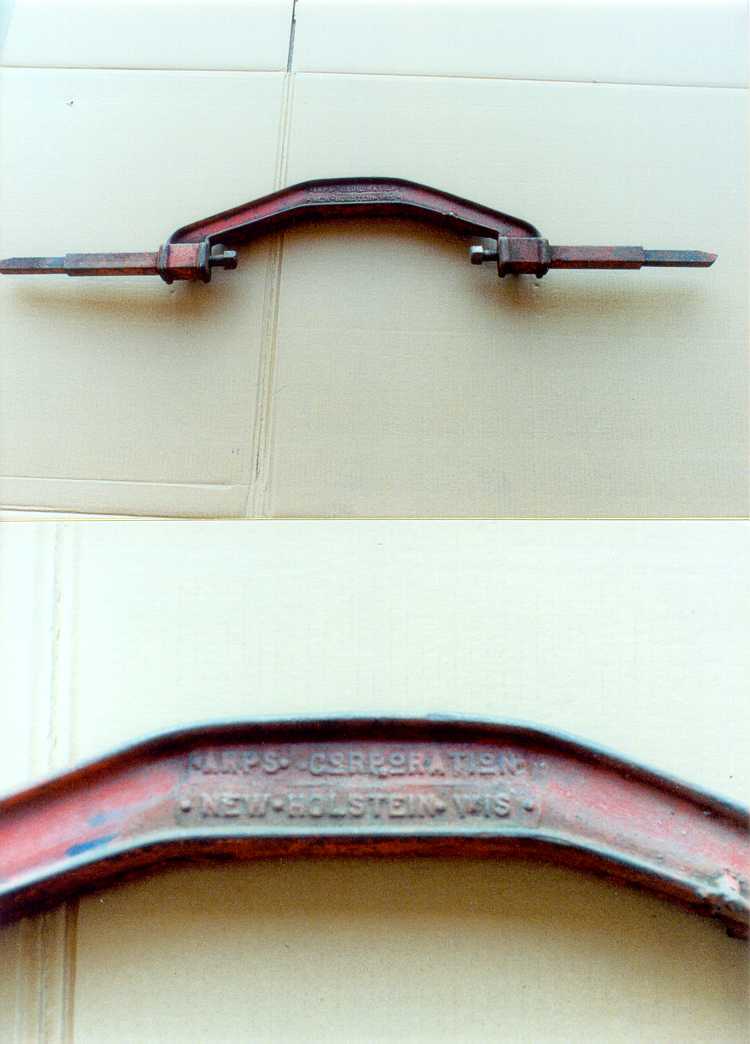
Wonder how many aftermarket spreaders were available. Mine was made by ARPS Corporation of Snowbird fame. I have seen another like it.
|
|
|
|
|
04-07-2011, 01:55 AM
|
#37 |
|
Senior Member
Join Date: Aug 2010
Location: Lead. South Dakota
Posts: 963
|
btt
__________________
IF IT CAN NOT BE FIXED WITH BLASTING WIRE, JB WELD OR DUCT TAPE ---IT CAN NOT BE FIXED Do not get me started on the stupidity of ethanol. I think one of the monitors is from Iowa and he will delete the thread. |
|
|
|
|
04-07-2011, 07:45 AM
|
#38 | |
|
Senior Member

Join Date: May 2010
Location: Bucks Co, Pa
Posts: 3,740
|
Quote:
Terry |
|
|
|
|
|
04-07-2011, 08:11 AM
|
#39 |
|
Senior Member
Join Date: Aug 2010
Location: Lead. South Dakota
Posts: 963
|
btt
__________________
IF IT CAN NOT BE FIXED WITH BLASTING WIRE, JB WELD OR DUCT TAPE ---IT CAN NOT BE FIXED Do not get me started on the stupidity of ethanol. I think one of the monitors is from Iowa and he will delete the thread. |
|
|
|
|
06-24-2011, 09:51 PM
|
#40 |
|
Senior Member
Join Date: Aug 2010
Location: Lead. South Dakota
Posts: 963
|
byy for a v/8 guy
__________________
IF IT CAN NOT BE FIXED WITH BLASTING WIRE, JB WELD OR DUCT TAPE ---IT CAN NOT BE FIXED Do not get me started on the stupidity of ethanol. I think one of the monitors is from Iowa and he will delete the thread. |
|
|
|
|
06-25-2011, 03:44 PM
|
#41 |
|
Senior Member
Join Date: May 2010
Location: Bucks Co, Pa
Posts: 3,740
|
I pooh poohed the danger involved until Itook the last sheackle out and It was Ppttwwanggggg! The spreader wound out in my wife's forsythia bush at least ten feet away. I Hhmmmed quite a few times wondering just what it would have done to my leg if it had contacted my shins. My spreader was made from 3/4" sched 40 water pipe. I had welded a long 3/4 - 10 bolt inside. It was bent approximately 20deg from straight. Try that with a hammer and see what kind of force it takes.
From this, I have concluded; All nuts and bolts should be grade 8. Part of the problem was no square faces on the contact points. Face them off in a lathe. Keep bolts dead center during welding. Shim them if you have to. Keep your forces in line. Mine were not. Loosen the center bolt as much as you dare. Replace it with an even longer one, Grade 8. This lessens the spring pressure a small amount, but the percentages are in your favor. Chain it down! I welded eyes for chain to mine to keep it from going so far. I will chain it down to keep it captive. Put a piece of plywood between you and it as a sheild. These things are powerful. Don't underestimate them. Terry |
|
|
|
|
06-25-2011, 05:47 PM
|
#42 |
|
Senior Member

Join Date: May 2010
Location: ca.
Posts: 2,522
|
ive changed several . they ARE dangerous . good spreader , help if ya got it & take your time .....................
__________________
V4f |
|
|
|
| Sponsored Links (Register now to hide all advertisements) |
|
|
|
06-25-2011, 08:03 PM
|
#43 | |
|
Senior Member

Join Date: May 2010
Location: Reseda, Calif.
Posts: 2,188
|
Quote:
Last edited by zzlegend; 06-25-2011 at 08:07 PM. Reason: picture |
|
|
|
|
|
06-26-2011, 12:50 PM
|
#44 |
|
Senior Member
Join Date: May 2010
Location: Southern California
Posts: 7,033
|
Join a local Model A club and convince them that the club should buy a quality spring spreader to have available to loan to members (or maybe rent to members to help recover the costs). If they buy the spreader start on a portable engine hoist and rear hub puller. All of these are expensive tools that are needed once every several years by the average Model A owner.
Charlie Stephens |
|
|
|
|
11-04-2011, 08:22 PM
|
#45 |
|
Senior Member
Join Date: Aug 2010
Location: Lead. South Dakota
Posts: 963
|
btt
__________________
IF IT CAN NOT BE FIXED WITH BLASTING WIRE, JB WELD OR DUCT TAPE ---IT CAN NOT BE FIXED Do not get me started on the stupidity of ethanol. I think one of the monitors is from Iowa and he will delete the thread. |
|
|
|
|
11-05-2011, 07:36 AM
|
#46 |
|
Senior Member
Join Date: Aug 2010
Location: Lead. South Dakota
Posts: 963
|
Sponsored Links (Register now to hide all advertisements)
__________________
IF IT CAN NOT BE FIXED WITH BLASTING WIRE, JB WELD OR DUCT TAPE ---IT CAN NOT BE FIXED Do not get me started on the stupidity of ethanol. I think one of the monitors is from Iowa and he will delete the thread. |
|
|
|
|
11-05-2011, 12:09 PM
|
#47 |
|
Senior Member

Join Date: Aug 2010
Location: Grass Valley,CA
Posts: 295
|
I have a very heavy Rear Spreader that was given to me years ago by a fella that worked on Lincoln Continenals (Pre WWII) It has a #307 and Nat'l Jack on the main casting. The newer lighter ones may be easier to handle. I strongly urge everyone to CHAIN WRAP the rear springs as a safety measure.
Bruce Davis [email protected] |
|
|
|
|
11-06-2011, 02:28 AM
|
#48 |
|
Senior Member
Join Date: Aug 2010
Location: Lead. South Dakota
Posts: 963
|
btt
__________________
IF IT CAN NOT BE FIXED WITH BLASTING WIRE, JB WELD OR DUCT TAPE ---IT CAN NOT BE FIXED Do not get me started on the stupidity of ethanol. I think one of the monitors is from Iowa and he will delete the thread. |
|
|
|
|
02-26-2012, 08:54 PM
|
#49 |
|
Senior Member
Join Date: Aug 2010
Location: Lead. South Dakota
Posts: 963
|
btt
__________________
IF IT CAN NOT BE FIXED WITH BLASTING WIRE, JB WELD OR DUCT TAPE ---IT CAN NOT BE FIXED Do not get me started on the stupidity of ethanol. I think one of the monitors is from Iowa and he will delete the thread. |
|
|
|
|
02-05-2013, 06:48 PM
|
#50 |
|
Senior Member

Join Date: Dec 2012
Location: Enterprise, WV.
Posts: 460
|
I just made one today , the only difference is I used 5" channel insted of the 3" , just because thats what I had. I just used it, worked great, I also didn't use the thrust bearings, instead of grease, I used anti- seize, It turned very easy.
|
|
|
|
|
02-05-2013, 10:01 PM
|
#51 | |
|
Member

Join Date: Jan 2013
Location: Wilmington, NC
Posts: 60
|
Quote:
Last edited by Donvito; 02-05-2013 at 10:12 PM. |
|
|
|
|
|
02-05-2013, 10:10 PM
|
#52 |
|
Senior Member

Join Date: Mar 2012
Location: Southern Nevada
Posts: 149
|
"plenty of grease to lubricate the moving sections"
Can you be specific about where you are applying the grease? Thanks |
|
|
|
|
02-05-2013, 10:14 PM
|
#53 | |
|
Senior Member

Join Date: Jul 2010
Location: Cow Hampshire
Posts: 4,188
|
Quote:
The risk here may be one of sideways thrust pulling the replacement bolt physically out of the threaded hole due to incomplete thread engagement. Maybe better to catch a couple or three bolts in a sector piece made to act as "foot" to your push-rod? That way if one fails (or starts) the others catch it? FWIW. Your projectile may vary in its target. Joe K
__________________
Shudda kept the horse. |
|
|
|
|
|
02-05-2013, 11:06 PM
|
#54 | |
|
Member
Join Date: Jan 2013
Location: Wilmington, NC
Posts: 60
|
Quote:
|
|
|
|
|
|
02-05-2013, 11:33 PM
|
#55 |
|
Senior Member
Join Date: Jul 2010
Location: Cow Hampshire
Posts: 4,188
|
Yeah. I learned about the banjo bolts "the good old fashioned way." And from picking up spots of 300W from my garage floor. Ford made these bolts oversized/overtight to prevent the leak: I still used pipe joint compound when I installed new bona-fide banjo bolts.
OBTW, the two times I have taken down my Model A rear spring I did it by the "weight in the pickup bed" and wood block method. This works but even so one is safest standing in the pickup bed when the hoist is raising the frame/spring clear of the blocks - and one of the blocks suddenly does a pa-twing richochet on the garage floor. Lotta power there. Joe K
__________________
Shudda kept the horse. Last edited by Joe K; 02-05-2013 at 11:42 PM. |
|
|
|
|
02-06-2013, 02:25 AM
|
#56 | |
|
Senior Member

Join Date: May 2010
Location: Between Seattle & Tacoma
Posts: 2,354
|
Quote:
|
|
|
|
|
|
02-06-2013, 02:34 AM
|
#57 |
|
Senior Member
Join Date: Jul 2010
Location: Cow Hampshire
Posts: 4,188
|
Means "bump to the top" meaning the originator (or anyone else) is desiring of more input and wants to keep the thread where it can be generally seen.
I like btt perhaps three times. If in three tries, more information is not forthcoming, it is probably best to look elsewhere for a response as those who are reading probably don't know. Joe K
__________________
Shudda kept the horse. |
|
|
|
|
02-06-2013, 08:16 AM
|
#58 |
|
Senior Member
Join Date: May 2010
Location: Liberty, MO
Posts: 201
|
check out the restorer arcives a few years back they had plans for one I made one very nice design and hevy duty works well have a blessed day
|
|
|
|
|
02-06-2013, 09:54 AM
|
#59 |
|
Senior Member

Join Date: May 2010
Location: Michigan
Posts: 581
|
|
|
|
|
|
02-06-2013, 12:32 PM
|
#60 |
|
Senior Member

Join Date: May 2010
Location: NC
Posts: 908
|
"How To Restore Your Model A" Volume 3 by MAFCA page 110-111. Complete instructions with blueprint for a heavy duty and safe rear spring spreader.
|
|
|
|
|
02-06-2013, 03:36 PM
|
#61 |
|
Senior Member
Join Date: Jan 2012
Location: Eastern Canada NB
Posts: 166
|
I just built one...will put up some pics
|
|
|
|
|
02-16-2013, 08:48 AM
|
#62 |
|
Junior Member
Join Date: Jan 2013
Posts: 7
|
I agree with Tom 100%
Its just not worth the material and time to do your own I am nearly complete in restoring my Father in Laws 1930 pickup We could not proceed without that rear spreader. My Father inlaw is a make it yourself kind of guys Thats great and he does a great job 1 inch away from the shackles and the home made spreader bent Nothing happened but it was a message Snyders has the Heavy Duty spreaders cheap. Shipping is lightening fast 2 days after we used the spreader we have 2 guys waiting to buy it from us Just a thought My website for those interested in some pics of our bent spreader and the new one http://teddyk1.wix.com/verlans-model-a |
|
|
|
| Sponsored Links (Register now to hide all advertisements) |
|
|
|
01-18-2015, 08:51 PM
|
#63 | |
|
Senior Member

Join Date: Jan 2015
Location: Birkdale, Qld,Aust
Posts: 170
|
Quote:
About to use this as a guide to make one. Anything you would change Tom seeing as this was 4 years ago and you have no doubt used it a few times. Thanks, John. |
|
|
|
|
|
01-18-2015, 10:00 PM
|
#64 |
|
Senior Member
Join Date: May 2010
Location: Mpls, MN
Posts: 27,582
|
It's worked fine for me. As I recall, I used 3/4" threaded rod and 1" square tubing. You might like to use 1" threaded rod and 1 1/4" square tubing, as the added strength would be more safety margin.
|
|
|
|
|
01-18-2015, 10:20 PM
|
#65 | |
|
Senior Member
Join Date: Jan 2015
Location: Birkdale, Qld,Aust
Posts: 170
|
Quote:
Your still alive so the 3/4 must be adequate.
|
|
|
|
|
|
01-18-2015, 10:25 PM
|
#66 |
|
Senior Member
Join Date: May 2010
Location: Mpls, MN
Posts: 27,582
|
Sponsored Links (Register now to hide all advertisements)
|
|
|
|
|
01-18-2015, 11:29 PM
|
#67 |
|
Senior Member
Join Date: Jan 2015
Location: Birkdale, Qld,Aust
Posts: 170
|
Point taken. Il'l see what I have here. Will go 1" if I have some. Thanks for the input. John.
|
|
|
|
|
01-19-2015, 12:00 AM
|
#68 |
|
Senior Member

Join Date: May 2010
Location: Wa.
Posts: 5,409
|
Seems no one has ever heard of Porta-power's.
They can be had on Ebay for around $40. 15 minutes to build an adapter for spreading springs and you probably have the safest way to spread a Ford spring. No wrenching or twisting of the spreader while under tension. Just pump the handle. The adapter is 3/8 steel with bungs welded on each end to take the Porta-power extensions. It is asymmetrical because the jack goes on one end. |
|
|
|
|
01-19-2015, 09:53 AM
|
#69 |
|
Senior Member

Join Date: Mar 2014
Location: Cleveland, Ohio
Posts: 2,763
|
This and the other threads on the importants of using spring spreaders is much appreated by this newbie. When the day comes, I shall sure obtain a good quality one.
__________________
-Mike Late 31' Ford Model A Tudor, Miss Daisy I don't work on cars --I'm learning about my Model A. Cleveland, Ohio |
|
|
|
|
01-19-2015, 10:03 AM
|
#70 |
|
Senior Member

Join Date: Oct 2014
Location: Charlotte, NC
Posts: 310
|
PA Joe
Do you have a local club. Most clubs have a tool crib and the spring spreader is usually one of the tools they have. We have an array of tools in our crib (Queen City Model A Club - Charlotte, NC) |
|
|
|
|
01-19-2015, 10:06 AM
|
#71 |
|
Senior Member
Join Date: Oct 2014
Location: Charlotte, NC
Posts: 310
|
I agree, I have always wrapped a chain around even a good spring spreader. Most dangerous procedure on a Model A. Even guys who pull the complete assembly out with the spring attached should put clamps around the spring. If that center spring bolt broke it would send the spring parts flying. I have the utmost respect for the Model A rear spring.
|
|
|
|
|
01-19-2015, 10:36 AM
|
#72 |
|
Senior Member

Join Date: Jun 2012
Location: Waukee, Iowa
Posts: 107
|
We made ours using the plans in the "How to restore your model A" Volume 3 (which came from "The Restorer"). It was written by Beau Lowerr from the Wisconsin Chapter of MAFCA. If you don't want to buy the manual, maybe a web search for Beau or the WI chapter will find it.
|
|
|
|
|
01-19-2015, 06:43 PM
|
#73 |
|
Senior Member
Join Date: May 2010
Location: Trumbull, CT
Posts: 134
|
Buy the good one from brattons. Dont take a chance with your life. latecomer
|
|
|
|
|
07-06-2017, 05:54 AM
|
#74 | |
|
Senior Member
Join Date: May 2010
Posts: 107
|
Quote:
|
|
|
|
|
|
08-06-2017, 09:46 PM
|
#75 |
|
BANNED
Join Date: Apr 2017
Location: Sacramento
Posts: 1,262
|
 Schedule 80 tubing,1 inch all thread grade 8,3/8ths 'knives'...works like a champ.on the tubing weld I triple stitched 1/8th 7018 on the tension side,single stitched the compression.full single stitch burn on knive to all thread joints. |
|
|
|
|
08-07-2017, 06:46 AM
|
#76 |
|
Senior Member
Join Date: May 2010
Location: Bucks Co, Pa
Posts: 3,740
|
It look dicey! But it's probably OK. It looks as though it has "Floppy rods". I used 1" pipe liners to take up the space. Your spring looks as though it has seven leaves. My T.S.had ten.
Good job! Terry |
|
|
|
|
08-07-2017, 07:58 AM
|
#77 |
|
BANNED
Join Date: Apr 2017
Location: Sacramento
Posts: 1,262
|
Yep,might spend a little more time on it with guide collars so the screws are aligned in the tubing..No flexing whatsoever,Id give it a try with a ten leave pack.
|
|
|
|
|
08-07-2017, 11:28 AM
|
#78 | |
|
Senior Member

Join Date: May 2010
Location: Northern New Jersey
Posts: 1,262
|
Quote:
bad link............ |
|
|
|
|
|
08-07-2017, 11:30 AM
|
#79 | |
|
Senior Member
Join Date: May 2010
Location: Northern New Jersey
Posts: 1,262
|
Quote:
|
|
|
|
|
|
08-07-2017, 11:40 AM
|
#80 | |
|
Senior Member
Join Date: May 2010
Location: Northern New Jersey
Posts: 1,262
|
Quote:
I made one from the blueprint and have used it many times for over 29 years. I would not use anything less than this heavy duty spreader. |
|
|
|
|
|
08-07-2017, 04:02 PM
|
#81 |
|
Senior Member

Join Date: May 2010
Location: Camarillo, CA and Pine Grove, CA
Posts: 2,832
|
I have the original WR Wilson Ford tool. Other members of my chapter of the club have aftermarket spreaders.Check with your local club and I'm sure you may fins someone who has one.
In the past I have used a bottle jack with a length of heavy chain and a chunk of 2X4 to spread the spring. Place the 2X4 on top of the axle housing with the spring end on top of it. Wrap the chain around each side of the rear cross member leaving enough excess hanging below the rear end to slip in a bottle jack. Jacking up the jack will pull the chain down and raise the rear end. This spreads the spring.
__________________
1921 Runabout 1930 Tudor Early 1930 AA Speed costs money. How fast do you want to go?
|
|
|
|
|
«
Previous Thread
|
Next Thread
»
 Linear Mode

|
|

| Sponsored Links (Register now to hide all advertisements) |
|
|
All times are GMT -5. The time now is 09:18 PM.