|
|||||||


| Sponsored Links (Register now to hide all advertisements) |
|
|
 |

|
Thread Tools | Display Modes |
 01-25-2012, 09:07 PM
|
#1 |
|
Senior Member

Join Date: Feb 2011
Location: Lincoln, Nebraska
Posts: 1,909
|
Posted these pictures of the floor boards I made for my 1929 AA truck on the AA truck site and thought folks here might like a look. The thread about them on the AA site has quite a bit of good information that people shared. http://forums.aa-fords.com/viewtopic.php?f=1&t=3188
Dave 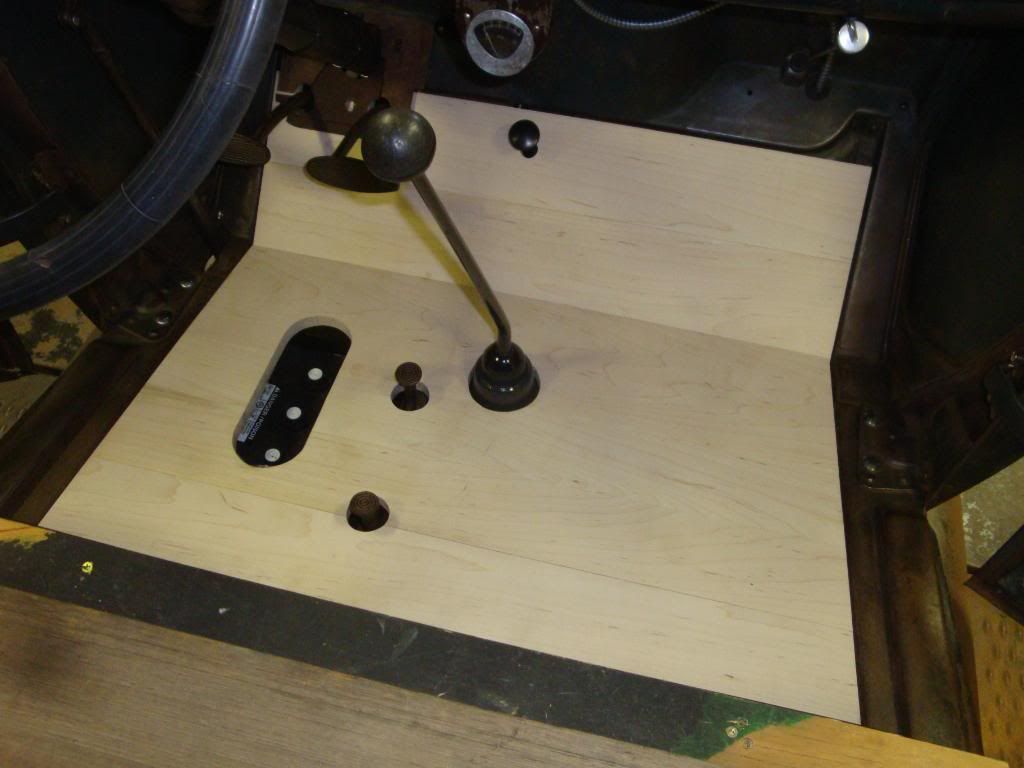 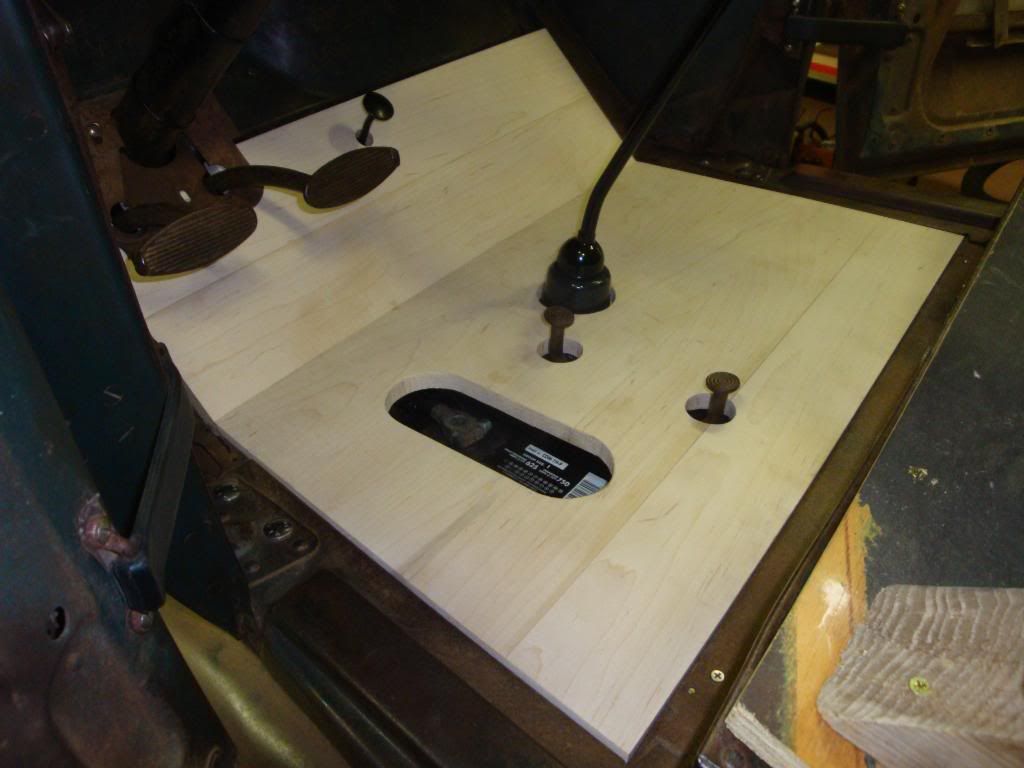 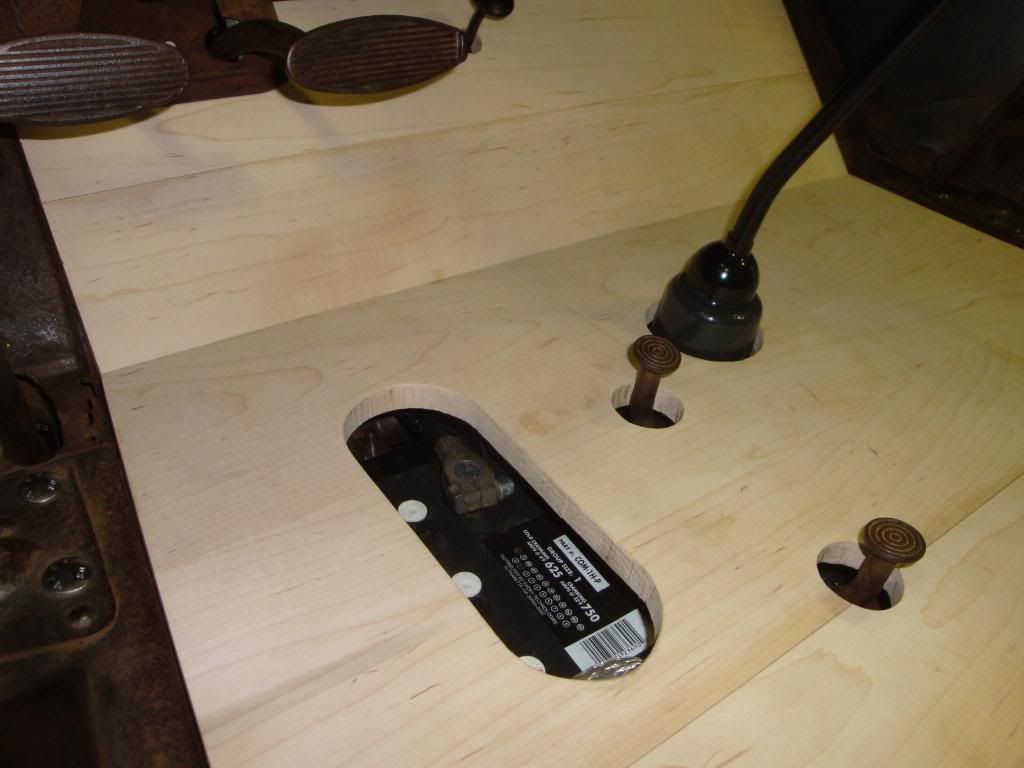 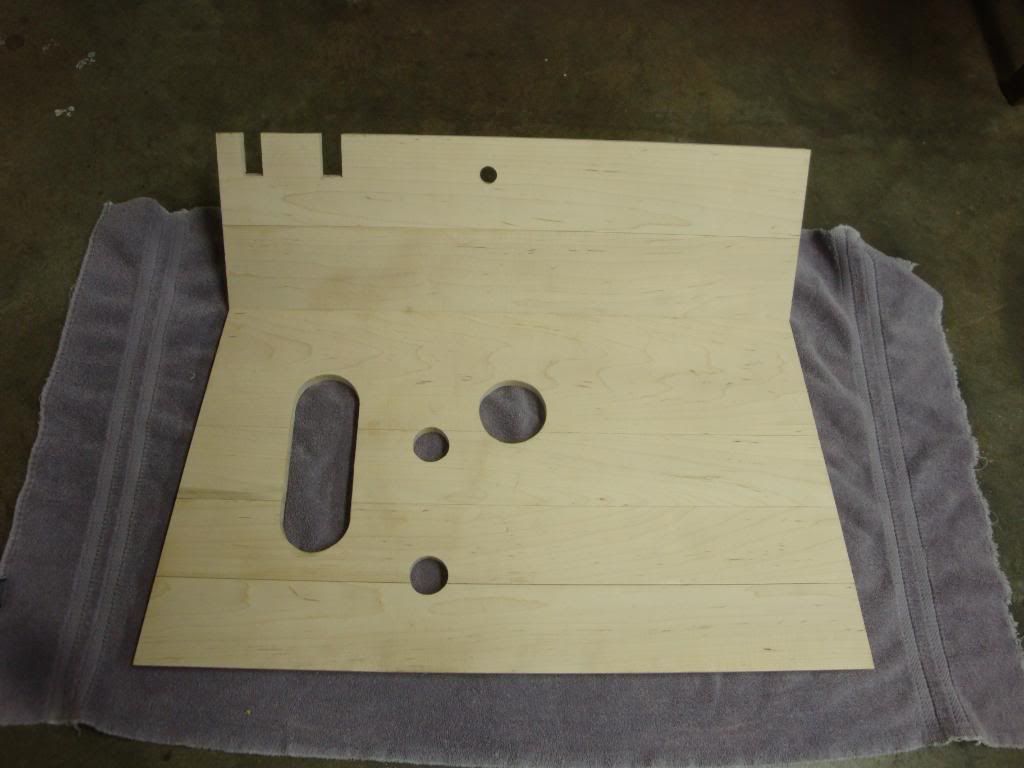 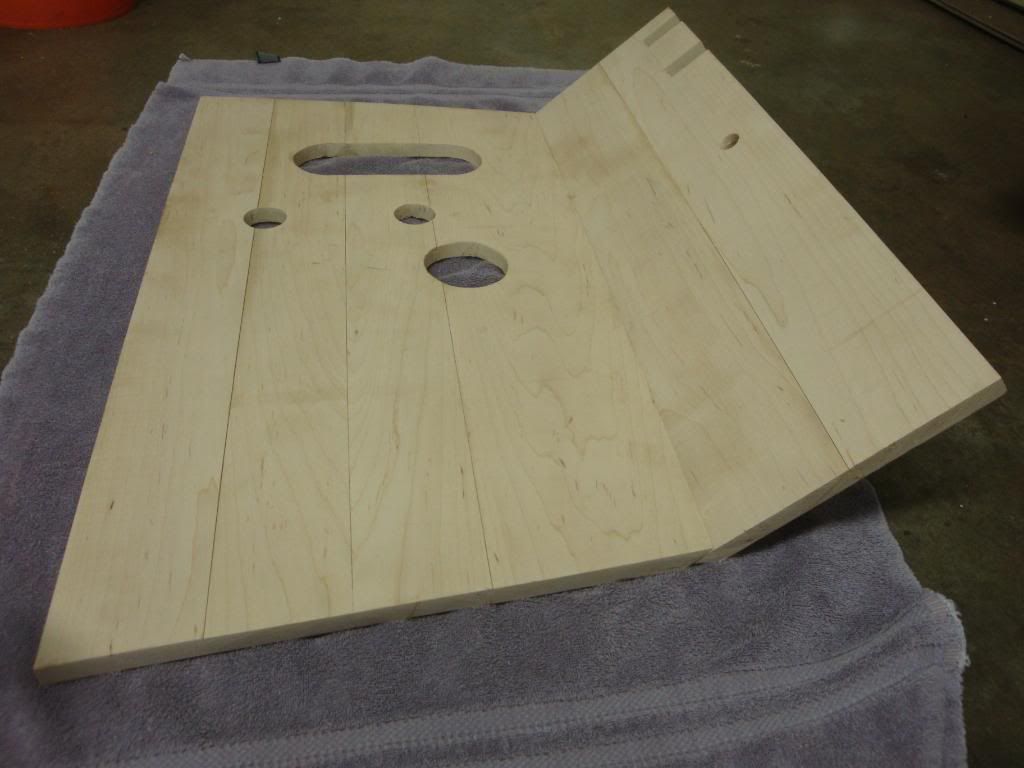 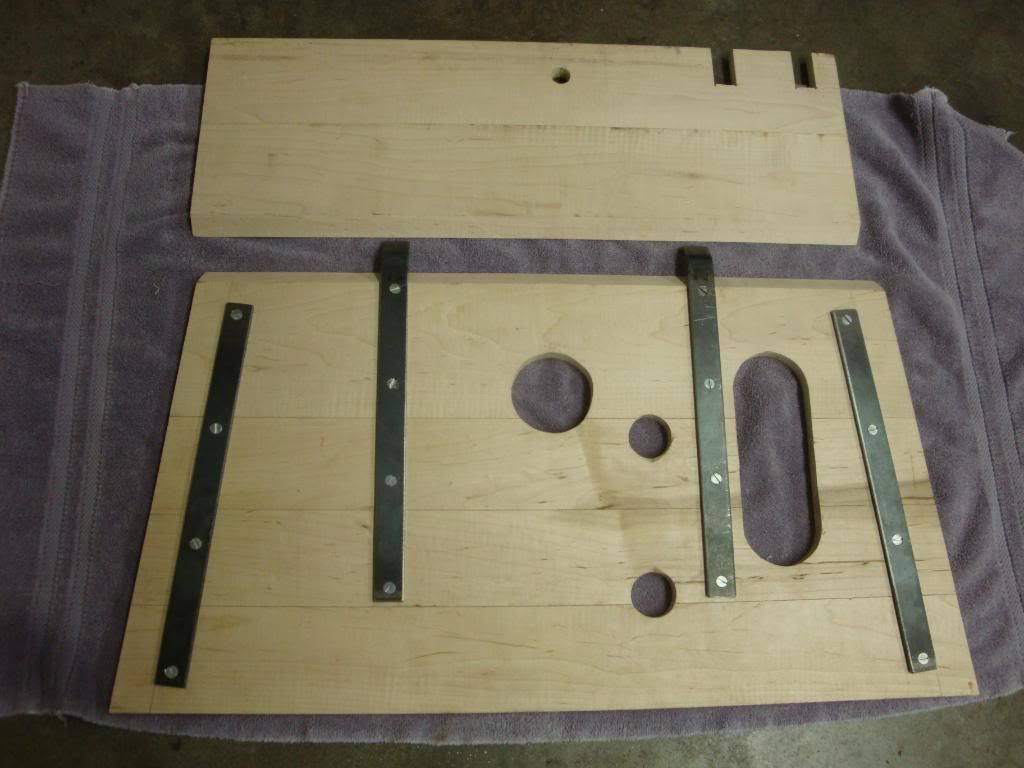 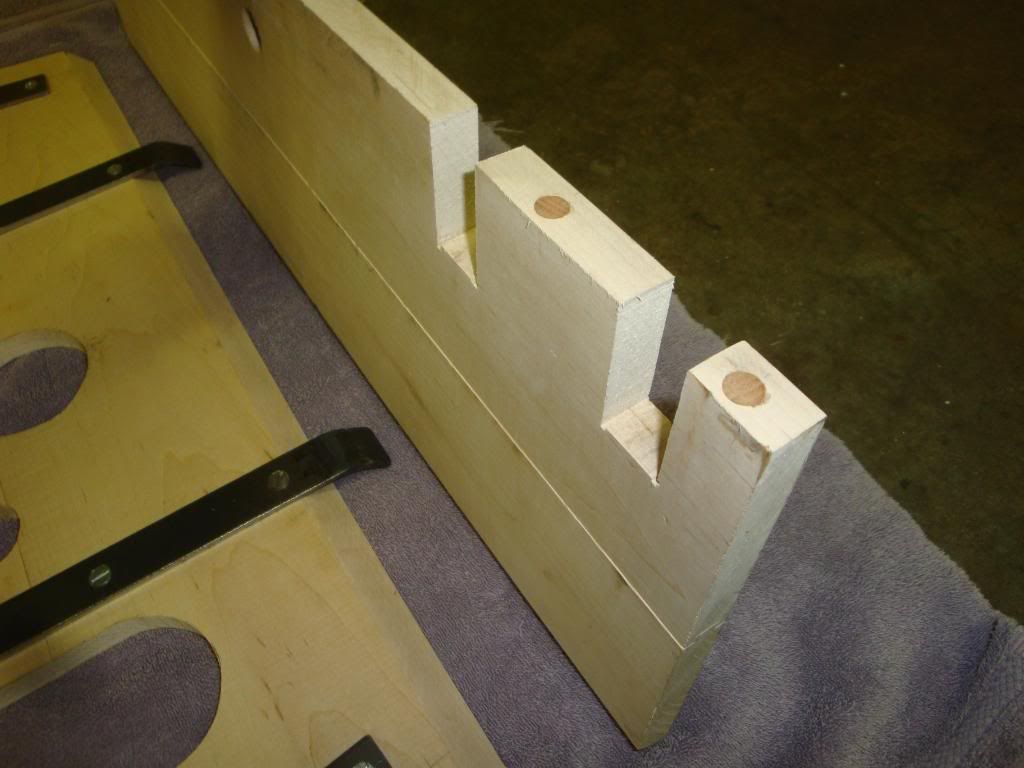 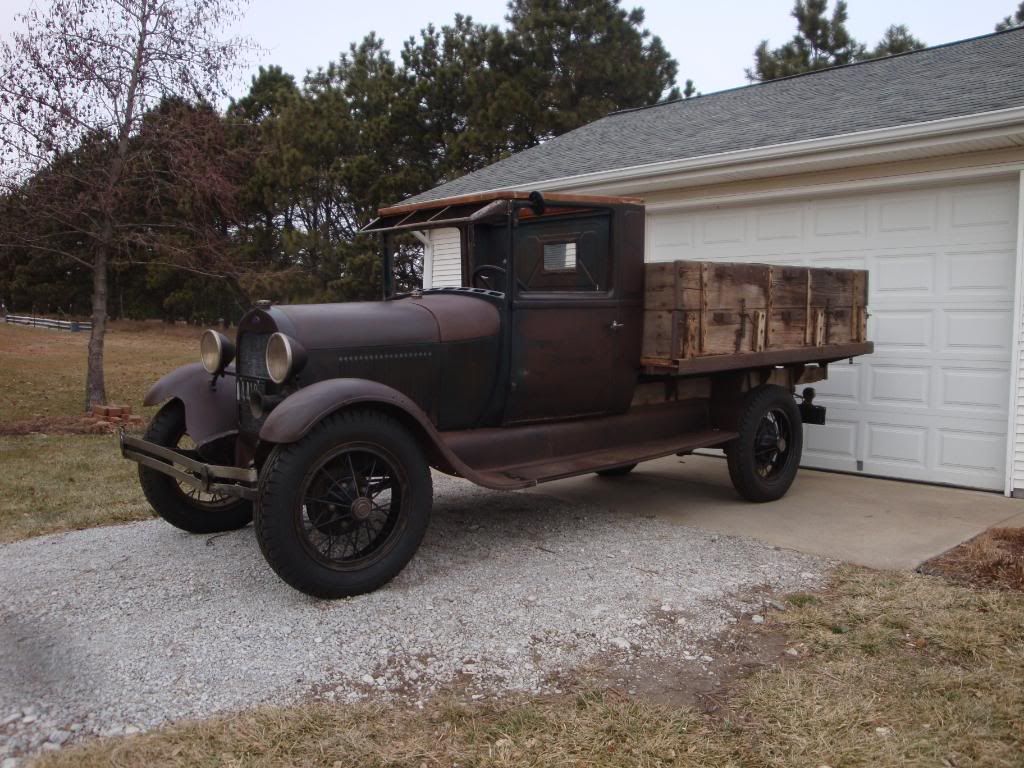 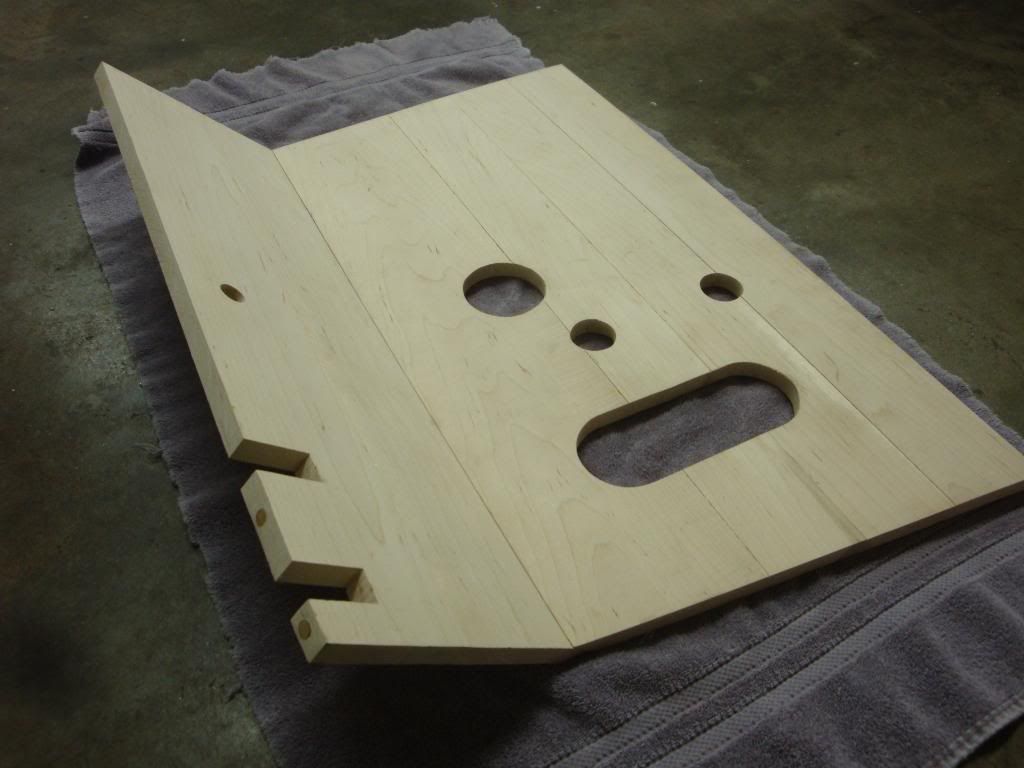
|

|

|
|
01-25-2012, 09:17 PM
|
#2 |
|
Junior Member

Join Date: May 2010
Posts: 25
|
NICE JOB..........looks great
|
|
|
|
| Sponsored Links (Register now to hide all advertisements) |
|
|
|
01-25-2012, 09:19 PM
|
#3 |
|
Senior Member
Join Date: May 2010
Location: Tulsa Oklahoma
Posts: 298
|
Wow You did a great looking job. Well done. Love the AA .
|
|
|
|
|
01-25-2012, 09:38 PM
|
#4 |
|
Senior Member
Join Date: May 2010
Location: Lakeville, MN
Posts: 5,162
|
I am building a couple sets of planked floorboards for my 28 special coupe and early 29 phaeton. I have an original set to use for patterns as you probably did also. You did a very nice job making them, you should be proud. I know how hard it is to make them. Since the floorboard are 11/16" thick, that is a problem for me since I don't have a planner, just a joiner and that doesn't work well planning wide hardwood boards. Did you try to make the narrow dovetail joints in the floorboard planks to fit them together like Ford did?
Rusty Nelson |
|
|
|
|
01-25-2012, 09:53 PM
|
#5 |
|
Senior Member
Join Date: Feb 2011
Location: Lincoln, Nebraska
Posts: 1,909
|
I did use the sliding dovetail joint. It does takes a bit of tinkering to get it right. I have a planner so I was able to make my boards the correct thickness. Probably the biggest challenge was making the templates to use for marking out the cut outs etc...
Dave 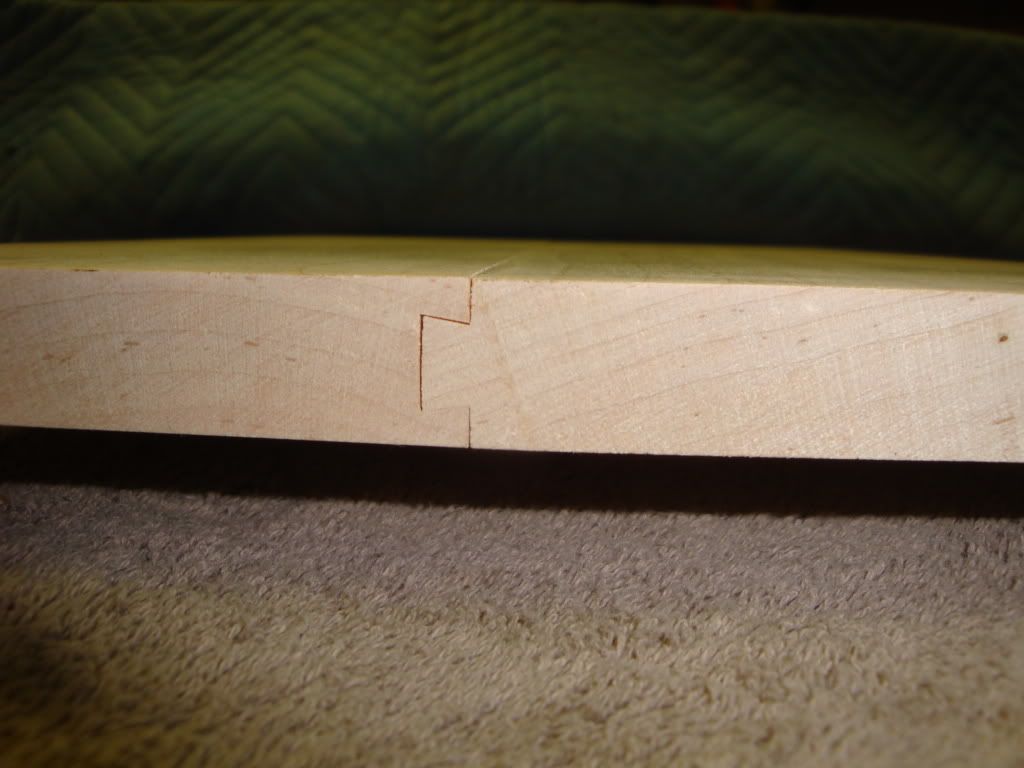
|
|
|
|
|
01-25-2012, 10:05 PM
|
#6 |
|
Senior Member

Join Date: May 2010
Location: Suttons Bay, Mich.
Posts: 3,384
|
Sponsored Links (Register now to hide all advertisements)
__________________
Respecting and Resurrecting Ford Model A's. |
|
|
|
|
01-25-2012, 10:25 PM
|
#7 | |
|
Senior Member
Join Date: Feb 2011
Location: Lincoln, Nebraska
Posts: 1,909
|
Quote:
|
|
|
|
|

|
01-25-2012, 10:33 PM
|
#8 |
|
Senior Member
Join Date: May 2010
Location: Suttons Bay, Mich.
Posts: 3,384
|
He painted em black I think..... I know, shame to cover them up.
__________________
Respecting and Resurrecting Ford Model A's. |
|
|
|
|
01-25-2012, 11:45 PM
|
#9 |
|
Senior Member

Join Date: May 2010
Location: Didsbury Alberta
Posts: 838
|
I would use transparent penetrating stain tinted black. Very close to original
|
|
|
|
|
01-26-2012, 01:14 AM
|
#10 |
|
Senior Member

Join Date: May 2010
Location: Mpls, MN
Posts: 27,582
|
Nice looking floorboards. I'm also making my own dovetailed boards for my 28 and early 29. I have some originals to copy and after much looking I finally found the correct dovetail router bit at Tried and True tools across the river from me. I bought Maple boards at Menards and they are the correct 11/16 thickness. I should have bought enough boards to do all the floorboards 8 years ago when I started the project. The Maple boards have increased quite a bit in price lately.
BTW, the original floorboards have boards that vary not only in width, but one end of the board can vary in width from the other end of the same board. Then to make up for this the board next to it will vary on the opposite ends, placing the wide end next to the narrow end of the previous board. My original boards have the original finish and it sure looks like black paint to me, and even has some runs. Last edited by Tom Wesenberg; 01-26-2012 at 09:21 AM. |
|
|
|
|
01-26-2012, 08:05 AM
|
#11 |
|
Senior Member

Join Date: May 2010
Location: Naperville, IL
Posts: 1,387
|
I have found that Ditzler's DP-90 epoxy primer gives a very nice satin finish that appears to match whatever preservative, paint, or stain that was used originally. Gar Williams
|
|
|
|
|
01-26-2012, 10:06 AM
|
#12 |
|
Senior Member

Join Date: Jul 2011
Location: shelby, nc
Posts: 201
|
Thanks for sharing - I would say an exceptional example of craftsmanship - Lucky truck
|
|
|
|
|
01-26-2012, 10:45 AM
|
#13 |
|
Senior Member
Join Date: May 2010
Posts: 451
|
Very skillful job on the boards... looks like fine cabinetry work. And your truck is a example of the fine materials used in its construction. I sincerely hope you will keep the finish as is. You should be as proud of owning this truck as the truck looks honest in its appearance. This is restoration at its finest. Preservation without destroying history.
|
|
|
|
|
01-26-2012, 09:28 PM
|
#14 |
|
Senior Member
Join Date: Feb 2011
Location: Lincoln, Nebraska
Posts: 1,909
|
Thanks everyone for your comments and advice. I plan on keeping the truck original and in his work clothes. I'm pretty new to the model a hobby but it doesn't seem that there are too many around with this kind of vintage patina. I'm making everything mechanically sound so it is a good / safe driver. The engine has been rebuilt and I'll be replacing the roof, interior, re-silver the headlight reflectors and replace all of the glass. On the box I plan on treating the wood with a 50/50 mix of turpintine and lindseed oil.
Dave 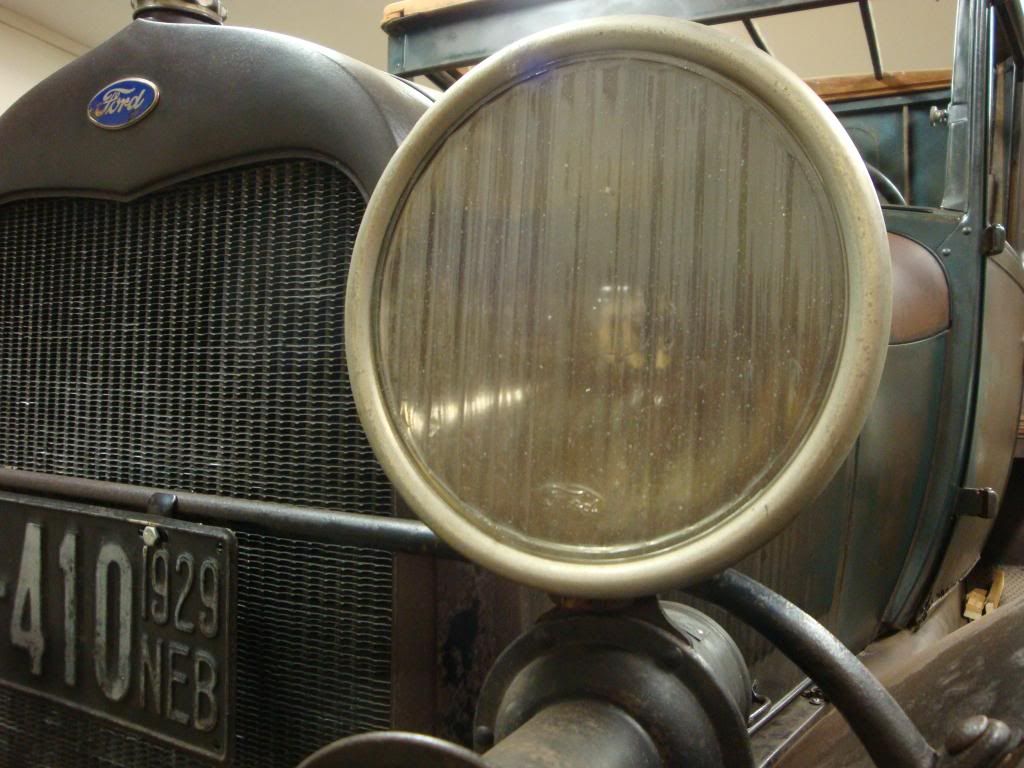
|
|
|
|
|
01-28-2012, 12:05 PM
|
#15 |
|
Senior Member

Join Date: May 2010
Location: Richmond, VA
Posts: 882
|
There is a small passage sitting quietly in Area 11: CARPETS and MATS of the Early 1928 VEHICLES {Jan-Jun 28} section of EARLY 1928 VEHICLES ( A-1 Revised 1997) Supplement to the Model A Ford Judging Standards & Restoration Guidelines tab which reads:
There was a round rubber gasket with metal trim secured to the floor boards around the gear shift tower. The carpet also had a metal trim piece around the gear shift until Feb-March, 1928. ... unclear if the dating pertains solely to the carpet ring.  I have never seen one specifically for the boards themselves. Is this perhaps the flat ring some vendors offer (however, never in stock)? Can someone kindly post a photo (original preferred)? |
|
|
|
|
03-06-2012, 12:37 AM
|
#16 |
|
Member

Join Date: Sep 2011
Location: Kansas
Posts: 70
|
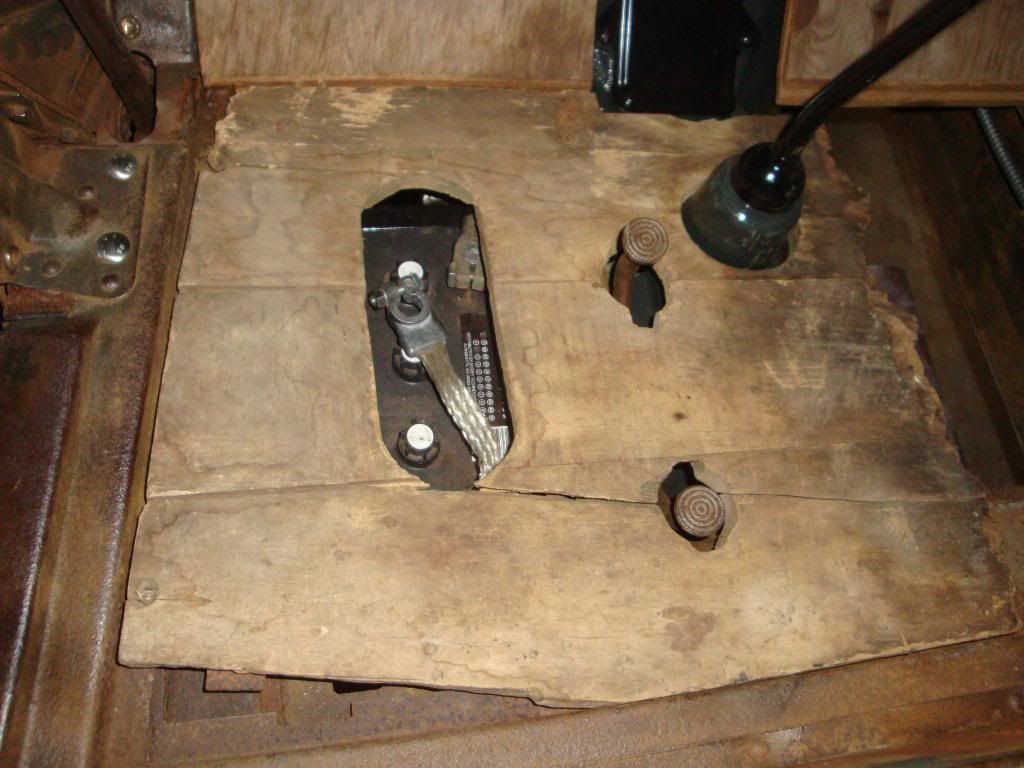
Heres an original '29 Model AA Floor Panel.
|
|
|
|
|
03-06-2012, 02:55 AM
|
#17 |
|
Senior Member
Join Date: May 2010
Location: Mpls, MN
Posts: 27,582
|
Beautiful job on the floorboards.
Isn't this a 1928 AA, since it has the left hand parking brake? I'm not sure if all floorboards have this hole, but my 28 and 29 floorboards have a hole for the threaded part of the throttle foot rest to fit into. |
|
|
|
|
03-06-2012, 07:35 AM
|
#18 |
|
Senior Member
Join Date: Feb 2011
Location: Lincoln, Nebraska
Posts: 1,909
|
Actually it is a very early 29 with a build date stamp of 1/29/29. The foot rest on mine is mounted to the top of the floor boards with three screws. I just finished it up a few days ago. I'll see if I can get up to the shop tonight and take some pics of it to post.
Dave |
|
|
|
|
03-06-2012, 11:00 AM
|
#19 |
|
Senior Member

Join Date: May 2010
Location: Fresno, Ca.
Posts: 3,636
|
1crosscut,
Neat truck, very nice wood work! Your truck has the 28 Ford emblem on the shell. Wheres your e-brake? Poor Boy, Isn't that the tin under the seat of a PU/Truck? Charles, I think Gary Karr does...................I think... Dudley |
|
|
|
|
03-06-2012, 11:14 AM
|
#20 |
|
Member
Join Date: Sep 2011
Location: Kansas
Posts: 70
|
Yeah, I'm pretty sure its the panel that sits under the seat, its been awhile since I took that old floor apart and don't really remember. I built an a new floor for the truck but crosscut wanted to see pictures of the panel.
|
|
|
|
|
03-06-2012, 11:45 AM
|
#21 |
|
Senior Member

Join Date: Jun 2010
Location: San Diego, CA
Posts: 1,486
|
Somewhere I have the factory drawings of the trim rings for the floor boards and carpet. I don't have the answer on whether or not they used the rubber seal and ring on commercial floor boards. Teh floor board ring was nickel plated and the trim ring on the carpet around the shift tower was painted black enamel.
|
|
|
|
|
03-06-2012, 06:57 PM
|
#22 |
|
Senior Member

Join Date: Jun 2010
Location: Huntsville, AL
Posts: 538
|
Here are the drawings that I have of the floorboard rings, but I have no idea whether they were used on the commercial vehicles.
Deron |
|
|
|
| Sponsored Links (Register now to hide all advertisements) |
|
|
|
03-06-2012, 09:51 PM
|
#23 |
|
Senior Member
Join Date: Feb 2011
Location: Lincoln, Nebraska
Posts: 1,909
|
Here are the pictures of how it turned out. I ended up using a satin polyurethane stain as a finish. It was sort of hard to cover up the maple wood but it is closer to original that way. The floor boards should have a hole cut out with a metal plate over it to allow access to the cover on the transmission. If anyone has pictures and or measurements of the floor board cut out and I can find the right metal cover plate then I would be able to finish it off the way it should be.
Dave d.j. - the hand lever for the service brake is on the left. 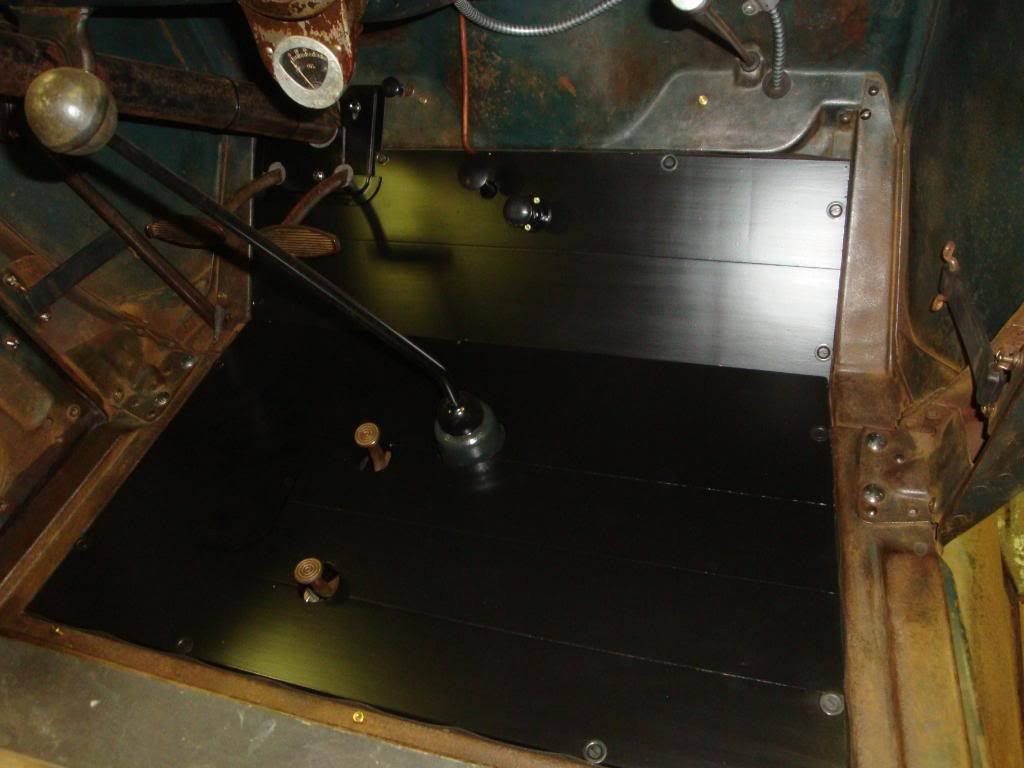 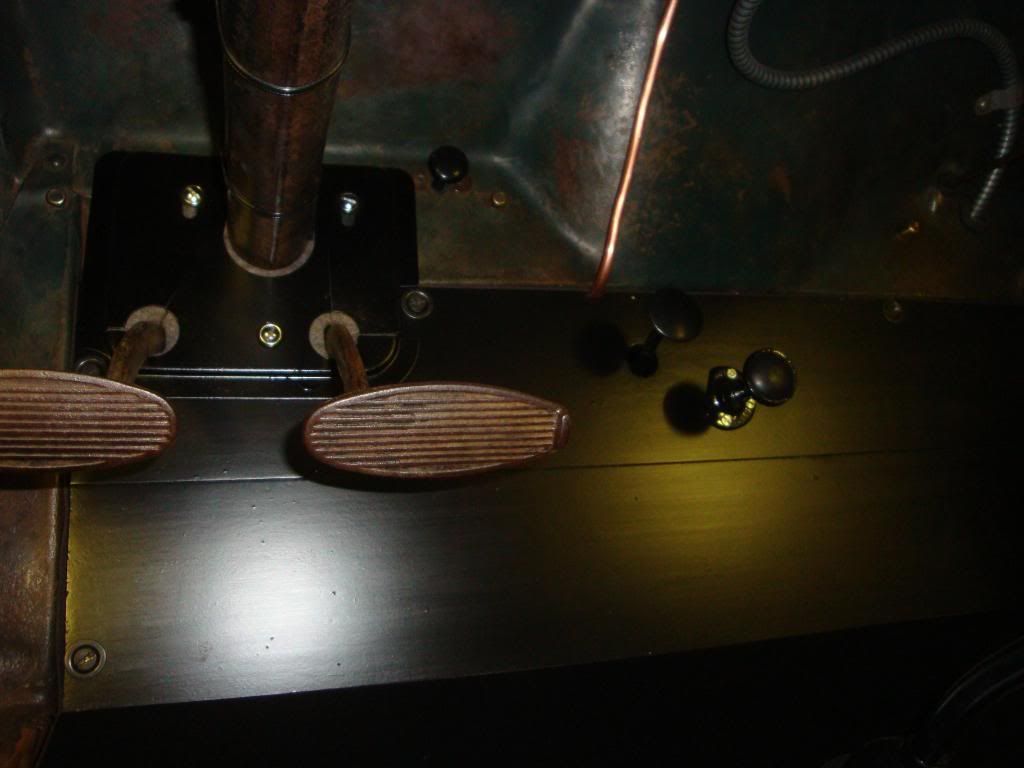
|
|
|
|
|
03-06-2012, 11:00 PM
|
#24 |
|
Senior Member

Join Date: Oct 2010
Location: Oregon and Baja Mexico
Posts: 617
|
Very nice!! Job well done!
|
|
|
|
|
03-08-2012, 01:01 PM
|
#25 |
|
Senior Member
Join Date: May 2010
Location: Richmond, VA
Posts: 882
|
anyone reproducing the metal ring/rubber seal around the shift tower?
|
|
|
|
|
03-08-2012, 01:10 PM
|
#26 | |
|
Senior Member
Join Date: Jun 2010
Location: Miami Fl.
Posts: 149
|
Sponsored Links (Register now to hide all advertisements)
Quote:
|
|
|
|
|
|
03-08-2012, 01:32 PM
|
#27 |
|
Senior Member
Join Date: May 2010
Location: Princeton, NJ
Posts: 965
|
Very pretty!
Did you make the metal straps on the bottom, or they from a vendor? Thanks, Doug
__________________
My '31 S/W sedan project:http://31ford.dougbraun.com My restoration diary: http://dougbraun.com/blog |
|
|
|
|
03-08-2012, 01:40 PM
|
#28 |
|
Member
Join Date: Nov 2011
Location: Nashville,IN.
Posts: 95
|
1crosscut,
The floorboards looks great, nice craftsmanship. First rate job for sure. |
|
|
|
|
03-08-2012, 01:41 PM
|
#29 | |
|
Senior Member

Join Date: Nov 2010
Location: Anchorage, Alaska
Posts: 9,115
|
Quote:
00346-2 TRANSMISSION OIL E-Z CHECK 28-31 Now it is easy to check and fill the Model A trasmission from INSIDE the car! Kit comes complete with fill pipe, cap, dip stick, floor cover plate, template and instructions. No more crawling under the car! 211A P. 97 |
|
|
|
|
|
03-08-2012, 01:55 PM
|
#30 | |
|
Senior Member
Join Date: Nov 2010
Location: Anchorage, Alaska
Posts: 9,115
|
Quote:
 Gear Shift Boot Gear Shift BootCode:A7000GB Price: $2.35 Model Year: 1928 - 1931 UOM: Each |
|
|
|
|
|
03-08-2012, 06:45 PM
|
#31 | |
|
Senior Member
Join Date: Feb 2011
Location: Lincoln, Nebraska
Posts: 1,909
|
Quote:
|
|
|
|
|
|
03-08-2012, 09:07 PM
|
#32 |
|
Junior Member
Join Date: Aug 2010
Posts: 28
|
The woodwork is beautiful but I have to ask how many miles are on your truck? The clutch and brake pedals have no wear at all. A truly beautiful truck! Thanks for the pictures. Terry
|
|
|
|
|
03-08-2012, 11:50 PM
|
#33 | |
|
Senior Member
Join Date: Feb 2011
Location: Lincoln, Nebraska
Posts: 1,909
|
Quote:
Dave |
|
|
|
|
|
03-09-2012, 11:11 AM
|
#34 |
|
Senior Member
Join Date: May 2010
Location: Fresno, Ca.
Posts: 3,636
|
1crosscutt,
How about some info on your truck....were the truck was built(plant), body number, tank date and such. Do you think it's a matching number, engine and frame? Dudley |
|
|
|
|
03-09-2012, 04:02 PM
|
#35 |
|
Senior Member

Join Date: May 2010
Location: Dripping Springs, Texas
Posts: 286
|
I have attached drawings floorboards, showing size and location of access hole for throw out bearing.
Does this help?
__________________
The pursuit of excellence is healthy and rewarding. The pursuit of perfection is frustrating, neurotic and a terrible waste of time. |
|
|
|
|
03-09-2012, 06:13 PM
|
#36 | |
|
Senior Member
Join Date: Feb 2011
Location: Lincoln, Nebraska
Posts: 1,909
|
Quote:
|
|
|
|
|
|
03-09-2012, 07:19 PM
|
#37 | |
|
Senior Member
Join Date: Feb 2011
Location: Lincoln, Nebraska
Posts: 1,909
|
Quote:
So if I can confirm that the cut out in the firewall section is right, find the correct cover plate and if someone has a picture / information on the placement of the riveted clips to hold it in place I'd be all set. I don't ask for much do I?  Many thanks Dave |
|
|
|
|
|
03-09-2012, 07:20 PM
|
#38 |
|
Senior Member
Join Date: May 2010
Location: Fresno, Ca.
Posts: 3,636
|
Dave,
The 1-29-29 could be the original tank number! Look at Steve Plucker's site on the front page "sticky" at the top, under "gas tank study"....good read. The plant and body number is on the cross sill, in front of the seat riser on the driver side, generally. |
|
|
|
|
03-09-2012, 08:10 PM
|
#39 |
|
Senior Member
Join Date: May 2010
Location: Lakeville, MN
Posts: 5,162
|
I just finished making a set of 1928 planked floorboards. There was a lengthy discussion concerning floorboards on Fordbarn about 9 to 12 months ago, I believe. It was kind of decided that the shift tower cutout was offset about 3/16" to 1/4" to the passenger side. Steve Watrous' drawings show the cutout centered on the link in Tom from Drippin' post. Steve's early floorboard drawing shows it offset. I don't know if the later style floorboards really had the cutout centered or the later floorboard drawing is in error. I don't think the transmission tower changed in the cars from early to later. Steve's website is: http://stevewatrous.com/modelaford_p2.html. I found errors in the dimensions for the 3 holes for the rivets that fasten the metal plate around the shift tower. The errors weren't large, but all the holes for the metal plate in the center around the shift tower were wrong. I was lucky I have some original floorboards. I have an original set (and half of another original set) of floorboards that I measured the holes for the rivets. All in all, Steve's drawings are pretty accurate, but there are some minor dimensional error in them.
Rusty Nelson |
|
|
|
|
03-09-2012, 08:52 PM
|
#40 |
|
Senior Member
Join Date: Feb 2011
Location: Lincoln, Nebraska
Posts: 1,909
|
I didn't mean that the shift tower was shifted to one side or the other but that the cut out in the floor board didn't go back all the way to the shift tower as in Steve's drawings. (see pic of what I have left of the original) One of the clips is still in place on the original and one of the original clips was moved to the firewall plywood piece that was replaced at some time in the past. So I only knew of two clips to hold the plate in place but am only sure of 1 of the locations of the clip that was left on the original floor board. Sounds like there was originally 3 clips.?
|
|
|
|
|
«
Previous Thread
|
Next Thread
»
 Linear Mode

|
|

| Sponsored Links (Register now to hide all advertisements) |
|
|
All times are GMT -5. The time now is 02:06 PM.