|
|||||||


| Sponsored Links (Register now to hide all advertisements) |
|
|
 |

|
Thread Tools | Display Modes |
 01-23-2023, 11:32 AM
|
#1 |
|
Junior Member
Join Date: Jan 2020
Posts: 15
|
I need to remove my 29 model a rear end and replace it, but I dont have a spring spreader. The spring is original & I did this as a kid, but the process escapes me. Have any of you removed the rear end without a spreader. If so how did you do this. Thank you for all answers. Im in Palatka Florida near Gainesville and St Augustine.
Last edited by Bmoody; 01-23-2023 at 01:51 PM. Reason: Adding location |

|

|
|
01-23-2023, 11:35 AM
|
#2 | |
|
Senior Member

Join Date: May 2010
Location: Eastern Tennessee
Posts: 11,520
|
Quote:
|
|
|
|
|

 )
)| Sponsored Links (Register now to hide all advertisements) |
|
|
|
01-23-2023, 11:47 AM
|
#3 |
|
Junior Member
Join Date: Jan 2020
Posts: 15
|
Brent...Then I have to remove the spring and replace the rear end Assy. Is it easier to get the spring off after the rear end is out?
|
|
|
|
|
01-23-2023, 11:49 AM
|
#4 |
|
Senior Member

Join Date: May 2010
Location: Southern California
Posts: 3,131
|
My advice:
Obtain a spring spreader and go about the project safely. The rear spring can be lethal. Removing a rear end with the spring attached puts all the tension on the 3\8 center bolt. If the head pops off the leafs will fly 20 feet in the air and take your head with it if you are standing over it. If they miss, they will be coming back down. Tom Endy |
|
|
|
|
01-23-2023, 12:05 PM
|
#5 |
|
Junior Member
Join Date: Nov 2021
Posts: 2
|
This is how I have done it a couple of times. With the rear end out and spring still attached, put a c clamps on each side of the center bolt. Then wrap heavy rope around the spring on each side of the clamps as a safety precaution. Next remove the center bolt and replace it with a piece of all thread rod. Slowly loosen the c clamps and the nuts on the all thread, and loosen the ropes a little as you go. Proceed until all the tension is out of the spring and you are left with only the bottom leaf attached at the shackles. It will be easy to remove now. Reassembly is done in the reverse order.
Ralph |
|
|
|
|
01-23-2023, 12:16 PM
|
#6 |
|
Senior Member
Join Date: May 2010
Location: brentwood, ca
Posts: 4,247
|
Sponsored Links (Register now to hide all advertisements)
Use a spring spreader!!! Last edited by Brentwood Bob; 01-23-2023 at 02:01 PM. |
|
|
|
|
01-23-2023, 12:20 PM
|
#7 | |
|
Senior Member
Join Date: Jun 2014
Location: Land of Lincoln
Posts: 3,131
|
Quote:
__________________
Don't force it with a little hammer tap, tap, tap get a bigger hammer tap done |
|
|
|
|
|
01-23-2023, 12:28 PM
|
#8 |
|
Junior Member
Join Date: Jan 2020
Posts: 15
|
Thank you
|
|
|
|
|
01-23-2023, 12:30 PM
|
#9 |
|
Senior Member

Join Date: Jul 2010
Location: Cow Hampshire
Posts: 4,188
|
I first removed the spring as the axle dangled from the car.
I.e. Jack car up Get free space between the shackles/spring knuckle and axle tube. Insert blocks of maple (hardwood) to fill the space between the knuckle and the axle tube. Lower car so weight of car "spreads" the spring until you get to a point where the shackle is "free" of the axle eyes/spring knuckles - and POUND IT OUT. In my case the car was a short-bed pickup (i.e. the 82A of my avatar) and the spring was PLENTY STIFF. Additional weight in the bed was required to get to that "loose point." So I started stacking 5 gallon pails filled with water. I think it took like six. A hand dipper allowed me to "fine tune" the weight to get to that "sweet spot" where the shackle could be pounded out. This CAN be precarious - you don't want to get much "underneath" the car in case the spring "squirms" off the maple block. A later disassembly I created a "bridge compressor" out of two 2x4 made in oak and All-Thread. Essentially creating a mechanical "logging chain restraint" without the chain. With the axle and spring removed "en-mass" the compressor action/blocks of wood could be performed without the hazard of "squirm" or being underneath. Now I have a home-made spring compressor made from 1" all-thread and 1" pipe bent to pass around the differential banjo. There are plans online to make your own spring compressor similarly but with weldment center. And, of course KR Wilson had their "rear axle compressor." A solution which might look nice in the KR Wilson Tool Cabinet - but I'm not sure I would trust it to actual use. A VERY GOOD write up at https://jmodela.coffeecup.com/spreader.html 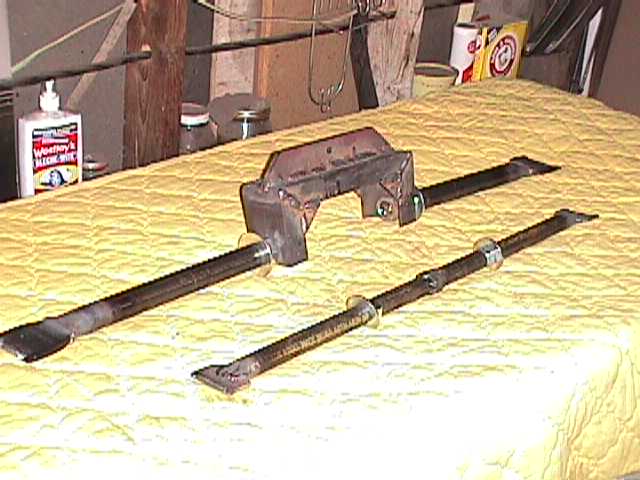 Joe K
__________________
Shudda kept the horse. Last edited by Joe K; 01-23-2023 at 12:49 PM. |
|
|
|
|
01-23-2023, 12:32 PM
|
#10 | |
|
Senior Member

Join Date: Jan 2019
Location: Florida Panhandle
Posts: 585
|
Quote:
|
|
|
|
|
|
01-23-2023, 12:40 PM
|
#11 |
|
Member

Join Date: Sep 2016
Location: San Jose, CA
Posts: 47
|
Since you're doing your own work, the cost of shop labor is saved. You could justify buying a spreader because you saved more money that the spreader cost. And you will have more Model A friends once people know that you own a spreader.
|
|
|
|
|
01-23-2023, 12:49 PM
|
#12 |
|
Senior Member
Join Date: May 2010
Location: Southern California
Posts: 3,131
|
Attached is a link to an article that describes how to go about removing a rear end from a Model A using a spring spreader.
During the restoration of my grandson's 1930 Tudor we found one of the shackle bolts was sheared off. Had we pulled the rear end without a spring spreader it would have become exciting. When reinstalling a rear end in a Model A you should tighten the two nuts on each shackle down tight in order to fully seat the shackle, then back off the nuts about a half a turn to allow the shackle to pivot as the spring functions going over a bump. If it is left fully tight, there is a chance the shackle bolt will shear. http://www.santaanitaas.org/wp-conte...ear-Spring.pdf Tom Endy |
|
|
|
|
01-23-2023, 01:11 PM
|
#13 |
|
Senior Member
Join Date: May 2010
Location: Southern California
Posts: 7,033
|
Add your general location to your profile, someone near by might have one they would loan you. Do any local clubs have one they would loan?
Charlie Stephens |
|
|
|
|
01-23-2023, 01:15 PM
|
#14 |
|
Senior Member
Join Date: Nov 2010
Location: Sebastian, FL
Posts: 479
|
Tom is correct. A spring spreader is the ONLY way to go. I did it a few years ago when I took everything off right up to the engine. New flywheel, pressure plate, gears, brakes, etc. Took my time and had it all back together in a couple of months. It has not given me any trouble since and purrs like a kitten. Actually was a fun job and learned a lot.
|
|
|
|
|
01-23-2023, 02:26 PM
|
#15 |
|
Senior Member

Join Date: May 2010
Location: Yucaipa, CA
Posts: 1,095
|
Some guys use a porta power between the eyes. I have a spring spreader that my dad used on Model A's that I have never even used. I'm always taking the springs completely apart anyway to paint the individual leafs. There is not a great deal of tension on a leaf spring like there is a coil spring, I worked on a 400-vehicle fleet for 30-years. I replaced a lot of individual broken leaf's that required removing the center bolt. We just used two large "C" clamps to hold it all together and then removed the center bolt. Even one clamp would work on a Model A. Pull the rearend out with the spring on it, use a large "Clamp that will be long enough to relieve the pressure as the clamp opens up. I better tell you to use two just to be safe. Remove the center bolt and let the pressure off of the Leafs. Remove all the Leafs and then you will be able to stretch the main leaf by hand to remove it from the shackle. Check the shackle bushing for wear. Put the main leaf on the new rear end, Then I use a piece of all-thread and a couple of tall nuts, they have more thread so there is no chance of them stripping as your compressing the spring. Clamp it, remove the all-thread and install the center bolt I've probably done a dozen front and rear Early Ford springs this way and never considered it to be dangerous. It's an easy job.
If you were in and Early Ford Dealership, working on a flat rate schedule, they probably used a spring spreader so they could leave the spring clamped to the crossmember and save time. But they weren't taking out the spring disassembling it and having it powder painted. Spring, spreaders, porta power,s or "C" clamps will get the job done. |
|
|
|
|
01-23-2023, 02:32 PM
|
#16 |
|
Senior Member
Join Date: May 2010
Location: Southern California
Posts: 3,131
|
Photo is of the broken shackle we removed from my grandson's 1930 Tudor. The car had a Borg Warner overdrive installed when we acquired it. I suspect when the overdrive was installed the previous owner tightened the shackle bolts down tight.
The broken shackle was discovered when we removed the rear end using a spring spreader. Had we pulled the rear end with the spring attached it could have come completely apart once the spring was unbolted from the frame of the car. Tom Endy |
|
|
|
|
01-23-2023, 03:10 PM
|
#17 |
|
Junior Member
Join Date: Jan 2020
Posts: 15
|
Thank you
|
|
|
|
|
01-23-2023, 03:44 PM
|
#18 | |
|
Senior Member

Join Date: Jul 2011
Location: Redondo Beach, CA
Posts: 5,849
|
Quote:
Same thing happened to one of my rears. I discovered it when I tried to remove the shackle nut and the whole shaft turned. I don't know how long it was like that. Luckily I had my spring spreader installed. Last edited by Y-Blockhead; 01-23-2023 at 05:39 PM. |
|
|
|
|
|
01-23-2023, 06:14 PM
|
#19 |
|
Junior Member
Join Date: Jan 2020
Posts: 15
|
Thanks everybody!!!!
A fellow from a model a club is coming to help and is bringing a spring spreader Saturday. |
|
|
|
|
01-23-2023, 06:43 PM
|
#20 | |
|
Senior Member
Join Date: Jul 2010
Location: Cow Hampshire
Posts: 4,188
|
Quote:
At the point of disassembly for blasting/painting. Clamped in a workbench vise hump up with the center bolt pointed "up." And a LARGE (single) C-clamp holding and waiting for the center bolt to be removed. So with the spring in my mind fully restrained by the large C-clamp I go ahead and cut the center bolt. Now mind you this is the 82A truck spring, which is the "stoutest" spring of the Ford Model A spring circus. I cut fully expecting no real reaction from the spring since the clamp is holding it. Cut done -head falls off. I reach for a large punch to drive the center bolt "down" so it falls on the floor. Two swipes with the hammer/punch and the clamp/spring decides to "squirm" since the bolt is now 2/3rds removed. UPWARD launched from the vise the upper 2/3rds of the spring - miss me and bang hard against the dining room floor above - and fall in a rain of steel around me. My mother calls down from the kitchen above - "What happened - are you all right?" Fortunately I missed all of the excitement (and impact) in BOTH accelerations. "Fine Mom." Damned fortunate. It would have been a real good way to break an arm - or worse. And YES - use TWO large C-clamps - possibly even two smaller but stout "bridge clamps" (four all-thread rods) - and replace the center bolt with some Grade 8 allthread bolt about 18" long - and only then relieve the pressure on the spring "equally" beginning at the center bolt. The clamps only serve to give you time to insert the all-thread. And then go back together as described above. I have described this story before I believe - Others describe the lesser Ford Model A springs as more forgiving. But you can never be sure. Just be careful out there. Joe K
__________________
Shudda kept the horse. |
|
|
|
|
|
«
Previous Thread
|
Next Thread
»
 Linear Mode

|
|

| Sponsored Links (Register now to hide all advertisements) |
|
|
All times are GMT -5. The time now is 06:28 PM.