|
|||||||


| Sponsored Links (Register now to hide all advertisements) |
|
|
 |

|
Thread Tools | Display Modes |
 03-29-2011, 04:38 AM
|
#1 |
|
Senior Member

Join Date: Jul 2010
Location: Cairns , Australia
Posts: 746
|
Has anybody got a picture or sketch of how the best way to build a simple spring spreader for removing and installing the springs. I've replaced shackles a couple times while in the car but I've just removed the complete rear and removed the rear spring today and I think it's going to be hard to replace without the aid of a tool. In the efv8 35-36 ford book it says fordor has 12 springs(this is what I have) and will be going into a phaeton which has 11. My 4th longest leaf is broken. Which is the correct leaf to remove when changing in this case? (do I replace the broken leaf and remove another ??) Should I keep 12? What do other 35-36 phaeton owners have that is comfortable with either 1 or 5 passengers?
|

|

|
|
03-29-2011, 05:22 AM
|
#2 |
|
Senior Member

Join Date: May 2010
Location: FP, NJ
Posts: 2,770
|
My recomendation towards installing springs is to assemble the main leaf only onto the front or rear axle and then assemble the rest of the leaves onto it. Unless you have a truly safe and sturdy spreader, there's an awful lot of energy in a spread spring to let fly if something goes wrong, and that energy can do an awful lot of damage, especially if you're right next to it.
__________________
Don't never get rid of nuthin! |
|
|
|
| Sponsored Links (Register now to hide all advertisements) |
|
|
|
03-29-2011, 07:09 AM
|
#3 |
|
Senior Member

Join Date: May 2010
Location: Lake City Mi.
Posts: 807
|
Some one on the barn said he rented a porta power and it worked very well. I used a spreader that some one loaned me I think it was home made and it was scary.
|
|
|
|
|
03-29-2011, 07:39 AM
|
#4 |
|
Senior Member

Join Date: May 2010
Location: Indiana
Posts: 488
|
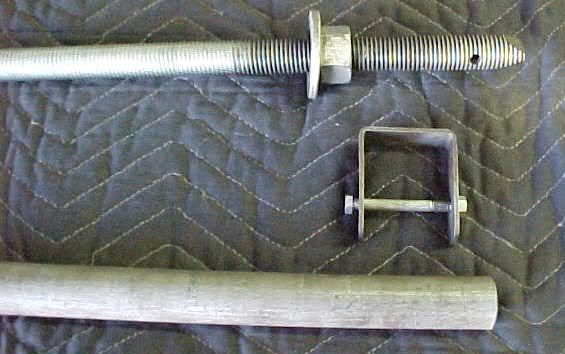
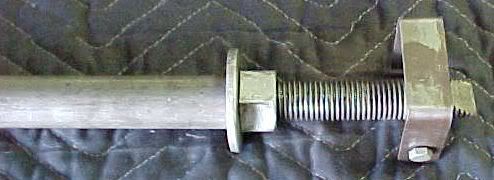
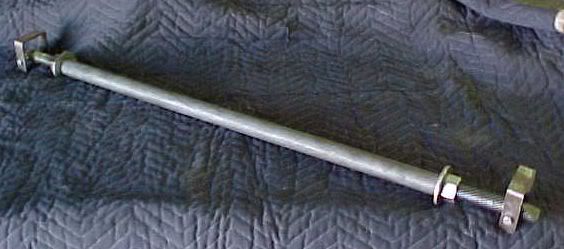
Here are a couple of pic of one I made from hardware store materials. The materials are 1 in black pipe and 7/8 dia all thread and nuts. That extra little piece on the end of the spreader foot is to enable it to be used with a reversed eye spring. I hope this helps.
|
|
|
|
|
03-29-2011, 07:53 AM
|
#5 |
|
Senior Member
Join Date: Jul 2010
Location: Cairns , Australia
Posts: 746
|
Thanks Joel. That's what I thought..... I was going to make something really complicated and your idea is really simple!!!Will save me heaps of time , Dan.
|
|
|
|
|
03-30-2011, 10:02 AM
|
#6 |
|
Senior Member

Join Date: Jul 2010
Location: Ventura, CA
Posts: 2,464
|
Sponsored Links (Register now to hide all advertisements)
Several of the "engineer types" have taken me to task because I did not incorporate a safety chain/devise to the spreader, they were afraid that the spreader would come unattached from the spring and put someones eye out... This is not a Red Ryder BB Gun... Remember the line from the movie... "you'll shoot your eye out". If you have springs with reversed eyes the end of the spreader has to be modified. Email me and I will send you the parts list, spec's for the spreader. In reality, the spring does not need that much power applied to work with the shackles. Foot Note: With the ends notched like I did, the spreader is very well secured to the spring eye. The spreader also exerts most of it's power on the center of the spring eye in lieu of up into the spring leaf.
__________________
Bill.... 36 5 win cpe Last edited by blucar; 03-30-2011 at 10:08 AM. Reason: Additional info |
|
|
|
|
03-30-2011, 10:41 AM
|
#7 |
|
Senior Member

Join Date: May 2010
Location: Coral Springs FL
Posts: 10,950
|
Here's mine. Made from a HUGE turn buckle.
|
|
|
|
|
03-30-2011, 11:06 AM
|
#8 | |
|
Senior Member

Join Date: May 2010
Location: Near Rising Sun, Maryland
Posts: 10,858
|
Quote:
__________________
John "Never give up on what you really want to do. The person with big dreams is more powerful than one with all the facts". Albert Einstein Last edited by JM 35 Sedan; 03-30-2011 at 03:18 PM. |
|
|
|
|

|
03-30-2011, 02:22 PM
|
#9 |
|
Senior Member

Join Date: May 2010
Location: Tulsa Ok
Posts: 519
|
I used my porta power on the last one I did, worked fine. But if you don't have a porta power, then any of these will work. I used one like Joel's that I made for years untill I loaned it and never saw it again.
|
|
|
|
|
03-30-2011, 03:21 PM
|
#10 |
|
Senior Member

Join Date: May 2010
Location: Highland,MI
Posts: 1,196
|
I was thinking of rebuilding my front end too. I heard that you need a spreader. Joels looks nice and easy to make. I noticed in the pic that there are shocks. Does someone make a kit to retro fit that to a 40 pickup. I didn't really look, but is their a set of knee action shocks,sway bar on a 40 or what. Who would sell the parts? Ken
|
|
|
|
|
03-30-2011, 03:35 PM
|
#11 |
|
Senior Member
Join Date: Jul 2010
Location: Cairns , Australia
Posts: 746
|
Thanks for the photos guys. Will post a pic of what I've built next week. Dan.
|
|
|
|
|
03-30-2011, 04:38 PM
|
#12 | |
|
Senior Member
Join Date: May 2010
Location: FP, NJ
Posts: 2,770
|
Quote:
__________________
Don't never get rid of nuthin! |
|
|
|
|
|
03-31-2011, 04:19 AM
|
#13 |
|
Senior Member
Join Date: Jul 2010
Location: Cairns , Australia
Posts: 746
|
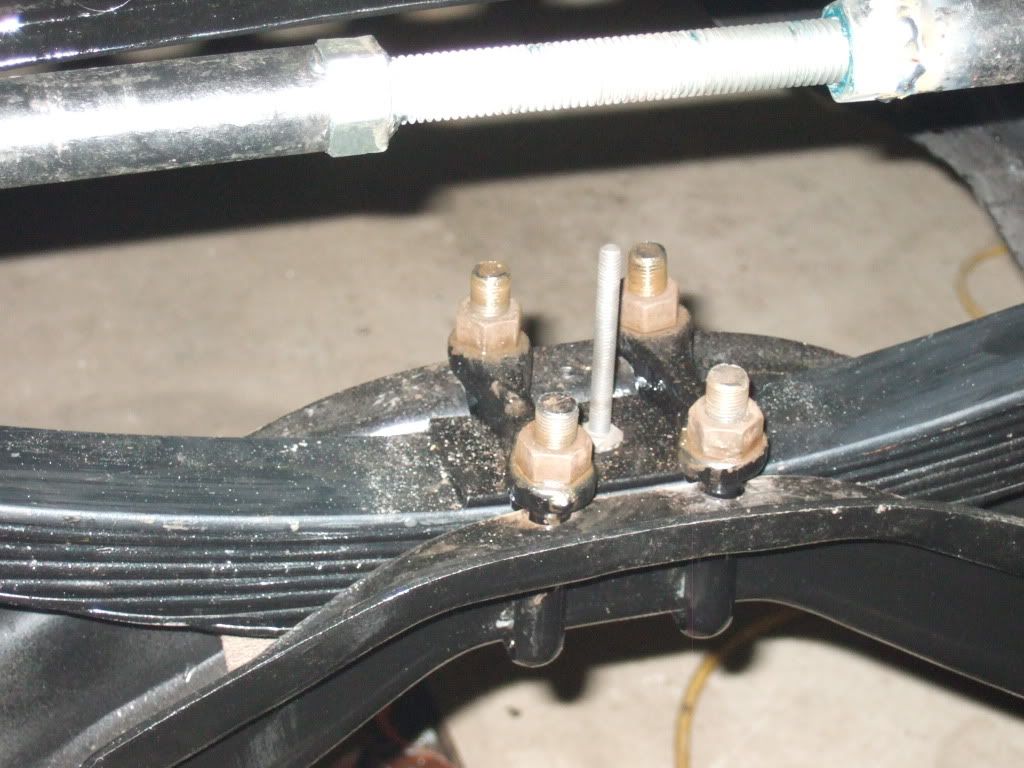
Guys I've basically copied Bills' tool. 1" id pipe, 15/16" all thread that goes all the way to the end inside and it makes the 2 halves tie together. A little heavy but works well. Thanks again to all.
|
|
|
|
|
03-31-2011, 08:49 AM
|
#14 |
|
Member

Join Date: May 2010
Location: In my Recliner, Rockingham
Posts: 78
|
This is a spreader a fellow gave me about 25 years ago. I have not used it much, but last time I used it, it felt like it must have weighed 50 pounds. My bathroom scales said that it was only 20 pounds. I must be getting old. On my back under the '40, holding it up with 1 hand and trying to turn the turnbuckle with the other, it felt at least 50 pounds!

|
|
|
|
|
03-31-2011, 09:03 AM
|
#15 | |
|
Senior Member
Join Date: May 2010
Location: Near Rising Sun, Maryland
Posts: 10,858
|
Quote:
__________________
John "Never give up on what you really want to do. The person with big dreams is more powerful than one with all the facts". Albert Einstein Last edited by JM 35 Sedan; 03-31-2011 at 09:51 AM. |
|
|
|
|
|
03-31-2011, 09:20 AM
|
#16 |
|
Senior Member
Join Date: Jul 2010
Location: Cairns , Australia
Posts: 746
|
Ok thanks John. I'll fab 2 brackets to stop em slippin!
|
|
|
|
|
03-31-2011, 10:08 AM
|
#17 |
|
Senior Member
Join Date: May 2010
Location: Indiana
Posts: 488
|
Good idea! I like that design better than mine. I forgot to mention; I made 2, 1 front spring and 1 for the rear spring so that a minium amount of all thread is exposed.
|
|
|
|
|
03-31-2011, 10:10 AM
|
#18 |
|
Senior Member
Join Date: Jul 2010
Location: Ventura, CA
Posts: 2,464
|
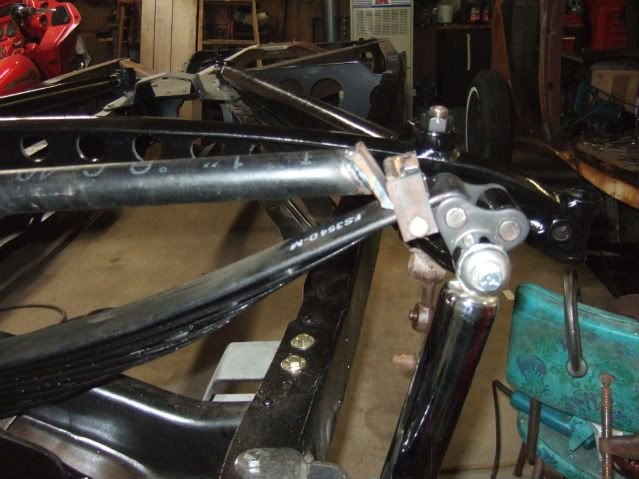
The spring that my spreader is attached to has been like the pix shows for over twenty-five years. The whole affair has been floating around my garage, being knocked around, hanging on the wall, from which it fell in a very strong earth quake in 2004, through all of the mishaps, the spreader and spring have not parted company yet.
There are two main features to the spreader I made; The 3/8" x 2' end pieces have concave ends that capture the spring eye. Secondly, the two nuts in the center provide a point to hold the shaft with one wrench, stopping the shaft from rotating while the outer extending nuts are turned to expand the spreader. Before I had a spring spreader we used a bumper jack on the bumper and a Ford bottle jack under the spring eye.. Placing the bottle jack under the spring eye, then lowering the bumper jack worked very well... Fine tuning the spring eye position could be done with the bottle jack.
__________________
Bill.... 36 5 win cpe |
|
|
|
|
03-31-2011, 07:43 PM
|
#19 |
|
BANNED
Join Date: May 2010
Location: nor~cal
Posts: 455
|
Like PeteVS said in post 2
Its so much easier to disassemble and assemble a spring with the main leaf in place. All you need is 1 C clamp 2 wrench 3 punch (to put in the hole for alignment) |
|
|
|
|
03-31-2011, 09:18 PM
|
#20 |
|
Junior Member
Join Date: Feb 2011
Location: Rocklin, CA
Posts: 2
|
Great forum subject since I have just received my new front leaf spring today that I planned on installing on my 39-ford truck. I like the suggested spring replacement process from PeteVS. Since I don’t have the ability to manufacture a spreader like the ones shown. Is there any disadvantage to using this method of installing one leaf at a time?
|
|
|
|
|
04-01-2011, 05:45 AM
|
#21 |
|
Senior Member

Join Date: May 2010
Location: tasmania
Posts: 221
|
he dan drop over to my workshop u can borrow mine ive got the diff out of my 35 at the moment lol regards scott
|
|
|
|
|
04-01-2011, 08:40 AM
|
#22 | |
|
Senior Member
Join Date: May 2010
Location: Near Rising Sun, Maryland
Posts: 10,858
|
Quote:
 You may want to adjust these dimensions some depending on your spreader design and the springs you need to spread. You may want to adjust these dimensions some depending on your spreader design and the springs you need to spread.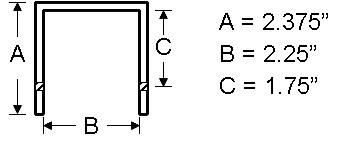
__________________
John "Never give up on what you really want to do. The person with big dreams is more powerful than one with all the facts". Albert Einstein |
|
|
|
|
| Sponsored Links (Register now to hide all advertisements) |
|
|
|
04-01-2011, 11:31 AM
|
#23 |
|
Senior Member

Join Date: May 2010
Location: Solihull, England.
Posts: 8,755
|
If you're making one, I agree, the bigger diameter threaded bar you can find the better. Just my opinion, but I reckon it is best to have the adjuster part offset to one side, I think it will be less likely to buckle, the middle is the weak spot in my view.
This is especially true if using it on a 32-34 rear spring, as the diff gets in the way of a straight shot. The frame has to be extra strong, surround the diff, and the threaded part on one side has to be in a direct line between the spring eyes. Sorry, no pics, but just some ideas. Mart. Mart. |
|
|
|
|
08-28-2023, 09:56 AM
|
#24 |
|
Senior Member
Join Date: Sep 2010
Posts: 350
|
i use a porta power
|
|
|
|
|
08-29-2023, 10:30 AM
|
#25 | |
|
Senior Member

Join Date: May 2010
Location: Napa,California
Posts: 6,037
|
Quote:
|
|
|
|
|
|
08-29-2023, 11:37 AM
|
#26 |
|
Senior Member

Join Date: May 2010
Posts: 2,488
|
Sponsored Links (Register now to hide all advertisements)
|
|
|
|
|
08-29-2023, 05:28 PM
|
#27 |
|
Senior Member

Join Date: Oct 2011
Location: Shelton, WA
Posts: 3,800
|
I can tell you from experience that no matter what kind of spreader you use, doing a 14 leaf covered station wagon rear spring will make you nervous. I hope to never have to do that again.
|
|
|
|
|
08-30-2023, 11:44 AM
|
#28 |
|
Senior Member

Join Date: Sep 2014
Location: Wiscasset, Maine
Posts: 1,981
|
I made one years ago from 3/4" threaded rod with is too small a diameter. Doing spring work about 5 years ago I decided to use a Porta-Power type tool and bought one from Harbor Freight. Here is the info:
https://www.fordbarn.com/forum/showp...7&postcount=22 |
|
|
|
|
09-03-2023, 08:01 AM
|
#29 |
|
Junior Member
Join Date: Jan 2015
Posts: 11
|
If using all-thread, remember that hardware and auto parts store all-thread is typically Grade 2. You need to go to somewhere like Grainger or a specialty supplier to get a heavier grade.
|
|
|
|
|
09-03-2023, 08:30 AM
|
#30 |
|
Senior Member

Join Date: Oct 2021
Location: Idaho
Posts: 148
|
The spring spreader in this video is the neatest one I have seen. Go to 4:30 into the video.
https://youtu.be/tnB-LtZh_Zc Patrick |
|
|
|
|
09-04-2023, 05:22 AM
|
#31 |
|
Senior Member

Join Date: Sep 2013
Location: Dighton, Mass
Posts: 1,230
|
Shame on me: Doing a normal service (oil and grease) on the lift my old eyes noticed on the rear right spring eye half missing and four broken leafs. I don't like tail draggers that will effect front geometry. All I could find online is reverse eye springs no good those lower the car. Middle of the night my brain flash! Eaton Detroit Spring. Called them No problem for $575 two weeks .we had genuine Ford shackles in stock OK. Never used a spreader or porta power. So easy, common floor jack under the eye then cut off shackle then the other side. (car is on jack stands) impact gun on 4 U bolts >spring OUT: Most people will fight getting 77 yr old shackles apart why they are toasted too. cut them off.. This story is all about Eaton Detroit the spring its perfect well worth it. They were and still a major supplier of all make light & heavy trucks and busses. In closing you do not need a spreader just a floor jack........Now the car is at proper height and even steers easier!!
Eaton > 10 stars |
|
|
|
|
09-04-2023, 11:54 AM
|
#32 | |
|
Senior Member

Join Date: May 2010
Location: Wisconsin, USA
Posts: 9,007
|
Quote:
Plus, at least at my current age, it takes about all I have to spread the spring far enough.
__________________
"I can explain it for you. However, I can't understand it for you". |
|

|
|
|
09-04-2023, 01:35 PM
|
#33 |
|
Senior Member

Join Date: May 2012
Location: Fredericksburg, Virginia
Posts: 764
|
You guys using a portapower, did you fabricate special wedge ends to fit the spring? Please explain and share photos. Thanks.
|
|
|
|
|
09-04-2023, 02:46 PM
|
#34 |
|
Senior Member
Join Date: Sep 2013
Location: Dighton, Mass
Posts: 1,230
|
ndnchf Most common portapowers come with only one wedge ya have to make one. I did try the porta power with car on lift and it exploded lots of force on springs, thats why I use a floor jack under the schackle little force because you are arching ONE side not TWO. And I did all with no help either. Hard to note that after cutting schackles off letting jack down how much the spring drops big time: Can't imagine a spreader spreading both sides thats wicked force, thats why a floor jack safe nothing will slip or fly at you try it with the car on the ground but with jack stands you see the car with tires still on the ground that is the weight needed transmitting this weight to the Jack..then the other side, drop U bolts and old spring drops down also with jack lowering the spring. I came upon this way being a kid changing a Model T spring never heard of a spring spreader then & did not have a floor jack only one of those jacks that had a crank..Now to install the hard part had to use plenty of heat to get the top threaded pins out,, surprise there is a hardened steel bushing in there, Mini air saw, chisel, nope finally had to blow it out with cutting torch carefully. This is the housing (top). I think it was first made that way, but my new Ford kit uses bubber bushings not steel. I think Ford replacements being rubber was a time savor for the dealer......sam
|
|
|
|
|
«
Previous Thread
|
Next Thread
»
 Linear Mode

|
|

| Sponsored Links (Register now to hide all advertisements) |
|
|
All times are GMT -5. The time now is 11:28 AM.