|
|||||||


| Sponsored Links (Register now to hide all advertisements) |
|
|
 |

|
Thread Tools | Display Modes |
 01-24-2012, 11:51 PM
|
#41 |
|
Senior Member

Join Date: Dec 2011
Location: Two Rivers, Wi.
Posts: 1,406
|
Hey Clayton... I am soon to be in the market for a FP spool kit...Even John the owner suggested I use the non adjustable kit. Thats what he runs in his car. I understand the set up on both, but why are the shims keyed? Is there a key in the kit that locks them together? What locks that down or does the whole shimpack spin and float in the housing?
On another note; did you alter the caster on yer front axle? Mines set at the OEM 5 degrees, and its been suggested I increase that to 7-1/2. Thoughts? See my post... Im making T bones that anchor to the frame instead of the oil pan. Whats an optimum length to consider? Bear in mind I am on a SEVERE budget! LOL... ws |

|

|
|
01-25-2012, 01:22 PM
|
#42 | |
|
Senior Member

Join Date: Jun 2010
Location: Portland, Oregon
Posts: 104
|
Quote:
The shims should not spin free, another reason I feel for keying the shims. I did alter my caster angle. The stock caster angle should be 5 1/2 degrees but mine is 6 1/2 or 7 degrees. I think the Ford "race cars" of the period would be set as much as 9 degrees or more.....but I would have to calculate it out. I think you are fine at 7 1/2 degrees. As for the wishbones, you really want the geometry to remain the same. My frame mounts are at the same distance from the front cross member as the original pan mount. Since I lowered my car quite a bit, I put the ball studs for the frame mounts 2" below the frame. The axle was push forward of the front cross member 2 3/4" ...so I think my 'bones are 47 1/2" if I remember right, but I will measure for sure. I don't have allot in that front end at all. I think I'm only into it $100 at most. 
__________________
MrModelT 1926 Model T Roadster http://www.jalopyjournal.com/forum/s...d.php?t=308741 |
|
|
|
|

| Sponsored Links (Register now to hide all advertisements) |
|
|
|
01-25-2012, 03:01 PM
|
#43 |
|
Senior Member
Join Date: Dec 2011
Location: Two Rivers, Wi.
Posts: 1,406
|
Thanks Mr.T ! I looked at the install PDF and it shows that you need to cut that key down BELOW the end of the gear. Hmmm. Ive seen several bone jobs that ran way back as far as the U joint area. I do agree about dropping the mount level. I mounted my axle C/L almost 3 inches forward. At 1-1/2 the mounting hardware hit the radiator lower tank.
I like the idea that you only have $100 into the front... frugal is the key word for me these days too!  More to follow! I included this too for some ideas I stole LOL.I like looking at home meade stuff! Strictly old school man!! More to follow! I included this too for some ideas I stole LOL.I like looking at home meade stuff! Strictly old school man!!http://www.scvmtfc.org/lghs_speedste...dster.html#top ws   First attempt caused intereference with the radiator  She's a gawner Last edited by yachtsmanbill; 01-25-2012 at 03:08 PM. |
|
|
|
|
01-25-2012, 10:35 PM
|
#44 |
|
Senior Member
Join Date: Jun 2010
Location: Evansville IN U.S.A.
Posts: 395
|
This front end had NO radiator interference! Tell me again why I sold it? I built the bracket for the most part out of the t speed secrets pattern.
How many things did I do wrong? http://s569.photobucket.com/albums/s...t=DSCF2565.jpg
__________________
1925 tudor (restoration) 1941 tudor"street rod" project1964 fairlane tube chassis "street car" 1996 f-350 crew cab 4x stroker! Na, I dont like working on cars...I exist for it! |
|
|
|
|
01-30-2012, 03:09 PM
|
#45 |
|
Senior Member
Join Date: Jun 2010
Location: Portland, Oregon
Posts: 104
|
*UPDATE*
Re-lowering the rear end: Chapter 1 Well, after a quick correction on the safety wire brought up thankfully by 64 DODGE 440...it was on to finally "mock-up" assembly of the rear axle (hubs, wheels, etc) and getting it mocked up under the chassis with the rest of the driveline, including the Chicago transmission case: Chris was kind enough to call into Pacific Machine Tool Steel and order us some good lengths of 4140 suspension grade 9/16th steel rod, the beginning of our lowering brackets: ...Then after getting the rear spring mounted up under the frame.. ..I spent the remainder of the evening working out the shape, dimensions and specifics of the shackle plates in the form of card board templates: More to come!
__________________
MrModelT 1926 Model T Roadster http://www.jalopyjournal.com/forum/s...d.php?t=308741 |
|
|
|
|
02-02-2012, 09:55 AM
|
#46 |
|
Senior Member
Join Date: Dec 2011
Location: Two Rivers, Wi.
Posts: 1,406
|
Sponsored Links (Register now to hide all advertisements)
Everything is new on the axle (bushing wise) and I find it very easy to barely lift the bones to decrease that angle. I know the book says 5.5. This isnt going to be built for speed so whats the general concensus on the angle of attack?? ws |
|
|
|
|
02-02-2012, 12:39 PM
|
#47 |
|
Senior Member
Join Date: Jun 2010
Location: Portland, Oregon
Posts: 104
|
*UPDATE*
Lowering the rear axle: Chapter 2 Last night I got some time to get some more progress made on the new rear shackles. I picked a nice heavy slab of 3/8th inch steel plate from the steel pile and went to work with the plasma cutter....my favorite tool  After I got them cut out and some basic clean up work done I drilled the upper 9/16th holes so they could be test fit (these holes will need to be opened up bigger later on) so that I could find out how much clearance I had and or needed to add around the e-brake cam levers. The clearance was a little tight, so I stuck one of the plates in the vise, hit it with the torch and put a little "Z" bend in it so that it would clear: With a simple C-clamp installed to keep the spring attached to the spring, I pulled the blocks out on one side and gave it a quick and gentle test....of which it preformed exactly as I had hoped and planned! If all goes as planed....I hope to have the shackles complete and the rear end hung this weekend ..stay tuned!
__________________
MrModelT 1926 Model T Roadster http://www.jalopyjournal.com/forum/s...d.php?t=308741 |
|
|
|
|
02-02-2012, 12:45 PM
|
#48 | |
|
Senior Member
Join Date: Jun 2010
Location: Portland, Oregon
Posts: 104
|
Quote:
8.5 degrees wouldn't hurt it at all, but I would try to pull it back to 7 or 7.5 degrees if you can.
__________________
MrModelT 1926 Model T Roadster http://www.jalopyjournal.com/forum/s...d.php?t=308741 |
|
|
|
|
|
02-02-2012, 01:45 PM
|
#49 |
|
Senior Member
Join Date: Dec 2011
Location: Two Rivers, Wi.
Posts: 1,406
|
Thats where I was a bit concerned. The pic shows the new bones on the axle at a relaxed stage. I trimmed the pipe to a manageable length and now need to heat and bend them up to the mounting level without reducing the caster too much. It looks like the sleeves wont adjust the caster so much as it will to correct dogtracking.
Old railroad saying... "she needs no gauging... spike her where she lies..." kinda holds true here I guess... ws   trimmed to a manageable length. Notice white mark at the tie rod. Thats where I need to bend it up without losing too much caster angle.  You need a little practice with the grinding LOL... |
|
|
|
|
02-02-2012, 02:42 PM
|
#50 | |
|
Senior Member
Join Date: Jun 2010
Location: Portland, Oregon
Posts: 104
|
Quote:
Not a bad lookin' chassis at all! Those adjustable wishbone links I see should give you plenty of adjustment for Castor angle. As far as the grinding goes ...I'm not doing my finish grinding, cleaning and painting until ALL the fab work is done, tested and approved. Used to do that in the past: fab something up, finish it and paint it.....only to find out I had to do something else to it, or it would get shop worn and messed up and I went along.
__________________
MrModelT 1926 Model T Roadster http://www.jalopyjournal.com/forum/s...d.php?t=308741 |
|
|
|
|
|
02-08-2012, 02:25 PM
|
#51 |
|
Senior Member
Join Date: Jun 2010
Location: Portland, Oregon
Posts: 104
|
*UPDATE* The rear suspension is now....FREE STANDING!!!! Extra HD photos by Mrs. Model T  I had a great weekend. I had intended to get the rear suspension hung and free standing by the close of the weekend....and by Sunday night....I was successful! I started out the day finishing up the shackle plates, drilling the lower holes after the inner plates were heated and bent: With the drilling work complete, Chris and I moved on to machining out some steel tubes to weld between the two shackle plate that will except a stock Model T perch bushing...and this time, it was my turn to run the lathe: ..Our finished product... ...me assembling... Here is the completed shackle assembly all welded up and installed for testing. Still have some cleanup to do....but it works! More to come!
__________________
MrModelT 1926 Model T Roadster http://www.jalopyjournal.com/forum/s...d.php?t=308741 |
|
|
|
|
02-09-2012, 01:01 PM
|
#52 |
|
Senior Member
Join Date: Jun 2010
Location: Portland, Oregon
Posts: 104
|
*UPDATE*
Still "cranking" along on the rear shackles.. Didn't make any "earth shattering" progress, but a few more steps toward the finish line were made. Got the shackle support rods cut down and threaded as well as some preliminary cleanup work done on my shackle assemblies. All I have left is to finish making up the shackle rod-to-radius rod brackets and the appropriate spacer tubes to complete the rear shackle setups. I also messed around with the rear shock placement. I have been stewing over this problem for months and last night it finally hit me. The setup I have in mind will tie the axle mount side of the shocks into my new shackle support rods and should be plenty stout. I will have more on the shock mounts this weekend...along with the finished shackles. I also messed around with the new hand crank. I wanted something with a little more of a stouter, classier look. I found this early crank on Ebay last week. Sadly the crank radius was too big and it hit the frame, so I was forced to cut and shorten it.....but with my welding practice you can hardly tell More to come!
__________________
MrModelT 1926 Model T Roadster http://www.jalopyjournal.com/forum/s...d.php?t=308741 |
|
|
|
|
02-09-2012, 04:20 PM
|
#53 |
|
Senior Member
Join Date: Dec 2011
Location: Two Rivers, Wi.
Posts: 1,406
|
Ive been debating whether or not to mount an early motor mount upside down on the new crossmember so as not to bend the twister that I do need to lengthen... ws

|
|
|
|
|
02-16-2012, 12:19 AM
|
#54 |
|
Senior Member

Join Date: Jul 2011
Location: Arlington, TX
Posts: 121
|
Hey. Pretty good to see you on this side too! Hopefully I'll have something to contribute of my own on this site soon.

|
|
|
|
|
02-16-2012, 11:01 AM
|
#55 |
|
Senior Member

Join Date: May 2010
Location: SPEEDWAY INDIANA
Posts: 4,148
|
I figure the new engine is almost ready to run.
I built ya a new Mallory this morning , will go out ups today. This is a unit we build for the T engine with automatic advance...as a direct replacement for the Texas T drive set up with manual advance. 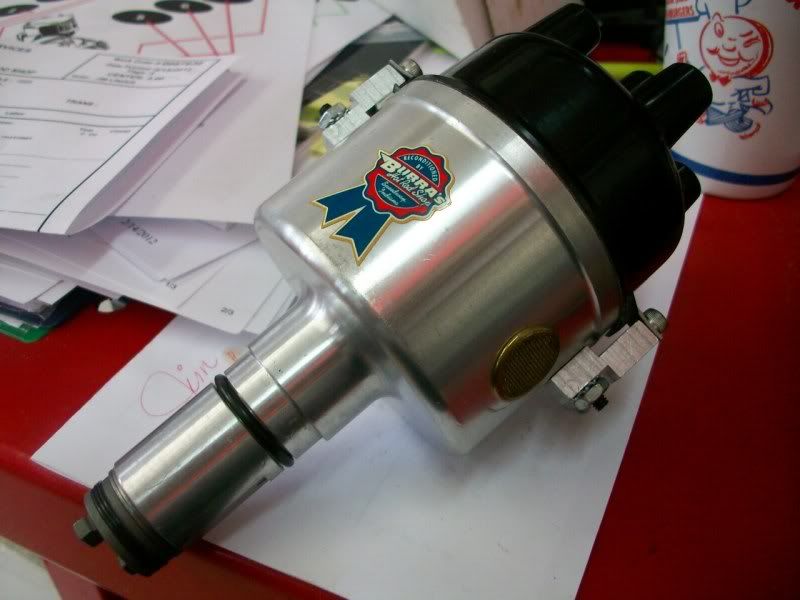
Last edited by BUBBAS IGNITION; 02-16-2012 at 11:14 AM. |
|
|
|
|
02-16-2012, 01:03 PM
|
#56 | |
|
Senior Member
Join Date: Jun 2010
Location: Portland, Oregon
Posts: 104
|
Quote:
That is about the coolest thing I have ever seen! ....you build a NICE looking "dizzy" I am so excited to play around with this on the new motor!
__________________
MrModelT 1926 Model T Roadster http://www.jalopyjournal.com/forum/s...d.php?t=308741 |
|
|
|
|
|
02-16-2012, 01:09 PM
|
#57 |
|
Senior Member
Join Date: Jun 2010
Location: Portland, Oregon
Posts: 104
|
*UPDATE* Work on the rear end draws closer to the finish line! Got some good progress made on one the last two phases of the rear suspension: the rear shock mounts. I've had this design rattling around in my noggin for a week or so now and finally got a chance to bring into a physical existence. I had originally intended to mount the rear shocks in much the same fashion as the front...but figuring how to attach them to the axle tubes without welding anything to the tubes or having them simple slide around them when in use (originally I was just going to use U-bolts and hope they didn't move) was proving to be a problem. Then....the other night (dreamland design work strikes again!) It hit me and I came up with this: These shock mounting "pads" tie into the new shackle setup via the 9/16th upper support rod and then tie down to the axle tube using my U-bolts (which will bolt through the shocks themselves) as seen here: Here are the shocks mocked up in position: I also picked up a cool old "dogbone" radiator cap for it too and spent some time early in the evening drilling the Moto-Meter stud hole larger to fit and getting it mounted: ..Looks good doesn't it? More to come!
__________________
MrModelT 1926 Model T Roadster http://www.jalopyjournal.com/forum/s...d.php?t=308741 |
|
|
|
|
02-23-2012, 02:50 PM
|
#58 |
|
Senior Member
Join Date: Jun 2010
Location: Portland, Oregon
Posts: 104
|
*UPDATE* Shock mounts: Part 1 Made some decent progress on the rear shock mounts and should have them, the front shock mounts and the steering box done tomorrow in my 3-day weekend roadster "progress spectacular" I have been trying to figure out the upper shock mounts for the rear shocks....but when I got to the shop, One of our shop buddies (who is working on a '48 Power Wagon) handed me these: Then I got the patterns made for the brackets that will hold them to the frame: ..and for some correctness.... More to come!
__________________
MrModelT 1926 Model T Roadster http://www.jalopyjournal.com/forum/s...d.php?t=308741 |
|
|
|
|
02-23-2012, 02:53 PM
|
#59 |
|
Senior Member
Join Date: Jun 2010
Location: Portland, Oregon
Posts: 104
|
*UPDATE* The rear shocks are DONE!!!!! Had the day off today, so I put in a decent days worth at the shop and got the rear shocks, shock mounts and rear suspension DONE! YAY! Here is how the upper rear shock brackets came out: ...and here is the finished product mounted up on the frame. I designed these brackets to use all preexisting bolt holes in the frame for mounting... Then after some drilling and tweaking....I got the shocks bolted up into place... Stay tuned for more!
__________________
MrModelT 1926 Model T Roadster http://www.jalopyjournal.com/forum/s...d.php?t=308741 |
|
|
|
|
02-23-2012, 02:56 PM
|
#60 |
|
Senior Member
Join Date: Jun 2010
Location: Portland, Oregon
Posts: 104
|
*UPDATE* Moving on the the front shock mounts Wednesday night was slow, so I plugged away on the new front axle clamp bolt assemblies for the front shocks to hold them to the front axle. I started with some big old leaf spring U-bolts from a '27 Dodge: They were a little too long stud wise and the two that would be used as the outboard clamps were too narrow...on account of the axle's taper. ...This meant surgery ..All welded up... Now just so you know.....I'm not done with them yet, this was just a test fit. I still have plenty of clean up work to do...so nobody get their undies in a twist lol!...I do know how to use a grinder  I also received a wonderful "care package" from Jim at Bubba's Ignition. He graciously offered to build up and donate one of their Mallory "Automatic Advance" T distributors (a direct replacement for my original) to the project. It was too kind of him and I can thank him enough Stay tuned for more!
__________________
MrModelT 1926 Model T Roadster http://www.jalopyjournal.com/forum/s...d.php?t=308741 |
|
|
|
|
«
Previous Thread
|
Next Thread
»
 Linear Mode

|
|

| Sponsored Links (Register now to hide all advertisements) |
|
|
All times are GMT -5. The time now is 05:14 AM.