|
|||||||


| Sponsored Links (Register now to hide all advertisements) |
|
|
 |

|
Thread Tools | Display Modes |
 11-02-2012, 05:58 PM
|
#61 |
|
Senior Member
Join Date: May 2010
Posts: 1,159
|
I just put a check in the mail to help fund his project.
|

|

|
|
06-29-2013, 02:02 AM
|
#62 |
|
Senior Member

Join Date: Jun 2010
Location: Huntsville, AL
Posts: 538
|
Well, so much for good intentions I guess. I had really intended to post updates more regularly but seeing that I had to dig down 10 pages to find this thread it seems that I've failed miserably in that regard. Bear with me guys, I promise to try and do better from here on out!
First off, I want to thank Andy Loso for the generous donation of the coil box and Bill in NJ for his donation. I started this thread for a couple of reasons, first because there seemed to be a lot of negativity toward young people in the hobby (at the time) and secondly because I always enjoy watching other people's projects take shape, but the last thing I ever expected when I made that first post was that anybody would be interested enough to actually make a contribution to the project! We really do appreciate it guys, and I wish I could find a better way to express that! Having said that, there's been a lot of progress over the past few months even though it might not look like it. A lot of time was spent sculpting the body buck to be sure that the lines flowed well and there weren't any funky lines (and unexpected whoop-de-doo's) in the body. Lots of file work and then gluing strips of 1/8" plywood to the ribs in order to make sure that all the lines were right. The three of us decided very early on that there's way too much work in this project for it not to be as "right" as we can make it, so a lot of time was spent going back and massaging little areas to be sure they looked right. One of the main areas of concern (at the time) was that we felt the opening around the passenger compartment was too "square", so some more wood was glued on and shaped so that now the sides of the cockpit will gradually slope up and roll around into the dash area. It might be hard to see in the pictures, but in person it seemed to make a big difference.     Once the buck was finally completed (or so we thought...), we used some welding rod to define the door opening, mocked up a couple wheels and then stood back to have a look at our progress, but it turned out to be one of those "Oh crap!" moments because something just didn't look right. There was too much empty space between the rear wheels and the door outline! My first thought was that maybe the lack of a tire was causing it, so I dug around and found a Model A wheel with a tire, but that only helped a little. After some head scratching we determined that the only way to fix the problem was either move the rear axle forward several inches or scoot the body back on the frame. Shortening the wheelbase didn't seem like the best alternative so we finally decided that moving the body back would be the least amount of work to get the look we were after, which in turn caused another hurdle because the firewall needed to remain in the same place due to pedal placement. After some deliberation we decided that 6" was the magic number and that it would need to be added in the cowl area. We figured that worst case, if a 6" stretch in the cowl looked funny then it could be shared between the cowl and the hood, with the extra length in the hood overlapping the cowl, but after all was said and done the stretched cowl looked pretty appropriate. We took the plywood seat and put it on a spare chassis 6" back from where we had originally expected it to be, and as it turns out Daniel has grown so much in the past year that the 6" setback was actually necessary! I guess it's really true that everything happens for a reason!    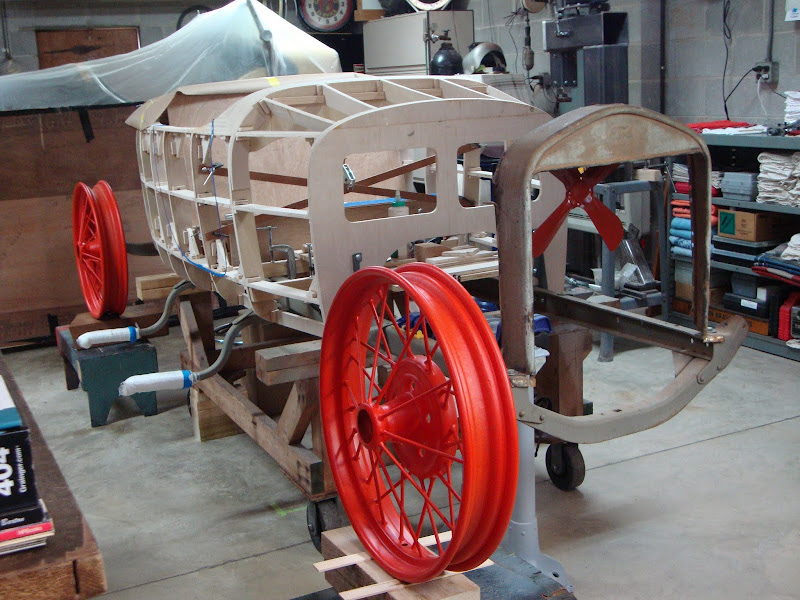  Wheel moved 6" forward to see how it looks:  Scooting the body back 6". Kid looks like he's having WAY too much fun cutting this thing up!    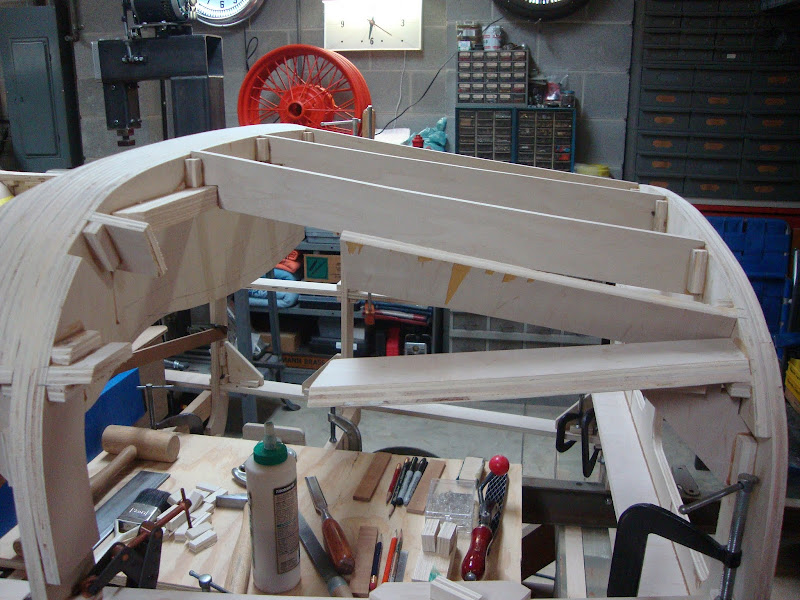  Once that was all figured out Dad started shaping a little aluminum...    We also got a couple of the wheels blasted and primed with some tinted primer that should be close to the finished color. There's a lot of time in just straightening bent spokes and filling rust pits, but the end result should be well worth the effort! In case you haven't noticed from the photos, Daniel is a huge Auburn fan ( It seems like the only clothes the kid owns are Auburn T-shirts... ) so the color scheme is going to be a sliver chassis, orange wheels & drivetrain and a dark blue body. War Eagle!  
|
|
|
|
| Sponsored Links (Register now to hide all advertisements) |
|
|
|
06-29-2013, 02:22 AM
|
#63 |
|
Senior Member
Join Date: Jun 2010
Location: Huntsville, AL
Posts: 538
|
On the mechanical side of things, we've had a lot going on trying to get an engine, transmission and both axles rebuilt. We were fortunate enough to pick up the remains of an old speedster for super cheap, and that netted us a spare engine/transmission as well as a 26/27 big brake rear end, so Daniel got to work tearing apart the rear axle. Then we delivered the parts to the local speed shop for hot tanking but once everything was cleaned we realized that the ring gear was severely worn, so he tore apart a spare small brake rear end I had put away. Unfortunately it ended up being just as worn out so we admitted defeat and ordered a new 3.00:1 ring and pinion, along with the other parts necessary to rebuild the axle. For sake of longevity I thought it would be smart to buy the roller bearing conversion kit that replaces the original babbit differential thrust washers, but in talking to some folks lately that have experience with them it seems like the bronze replacements are a better alternative. Being that I'm not a fan of doing the same job twice, I think we're going to order a set of the bronze thrust washers and go that route. In the mean time Daniel was busy blasting the housings and various other parts to get them ready for paint.
       Our local speed shop (R&R Speed and Machine, great guys!) installed hardened valve seats, opened everything up for larger valves (of the foreign type, you know, those guys with the bowties...), decked the block and then bored it .020" over. Once that was completed Dad and Daniel delivered it to Robert Cardin in Newnan, GA for the babbit work which should be done by any day now. We also had the magnets recharged by R.V. Anderson and then started on the transmission. We found that our reverse drum was scarred pretty bad so Daniel pulled the transmission off of the spare motor. It turned out that it had a really nice reverse drum but the gear was badly worn, so we ended up using the drum from one transmission and the gear from the other. Once we'd picked the best parts from the two transmissions we pressed in the bushings and had David at R&R hone them on their Sunnen machine, so now it's just matter of balancing everything and getting it all assembled. One other thing we decided to do was put a little effort into finding a way to prevent oil from leaking around the pedal shafts, so I did a little homework and found a CR seal that was just the right size. I ordered a cutter from McMaster-Carr to counterbore the holes and a little while later we were in business!     From day one this was intended to be a low-buck build utilizing parts that we either had laying around or could find for cheap, but we've always thought it would be really nice to have an overdrive so I decided to place a "Wanted Ad" for a Warford or something similar. Oddly enough I placed that ad on both the HAMB and the MTFCA websites one evening and within ten minutes I had a reply from a fellow that had one for sale. It wasn't the prettiest thing in the world and looked like it had been in the weather for years, but it was in our price range (cheap!) so I figured that it was worth the gamble. Unfortunately it ended up being completely locked up, but a 30 minute bath in a 50/50 mix of ATF and acetone freed it right up! It's now at R&R being hot tanked and once we get it back we'll get busy trying to locate what we need to get it back in working order, but in the mean time it's allowed us to go ahead and shorten the driveshaft and housing.      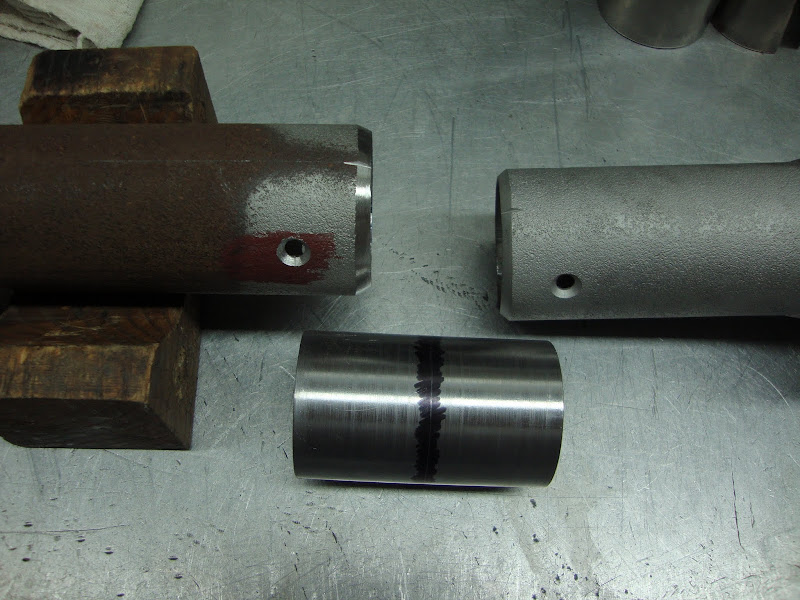 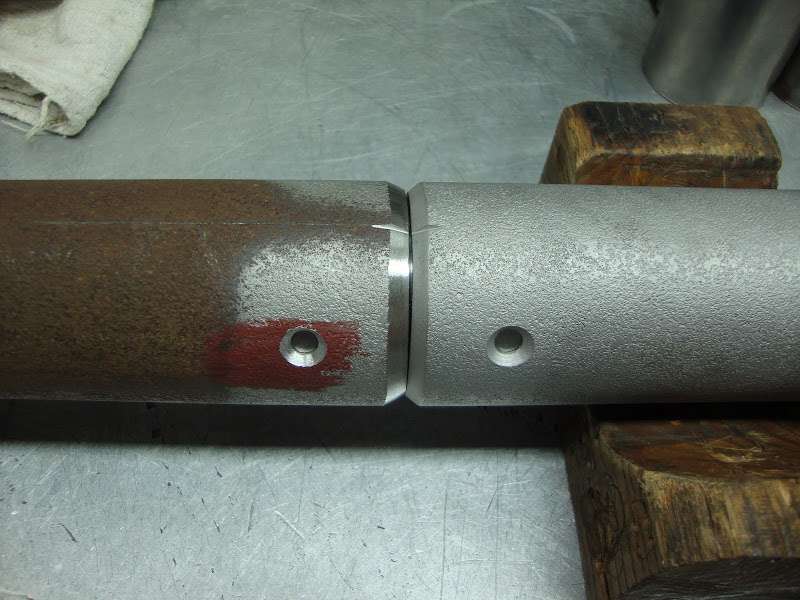  
|
|
|
|
|
06-29-2013, 02:24 AM
|
#64 |
|
Senior Member
Join Date: Jun 2010
Location: Huntsville, AL
Posts: 538
|
Now we're to the point of looking forward and trying to figure out things like spare tire placement, windshield, gauges and other details. I happened to be surfing eBay one night and stumbled across this killer dash from a 1927 or 1928 Essex, and before I knew what happened I'd bid probably twice what it was worth, but you can see from the pictures that it's absolutely stunning. It dang sure wasn't in the budget but hey, you only live once... Right now we're thinking that having the gauges rebuilt and re-screened with the winged Ford logo will be just right for this project.
  Stay tuned guys. This thing is starting to take shape! |
|
|
|
|
06-29-2013, 02:30 AM
|
#65 |
|
Senior Member
Join Date: Jun 2010
Location: Huntsville, AL
Posts: 538
|
Here's a few more random photos that I had taken. Transmission parts cleaned and ready for bushings:
 And after the bushings were installed:  And here's a couple of the buck after being re-done from having to move it back 6": 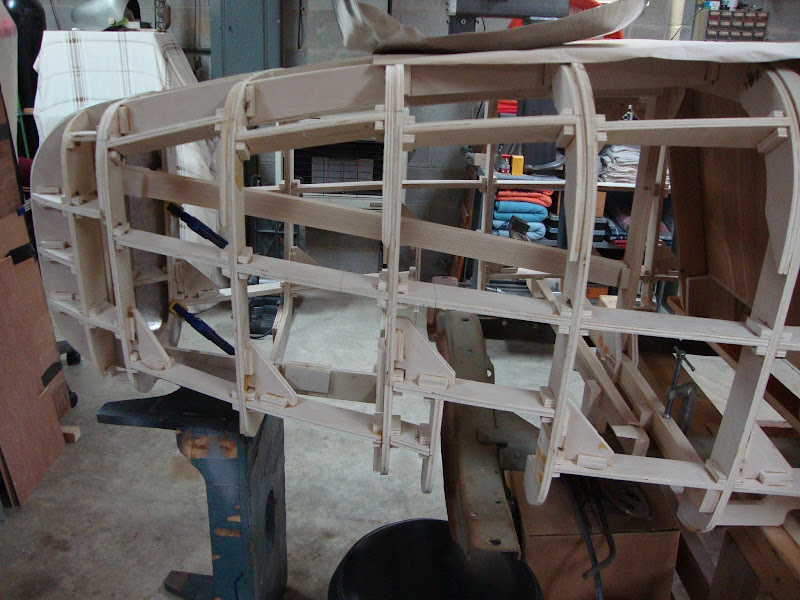 
|
|
|
|
|
06-29-2013, 07:56 AM
|
#66 |
|
Senior Member

Join Date: Apr 2012
Location: Parkerfield KS
Posts: 526
|
Sponsored Links (Register now to hide all advertisements)

|
|
|
|
|
06-29-2013, 10:14 AM
|
#67 | |
|
Senior Member
Join Date: Jun 2010
Location: Huntsville, AL
Posts: 538
|
Quote:

|
|
|
|
|

|
06-29-2013, 11:02 AM
|
#68 |
|
Senior Member

Join Date: Jun 2010
Location: West Hammond, Illinois
Posts: 2,786
|
Someone buy this kid a pair of Safety Glasses. There are times that I have to admonish some of the guys I work with. I say to them, "You want to see your kid grow up? Put on the safety glasses." And they do. Kid, if you want to see your future, wear safety glasses.
By the way, good job on the car. It is looking like it is going to be really scrumptious. TM |
|
|
|
|
06-29-2013, 04:11 PM
|
#69 |
|
Senior Member
Join Date: Jan 2012
Location: Ashby, Mass
Posts: 452
|
You must be really proud of that boy. I remember working in the garage all winter with my father rebuilding anything from antique compressors to lawn mowers. My father was not a mechanic but we had plenty of ambition and that counted for a lot. We had the wood stove going and I only wish that he let me work on a project of my choosing. He is a lucky boy. Keep the pictures and writing coming.
__________________
I know I can, I know I can http://www.flickr.com/photos/waltsprojects/ |
|
|
|
|
07-01-2013, 10:50 PM
|
#70 |
|
Senior Member
Join Date: Jun 2010
Location: Huntsville, AL
Posts: 538
|
Thanks guys, we're all having a lot of fun with this project! I spoke with Robert Carden today and he's hoping to have the babbit work done next week, so maybe we'll have an assembled engine before the end of next month!
Also learned something very interesting last week that some of you speedster guys might be interested in knowing. There's a thread going over on the HAMB about Multi Aldrich's old roadster and the discussion turned to the wire wheels he was running back in the 1950's (as shown in photos from that period). They were obviously smaller in diameter than the stock 21" wheels, and someone mentioned that they had heard a 1932 Studebaker had the same bolt pattern. I've been working on a 1932 Plymouth PB lately and happened to have one of the wheels off, so I figured that I'd check one of these just for giggles. As it turns out, the 32 Plymouth 18" wire wheels are a perfect fit for original Model T wire wheel hubs! And as luck would have it, the fellow that owns this Plymouth happened to have a spare set of wheels at home!   Being that we've already got two 21" wheels almost ready to paint and the tires are already bought, we're going to finish the car with original wheels and then restore the 18's for future use. |
|
|
|
|
07-02-2013, 03:35 AM
|
#71 |
|
Senior Member

Join Date: Apr 2011
Location: South pacific island
Posts: 1,724
|
Are 18 inch wheels better?
__________________
<Link> This is how we roll<Link> "I'm Convinced that no one really reads posts anymore; they just fabricate what they think the post says then ramble on about red herrings."--Bob Outcasts rules of old cars #1 Fun is imperative, mainstream is overrated #2 If they think it is impossible, prove them wrong #3 If the science says it impossible you are not being creative enough. #4 No shame in recreating something you never had #5 If it were not for the law & physics you would be unstoppable |
|
|
|
|
07-02-2013, 06:06 AM
|
#72 |
|
Senior Member

Join Date: Dec 2011
Location: Two Rivers, Wi.
Posts: 1,406
|
Id guess less prone to wobble and probably a lot easier to get tires for IMHO... Also would contribute to more reduction if diameter is smaller. Just don't run mopar hubcaps! ws
__________________
" Warning; the following contains content that the anal retentive may find offensive - please skip on to the next posting!" |
|
|
|
|
07-02-2013, 08:58 AM
|
#73 | |
|
Senior Member
Join Date: Jun 2010
Location: Huntsville, AL
Posts: 538
|
Quote:
|
|
|
|
|
|
07-02-2013, 12:39 PM
|
#74 |
|
Member
Join Date: Jan 2012
Location: Riverside NJ
Posts: 48
|
This is a great thread, Thank you for posting. Your son is a lucky young man to be able to learn these skills, and wind up with a great car.
JJ |
|
|
|
|
07-02-2013, 07:04 PM
|
#75 |
|
Senior Member
Join Date: May 2010
Posts: 1,159
|
Could you tell me approximately how many hours it took to build your buck and cost for wood ? Please also tell me that body would not fit on a model a ? Nice job so far !
|
|
|
|
|
07-03-2013, 12:34 AM
|
#76 |
|
Senior Member
Join Date: Jun 2010
Location: Huntsville, AL
Posts: 538
|
Good questions Bill. In all honesty, I have no idea how many hours are in that buck but it's a lot. I'll ask Dad tomorrow and see what he thinks, but I suspect that he could probably duplicate it in maybe 80 - 100 hours knowing what he knows now. I wouldn't be surprised if there were double or triple that many hours in this one because of all the nifty things we learned along the way. There were a lot of little 1/8" strips of wood glued onto the ribs in places, just to get the contour "just right", and all of the ribs in the rear were re-made at least once. Then there was that whole "moving the body back 6 inches" deal, which necessitated cutting out some of the inner bracing and relocating the cutouts for the rear spring. There was a huge learning curve for all of us, but so far we're pleased with the results. Another reason I don't know how much time it took was because there were a lot of "30 minutes here and 30 minutes there" work sessions. Often we'll sit down to eat lunch and study the project while it's quiet. Once we're done eating it's not uncommon for one of us to jump on a project and get a few minutes worth of work done before time to get back to work.
In regards to the wood, that's another story in and of itself. We started out using whatever scraps of plywood we had around the shop but quickly realized that it was going to take WAY more than we had. Dad happened to be surfing the local Craigslist one night and ran across some fellow with pieces of birch plywood (can't remember if it's 1/2" or 5/8") for sale for either $1 or $2 each (boy, my memory is getting worse...  ). Anyway, they were all the same odd size of something like 23" by 47", and the guy said he had all we could possibly want. As best we can tell they were drops from a cabinet shop that this guy had saved from a big job, and we were all too happy to take them off his hands! I think there ended up being 60 or 70 pieces total. ). Anyway, they were all the same odd size of something like 23" by 47", and the guy said he had all we could possibly want. As best we can tell they were drops from a cabinet shop that this guy had saved from a big job, and we were all too happy to take them off his hands! I think there ended up being 60 or 70 pieces total.Funny you mention this fitting a Model A chassis because we were discussing that very thing a few days ago. I haven't taken any measurements but my guess is that it could be adapted with a little effort. |
|
|
|
|
07-22-2013, 04:53 PM
|
#77 |
|
Senior Member
Join Date: Jan 2012
Location: Ashby, Mass
Posts: 452
|
Cant wait to see some more progress on the speedster. I know it is tough to get much done in the middle of summer.
__________________
I know I can, I know I can http://www.flickr.com/photos/waltsprojects/ |
|
|
|
|
07-28-2013, 10:07 PM
|
#78 |
|
Senior Member
Join Date: Jun 2010
Location: Huntsville, AL
Posts: 538
|
Not much progress to report lately, but we did get a call from the fellow doing the babbit work and the motor is ready to be picked up! Dad and Daniel are going to head down to south Georgia later this week to pick it up, so we should have a decent update next week sometime. Stay tuned!
|
|
|
|
|
08-11-2013, 12:01 AM
|
#79 |
|
Junior Member

Join Date: Apr 2011
Location: Seattle - Renton
Posts: 17
|
I have to join the chorus and say how cool this is to see your progress and working together as a family - awesome. My daughter (8) and son (10) are crazy about model As and I wish I had the skills to do what you're doing here - still, we are having a great time following along. The wood framing (buck?) is gorgeous! Thanks so much for sharing.
__________________
Learning how to make it fun. |
|
|
|
|
08-12-2013, 11:43 AM
|
#80 |
|
Senior Member

Join Date: May 2010
Location: Daytona Beach, Fl & Spencer, W. Va,
Posts: 4,442
|
As several others have said, "lucky kid".
MIKE
|
|
|
|
|
«
Previous Thread
|
Next Thread
»
 Linear Mode

|
|

| Sponsored Links (Register now to hide all advertisements) |
|
|
All times are GMT -5. The time now is 05:13 PM.