|
|||||||


| Sponsored Links (Register now to hide all advertisements) |
|
|
 |

|
Thread Tools | Display Modes |
 02-02-2016, 03:32 PM
|
#1 |
|
Senior Member

Join Date: Aug 2014
Location: melb, aus
Posts: 141
|
Hi everyone. I'm a long time observer but this is my very first post.
I was hoping someone could help me out with a '41 instrument panel. I'd like to take the glass off to clean the inside of the glass. Is there a way of doing this without pulling the dash completely apart? 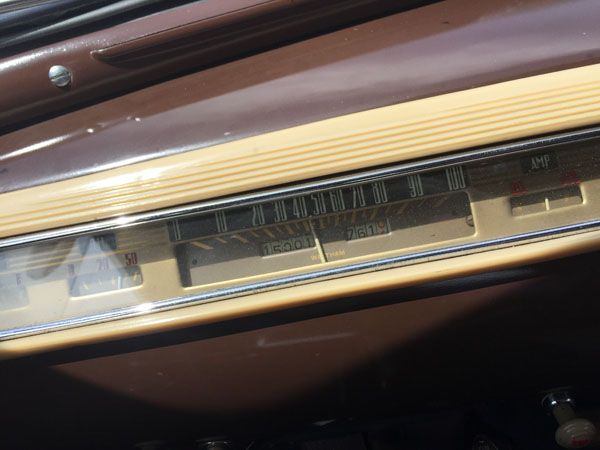 Thanks! -tony. |

|

|
|
02-02-2016, 03:48 PM
|
#2 |
|
Senior Member

Join Date: Jun 2011
Location: central Iowa
Posts: 484
|
The instrument cluster can be removed, disassembled and cleaned. You have to reach up inside the dash behind the cluster to remove the fasteners. It's been a while since I did it.
I think you can then pull the cluster out toward the steering wheel to disconnect the wiring. Handle it carefully.
__________________
Louvering, bias ply tire-truing, metal shaping and forming, lathe and mill work, member shop HAGERTY Ins. expert repair network. High quality paint work in Iowa. |
|
|
|
| Sponsored Links (Register now to hide all advertisements) |
|
|
|
02-02-2016, 03:57 PM
|
#3 |
|
Senior Member

Join Date: Dec 2010
Location: North of sandy ago, CA.
Posts: 2,067
|
Tony
Welcome to the Ford Barn. First disconnect the battery!!! Yes you need to remove the instrument cluster from the dash, four nuts. Disconnect the speedometer cable, oil pressure, water temp, fuel gauge, and ammeter wires. then you can address the chore of removing the bezel holding the lens. Bruce
__________________
Works good Lasts long time |
|
|
|
|
02-02-2016, 04:27 PM
|
#4 |
|
Senior Member
Join Date: Aug 2014
Location: melb, aus
Posts: 141
|
Thank you John and Bruce.
__________________
tony-starr.com |
|
|
|
|
02-03-2016, 12:29 AM
|
#5 |
|
Senior Member

Join Date: Oct 2011
Location: elmira,ny
Posts: 1,527
|
what I do is remove the speedo & gauges. Gives a bit move room to get the cluster out. when out you will notice the case is crimped together at about 6 spots. Uncrimp with pliers and disassemble
|
|
|
|
|
02-03-2016, 01:30 AM
|
#6 |
|
Senior Member

Join Date: May 2012
Location: Queensland, Australia
Posts: 10,441
|
Sponsored Links (Register now to hide all advertisements)
Be very careful with the little Tabs that fold over, as they are easily broken. not sure if the Ford Dash has them, but the same year Mercury Dash had them. |
|
|
|
|
02-03-2016, 01:43 AM
|
#7 |
|
Senior Member
Join Date: May 2012
Location: Queensland, Australia
Posts: 10,441
|
To illustrate the point that I mentioned in my previous Post, these cars use the carry-over 1941 Style Dash. In the top photo, we have an Australian 1947 Ford Super Deluxe. The middle Photo shows an Australian 1948 Mercury, while the bottom photos shows a New Zealand 1946 Mercury. You will notice that the Australian assembled cars didn't have the "vents" in the Windscreen moldings, while the NZ car does. that is because no Heaters or Demisters were available in cars assembled in Australia. All of these RHD models use the equivalent Ford or Mercury 1941 Style Dash. |
|
|
|
|
02-03-2016, 03:01 AM
|
#8 |
|
Senior Member

Join Date: May 2010
Location: Lower Hutt , New Zealand
Posts: 2,127
|
I've pulled a couple of these to pieces about 12 yrs back. Take care with the glass it is quite thin and easy to crack. I did mine but luckily had about 3 spare clusters. I'm pretty sure the chrome surround which holds the glass to the body of the unit has be prised away from some "tits" on the body of the unit in order to clear it to lift it off.
GB
__________________
"you can't make honey out of dog sh*t" "You're a long time looking at the lid" |
|
|
|
|
02-03-2016, 03:04 AM
|
#9 | |
|
Senior Member
Join Date: May 2010
Location: Lower Hutt , New Zealand
Posts: 2,127
|
Quote:
GB
__________________
"you can't make honey out of dog sh*t" "You're a long time looking at the lid" |
|
|
|
|

|
10-07-2020, 11:17 PM
|
#10 |
|
Senior Member

Join Date: Sep 2016
Location: Melbourne Australia
Posts: 546
|
Apols for digging up an old thread, but if anyone is interested, I'm pulling my 41 instrument cluster apart at present.
Happy to share pics if there is any appetite for 'em. |
|
|
|
|
10-08-2020, 01:19 PM
|
#11 |
|
Senior Member

Join Date: Jun 2014
Location: Williamsburg, VA
Posts: 1,644
|
Rebuilt the cluster in my '41 in 2014 to clean and improve illumination. The early model year '41s had red needles which are very hard to see against the dark gold background, except in direct sunlight. The dash lights do not help much, even on full bright, even at night; I took the dimmer out of the circuit. I keep a flashlight handy.
Painting the inside of the housing white helped a little. I painted the faded needles red; should have painted them all white. I guess that is why they switched to white needles later in the '41 model year. The lettering on the inside of the glass was flaking off, making cleaning the surface impossible. If anyone needs the name of the guy that does silk screen replacements for the '41 cluster, let me know and I will dig it out. It was a nice piece of work. I removed and replaced my cluster with the instruments installed. It takes some maneuvering, but it can be done. |
|
|
|
|
10-08-2020, 05:07 PM
|
#12 | |
|
Senior Member

Join Date: Apr 2019
Location: Kansas
Posts: 1,001
|
Quote:
Yes, please. I'm interested in seeing the pics since my '41 Merc is in need of the same thing. Thank you! Terry
__________________
"It don't take but country smarts to solve the problem" (Smokey Yunick) '41 Merc Town Sedan / 260" 8CM engine '66 Fairlane four door / "warmed up"  302 302
|
|
|
|
|
|
10-08-2020, 05:07 PM
|
#13 |
|
Senior Member
Join Date: Sep 2016
Location: Melbourne Australia
Posts: 546
|
The 41 panel can be gloomy at the best of times. I believe that the inner glass (with the numbers) was designed to be lit from the edge. I had a lot of dust and sealant in there. If you clean the edge of that glass it helps.
 I also repainted the inside of the gauge housing but I still wasn't happy. I added a string of LED lights (made up from some battery operated Christmas tree lights) to illuminate that glass edge and it's much better. 
|
|
|
|
|
10-08-2020, 05:12 PM
|
#14 |
|
Senior Member
Join Date: Apr 2019
Location: Kansas
Posts: 1,001
|
Yes,indeed. Well done! Thank you...I'll be planning to do a similar improvement. An amazing difference.
Terry
__________________
"It don't take but country smarts to solve the problem" (Smokey Yunick) '41 Merc Town Sedan / 260" 8CM engine '66 Fairlane four door / "warmed up" 302
|
|
|
|
|
10-11-2020, 04:40 AM
|
#15 |
|
Senior Member
Join Date: Sep 2016
Location: Melbourne Australia
Posts: 546
|
The gauge cluster is held in with four bolts that are accessed from the rear of the dash.
 Before removing the bolts, disconnect all electrical connections and speedo and odometer cables etc. Note, I could not slide the ammeter lead through the ‘inductive loop’ on the rear of the ammeter. The connector was too large, so I cut the terminal off and will connect a new one after reinstallation. Once the bolts are removed the gauge assembly will come out from behind the dash.  The gauge assembly is a clamshell held together at a few pinch points. Prise these back and the the case halves will come apart. Be gentle as the glass is long and narrow and could easily be cracked. I removed the gauges and speedometer so I could give the faces a clean and repaint the needles.  There are two pieces of glass - the outer one and the inner one with the white and red numbers. Mine was pretty cruddy inside so I removed the outer glass. It is mounted in the chrome frame which is press fit and will prise away gently.   Behind the ‘inner’ glass is the cluster face which is held on by bent tabs. There is a gap on the top and bottom of the cluster face where the light has to get through. Remove the cluster face so you can clean the glass and edge. Mine had a lot of crud/adhesive/sealant which was stopping the light getting in. The numbers are just painted on, so use caution.    I wasn’t happy with the level of illumination so I added a string of tiny LED lights. I chose a set of battery operated Christmas tree lights because: they were tiny, they were the right color (warm white), and powered by 4.5V. I added a 180 Ohm resistor to the string for a 12v voltage drop to 4.5, but you could probably use a 5v USB power adaptor. I placed the string along the bottom glass edge for effect. The top edge will continue to be lit by the stock lamps.  The light strings are usually about a yard long so I had to gather it up with heatshrink to get the LED’s close together. I used sealant to fasten it being careful not to get any on the glass edge. The light string is not visible from the front  I put a small hole in the back of the case for the leads to exit and connect to the instrument light circuit. Replace the cleaned up gauges and re-assemble. Don’t forget to reconnect the ammeter terminal after sliding through the inductive loop! Here is the panel without the LED's with stock illumination Here is the panel with the LED's working in addition to the stock lamps. I hope this helps. Last edited by fortyonerag; 10-11-2020 at 04:46 AM. |
|
|
|
|
10-11-2020, 05:32 AM
|
#16 |
|
Senior Member

Join Date: Sep 2013
Location: Dighton, Mass
Posts: 1,231
|
Wow that pops. whats the voltage of the led string? 9vt battey? sam
|
|
|
|
|
10-11-2020, 06:43 AM
|
#17 | |
|
Senior Member

Join Date: Jul 2010
Location: 36 miles north of Albany NY
Posts: 2,968
|
Quote:
Thanks to fortyonerag for the pictorial, I’ve got to take my speedo out as the odometer is not working. Last edited by corvette8n; 10-11-2020 at 06:58 AM. Reason: Added info. |
|
|
|
|
|
10-11-2020, 06:44 AM
|
#18 |
|
Senior Member
Join Date: Apr 2019
Location: Kansas
Posts: 1,001
|
Sam, he posted this below one of the pics above:
" I chose a set of battery operated Christmas tree lights because: they were tiny, they were the right color (warm white), and powered by 4.5V. I added a 180 Ohm resistor to the string for a 12v voltage drop to 4.5, but you could probably use a 5v USB power adaptor." Terry
__________________
"It don't take but country smarts to solve the problem" (Smokey Yunick) '41 Merc Town Sedan / 260" 8CM engine '66 Fairlane four door / "warmed up" 302
|
|
|
|
|
10-11-2020, 09:39 AM
|
#19 |
|
Senior Member

Join Date: May 2010
Location: Fairfax, VA
Posts: 3,404
|
I trust you don't drive with all those keys aboard I assume that is the key ring for all your old cars. In the Model A world the ignition suffers from too much weight on the ign switch.
|
|
|
|
|
10-11-2020, 08:06 PM
|
#20 | |
|
Member
Join Date: Sep 2020
Posts: 52
|
Quote:
Sounds like an easy job. We might take a look at my buddy's uncle's '42 project after we finished installing the suspension from 4Wheelonline onto the Jeep. The interior needs a thorough cleaning. |
|
|
|
|
|
«
Previous Thread
|
Next Thread
»
| Thread Tools | |
| Display Modes | |


 Linear Mode

|
|

| Sponsored Links (Register now to hide all advertisements) |
|
|
All times are GMT -5. The time now is 05:07 AM.