


 02-26-2013, 07:50 PM
|
#1 |
|
BANNED
Join Date: May 2010
Location: Bucks County, PA
Posts: 11,454
|
getting ready to rebuild my rear differential. its already torn apart and everything has been powder coated. from different articles i have read its seems the best way to work on it is to clamp the axle housing in a vice with round collars. any suggestions of what i can use to go around the tubes, and also protect the finish at the same time. is there a place i can purchase a holding fixture designed for this?
thanks |

|

|
|
02-26-2013, 08:05 PM
|
#2 |
|
Senior Member

Join Date: May 2010
Location: Eastern Tennessee
Posts: 11,520
|
Why do you need a fixture? We don't use one. Use a table to lay it on and get with it.
|
|
|
|
 )
)| Sponsored Links (Register now to hide all advertisements) |
|
|
|
02-26-2013, 08:12 PM
|
#3 |
|
Member
Join Date: Jan 2011
Posts: 69
|
I never paint mine until it's done.
|
|
|
|
|
02-26-2013, 08:23 PM
|
#4 |
|
BANNED
Join Date: May 2010
Location: Gothenburg Nebraska Just off I-80
Posts: 4,893
|
Much agreed Brent. Fixtures are nice, but not neccessary. I just put the right side hsg in the vice, but have rebuilt them with no clamping also. Rod
__________________
Do the RIGHT thing - Support the H.A.M.B. Alliance!!!! |
|
|
|
|
02-26-2013, 08:27 PM
|
#5 |
|
Senior Member

Join Date: Jul 2010
Location: Cow Hampshire
Posts: 4,188
|
I've seen pix of wooden "carriages" that can be made. They sort of emulate the KRW dedicated appliances for working on front and rear axle.
The rear one was a sort of "box" with three supports. Once each for the trumpets and one for the torque tube (or the drive shaft if still in the banjo.) These seemed VERY convenient. But of course you have to store them when you're not actually working on an axle with them. I do have a roll-around stand which is nothing but a dolly with two supports for either side/trumpet. Make sure when you go together that you put the ring gear on the correct side. Otherwise you get one forward speed and three reverse! I NEVER made this mistake. Joe K
__________________
Shudda kept the horse. |
|
|
|
|
02-26-2013, 09:00 PM
|
#6 |
|
Senior Member
Join Date: May 2010
Posts: 4,179
|
Sponsored Links (Register now to hide all advertisements)
2. On opposite end, dirll 9/16" hole through the flat side of both 2x4's & provide a 1/2" threaded rod with a nut & washer on each end of the threaded rod. 3. With wood rasp, in about the center of the 2x4's, (24" from both ends), carve out a conical shaped, tapered indentation, averaging about 1/2" deep on the in-side of each 2x4 to place axle housing in this identation. Position wheel bearing end of axle housing near floor & banjo end of axle housing pointing upwards -- conical indentation should be larger at top & smaller at bottom to prevent axle housing from slipping downwards & from moving back & forth sideways. 4. Set axle housing vertically in conical indentation & clamp & tightly secure same in place with the nuts on the threaded rod on the end of the 2x4. 5. Lay both 2x4's on (2) steady, level saw horses or an type of level steady supports & get to work. 6. Because of paint, maybe provide something like a towel for a cushion to protect the paint on the axle housing. 7. Had no problem with this simple inexpensive set up. Last edited by H. L. Chauvin; 02-26-2013 at 09:05 PM. Reason: typo |
|
|
|
|
02-26-2013, 09:08 PM
|
#7 |
|
Senior Member
Join Date: Nov 2011
Location: Arkansas & Alaska
Posts: 645
|
I have used a table covered with carpet or saw horses also covered with carpet.
|
|
|
|
|
02-26-2013, 10:14 PM
|
#8 |
|
Senior Member

Join Date: May 2010
Location: Southern California
Posts: 3,131
|
I had two very bad experiences trying to rebuild a rear axle assembly for customers who had the axle housings, torque tube, and banjo powder coated.
In both cases the powder coating people coated everything, machined surfaces and receses where races install. In the first instance I disasemble the rear axle assembly for the customer and warned to tell the powder coating people to mask off the sensative areas. All to no avail. When they brought the parts back everything was powder coated. I told the customer there was no way I could rebuild it. He took the parts back and a shop employee removed the powder coating with disk grinder and destroyed all the machined surfaces. It ended up in a law suit and the powder coater paid a fee for the customer to buy a new rear axle assembly. The second one the customer brought everything to me apart and already powder coated. Same story, they powder coated everything. I wouldn't touch it. In my cottage industry I will not take a rebuild job in if powder coating is involved. I don't think powder coating on the rear axle assembly is a good idea. It can easily chip from rocks and such hitting it. And there may come a day when AAA has to haul the car home on a flat bed truck with rusty chains wraped around the rear axle housing. Paint the rear axle assembly when it is all together like Henry did, it will look good, it will last, and it is easy to repair the painted surface. Tom Endy |
|
|
|
|
02-26-2013, 10:29 PM
|
#9 |
|
BANNED
Join Date: May 2010
Location: Bucks County, PA
Posts: 11,454
|
tom,
all the sensitive areas were protected i made sure of that and was done to meet my specs, but i see your point of what a mess it can be if not done properly. thanks for your input greatly appreciated |
|
|
|
|
02-27-2013, 12:59 AM
|
#10 |
|
Senior Member

Join Date: May 2010
Location: Mpls, MN
Posts: 27,582
|
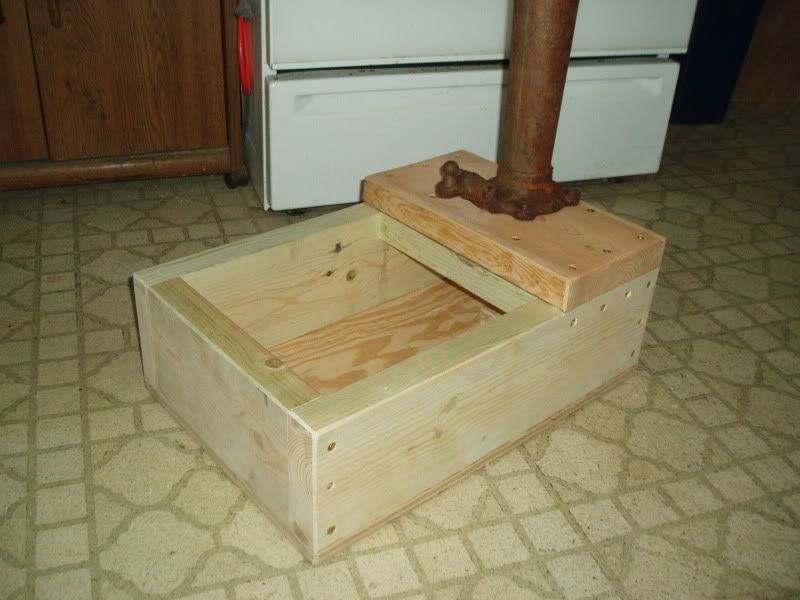 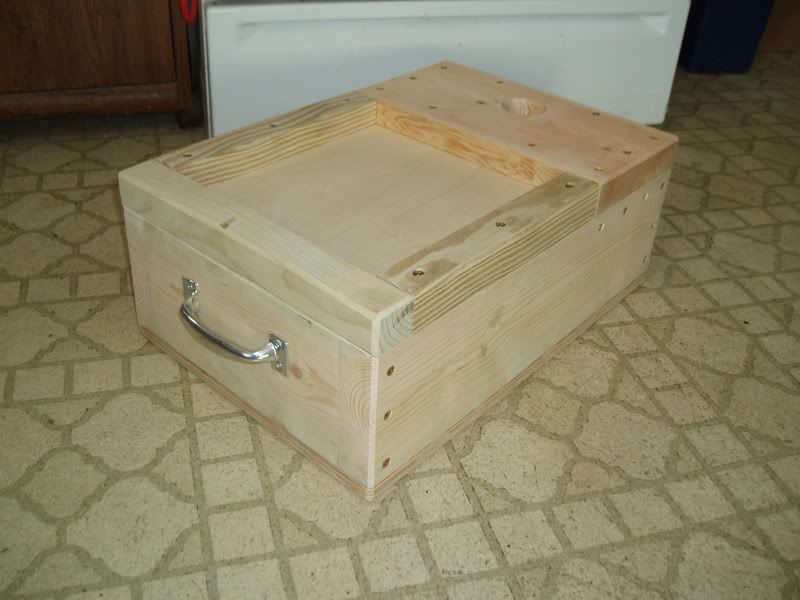 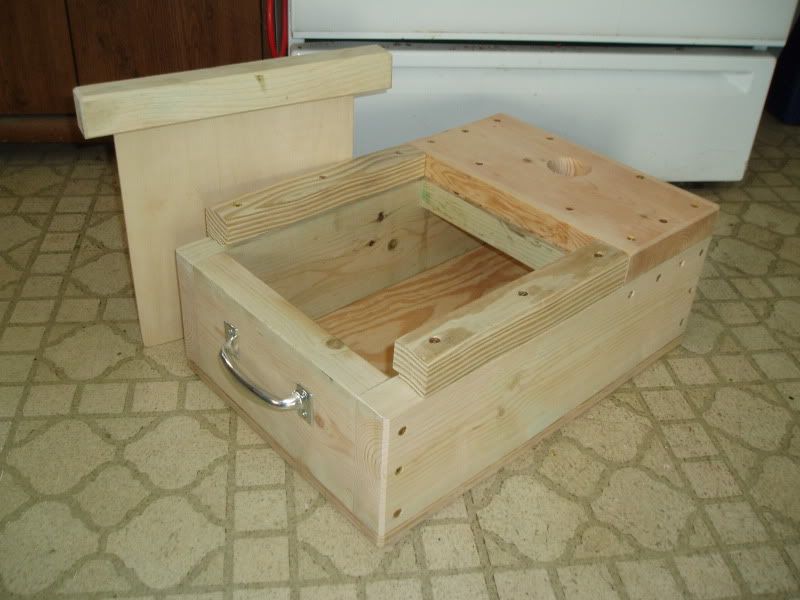 I've varnished this box since I took these pictures. This works great to build up rear ends, and the box is great for holding gaskets, tools, and parts. The first couple rear ends I did on a table, then I made a couple holders that the customers kept, since I made them using their wood. I cut 3 pieces of 2 x 12, the bottom piece about 18", then the next piece on top of it about 12", then the top piece about 6". I used a hole saw to drill holes through the top two pieces for the axle tube to stick into. I screwed the 3 pieces of 2 x 12 together, and it made a nice work stand for assembling the rear end. With the bottom board 18" and the support hole located near the end, it was stable even with the drive shaft and torque tube bolted on. |
|
|
|
|
02-27-2013, 02:07 AM
|
#11 |
|
Senior Member
Join Date: May 2010
Location: Southern California
Posts: 3,131
|
It is not absolutely necessary to build up the rear axle assembly in a verticle jig, it just makes it so much easier. I built this jig years ago. It is a bench vise that swivels that I picked up at a swap meet. I mounted it on some boards I laminated together and I clamp it in a wood vice I have attached to my work bench. The grabbers are made from a section of steel pipe I cut in half and had the two pieces welded to brackets I could bolt to the swivel vice.
I glued some pieces of carpet inside the grabbers to protect the axle housings. Right above the bench I have an electrical hoist attached to ceiling rafters that I use to lift out the whole assembly when complete. Tom Endy |
|
|
|
|
02-27-2013, 07:33 AM
|
#12 | |
|
Senior Member
Join Date: May 2010
Location: Eastern Tennessee
Posts: 11,520
|
Quote:
 The truth of the matter is we powdercoat the individual pieces and then machine, and then assemble. We don't have problems!! For someone that wants to do their machine work first, the Powder painter should have fiberglass tape that is specially made to cover areas prior to applying the powder. My reasoning for not needing a fixture is the length of time it would take to fabricate one vs. the useage and/or need. Most folks I know will only rebuild one rear end during their restoration and spending time fabricating specialty tooling that takes more time to do than the time they save is foolish in my opinion. There are a lot of individual tasks in rebuilding a rear end assy that a "holding fixture" would be of no service to use. Using Tom's example or the KRW Axle Fixture clone (pictured below), how would either of these fixtures assist with assembling the differential or setting the pinion preload? Think about installing the axle or driveshaft seals. No help there IMO as it would take more time to mount the housing than drive in the seal. Even setting differential bearing preload would be cumbersome but to each his own I suppose. . |
|
|
|
|

|
02-27-2013, 09:40 AM
|
#13 |
|
BANNED
Join Date: May 2010
Location: Bucks County, PA
Posts: 11,454
|
thank you for the replies and all the ideas. 99.9 % of the responses were very helpful, accurate and pertinent to the question i asked. i like tom w's "box"
 and at first i thought it would not be stable and that he screwed it to his kitchen floor to build the rears. H.L. any pics of your setup? brent for now i am going to slap it on a bench as you and others mentioned and get to it. i don't have the time right now to manufacture something since i only need to do this one. right now we are mobbed here at the shop with modern iron.. and at first i thought it would not be stable and that he screwed it to his kitchen floor to build the rears. H.L. any pics of your setup? brent for now i am going to slap it on a bench as you and others mentioned and get to it. i don't have the time right now to manufacture something since i only need to do this one. right now we are mobbed here at the shop with modern iron.. i definitely would like to put something together for future use for sure. i had everything powder coated under this car from front to back to specific instructions that i told the p.c.'er as not to interfere with any tolerances on assy. the last car i did the chassis and components were painted, and i wanted to take a different approach this time. Last edited by Mitch//pa; 02-27-2013 at 10:05 AM. |
|
|
|
|
02-27-2013, 09:46 AM
|
#14 |
|
Senior Member

Join Date: May 2010
Location: ca.
Posts: 2,522
|
i did my first diff on the floor with blocks . im doing my 2nd one in a vise (verticle) with 2x4 clamps & rags as i painted it b 4 i finished . just use what you have & take your time ..........
__________________
V4f |
|
|
|
|
02-27-2013, 10:19 AM
|
#15 |
|
Senior Member
Join Date: May 2010
Location: St Charles , Missouri
Posts: 1,998
|
Mitch,
I agree with Brent.... that the rear end fixtures are not needed.. in fact they would be a pain in the rear! ( no pun intended). I am a KRW collector and have almost all the tools and have passed by several of the rear axle stands as it is just not practical or space wise something I need/want to have. I have rebuilt many rear axles ( have one to do this week and a columbia as well) and I feel that I am better off on the bench/table, or the floor if need be. It's more about what you do in your process, attention to detail, and doing it all properly that makes the most difference. There's plenty of good tech stuff written on the rear axles. Read it carefully and proceed. Again.. attention to detail. Forget the fixture and just get to it! Good luck! Larry Shepard |
|
|
|
|
02-27-2013, 01:04 PM
|
#16 |
|
Senior Member
Join Date: May 2010
Location: Mpls, MN
Posts: 27,582
|
  I like any tool or jig that makes the job go easier. I think it was Tom Endy that gave me the idea to make this jig to hold the rear end. This comes in handy while assembling the backing plates, spring and brakes. The square tubing and Y yokes just slip out, so it's easy to make different working heights. The hitch pin pulls out to make storage easy. 
|
|
|
|
|
02-27-2013, 01:24 PM
|
#17 | |
|
Senior Member
Join Date: Jul 2010
Location: Cow Hampshire
Posts: 4,188
|
Quote:
Joe K
__________________
Shudda kept the horse. |
|
|
|
|
|
02-27-2013, 02:10 PM
|
#18 |
|
Senior Member
Join Date: May 2010
Posts: 4,179
|
Mr. Tom W.,
Have one similar, a very lightweight tee, (weighing just a few pounds), set on (3) small 1" diameter casters, with the tee made out of (2) select pine 1x4's with (3) vertical, much shorter fixed 2x4 vees -- (1) to support the drive shaft tube & (2) to support axle housings. 1. The (3) wood vees supporting the axle housings were set at a low enough height whereby the differential can be easily removed from either the right or the left side of vehicle with rear spring "attached", passing through & under either the right or the left fender well; hence, the vehicle does not have to be jacked up very high for the differential & rear spring to clear vehicle obstacles if the differential were pulled out from the rear. 2. Next, the (2) vees supporting the axle housings were purposely set at a low height whereby my battery operated drill with an attached socket can be placed in an upright position with the drill's battery resting on the floor, such that when an axle or drive shaft is placed in said vees, the drill can rotate the nut on either the axle or the drive shaft, & easily rotate either the axle or the drive shaft. 3. In doing so, it is like rotating either the axle or drive shaft in a drill press or in a lathe, thus eliminating need for another tool or jig such as a drill press to turn the drive shaft to dress down the rear of the pinion gear tube as recommended; hence: A. A "new" pinion gear can be installed on the drive shaft, secured with the nut, & rotated in the vees with the drill socket on the nut such that a few thousandths of an inch of the diameter of the tubular part of the rear of the "new" pinion gear can be removed per Mr. Tom Endy's suggestions, to match the tapered tubular part of Ford's slightly tapered "original" pinion gear. Makes it far easier to adjust pinion gear to specificatons. B. The tapered outer part of an "existing" rear axle can be burnished to remove deformed metal high spots, (if any) for a very tight tapered fit when the tapered hub is placed & secured with the axle nut. If one follows "all" of Mr. Endy's recommended adjustments in his article on differential re-build, one is sure to have a serviceable differential for a long time. Made several other very simple jigs from almost nothing for successful differential adjustment & overhaul. Last edited by H. L. Chauvin; 02-27-2013 at 02:13 PM. Reason: typo |
|
|
|
|
03-01-2013, 06:29 PM
|
#19 |
|
Senior Member
Join Date: May 2010
Posts: 4,179
|
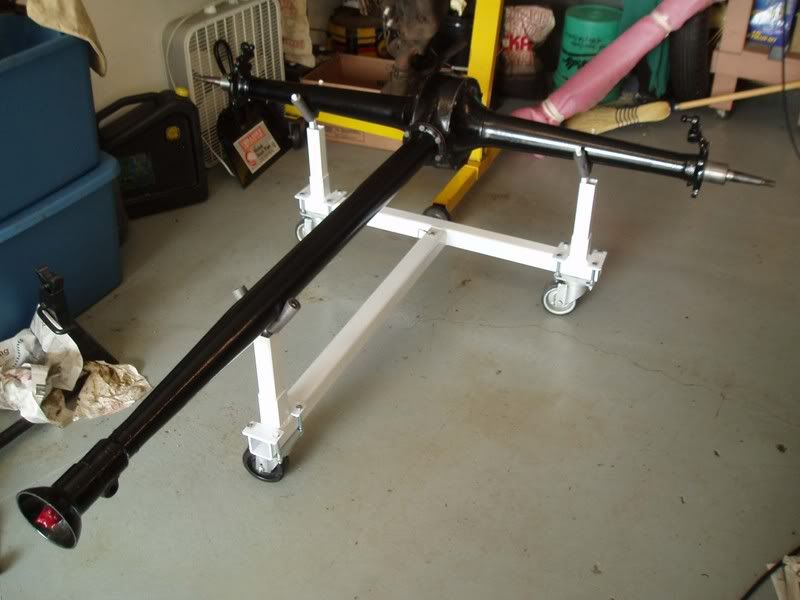
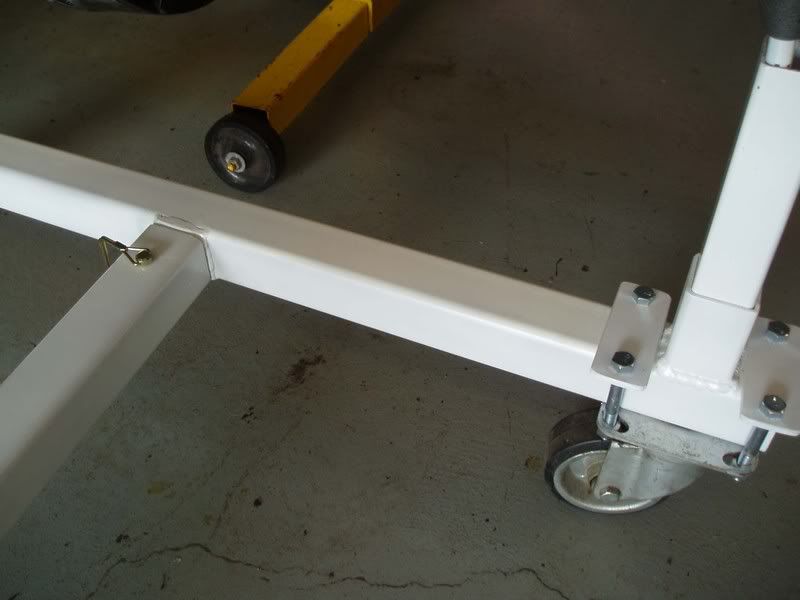
Mobile Wood Differential Carrier
When the axle is rotated with the drill, the part of the axle where the seal occurs can be polished in a similar manner as the tapered part of the axle as per reply #18 above. |
|
|
|
|
03-02-2013, 01:48 AM
|
#20 |
|
Senior Member
Join Date: May 2010
Location: Southern California
Posts: 3,131
|
The rolling rear axle assembly jig in the photo was built about 20 years ago. It was primaily designed for removing and installing the whole rear axle assembly in the car. Note that there is a cut out directly under the banjo, This is so you can place a floor jack under the banjo to be able to lower and raise the rear axle assembly when removing or installing it in the car. It also has a number of wheels so it can be rolled around. With this jig I am able to easily remove and install a rear axle assembly in a car by myself with little effort.
Another requirement at the time was to make it portable. The jig is made of four parts that bolt together so it can be broken down and transported in the trunk of a modern iron. The requirement was important at the time, but not so much any more as I no longer have a reason to transport it. I could also break it down for easy storage. However, it has been in constant use so I have no reason to want to break it down. I use the jig for disassembly when a job comes in and for the final assembly. Once a rear axle assembly is nearing completion in my verticle jig I move it to the horizontal rolling jig with a small electrical hoist mounted to the ceiling rafters of the shop directly above the vericle jig. Once it is in the rolling jig I install the torque tube and prepare the assembly for painting. Painting is done while in the jig as I can flip it over and paint top and bottom and allow the whole thing to dry while in the jig. It is much easier to work on a rear axle assembly when it is in the jig and I am sitting on a little roll around stool. An added feature that I found necessary and later had to add is the counter weight at the front. It weighs about 50 lbs and is enough to counterbalance it so that the jig does not tip when the rear axle assembly is flipped over. The counter weight are easily removed for transport. If the plan calls for installing the rear brakes it is easily done while in the jig. The jig is very handy for installing Mitchell overdrives. The rear axle assembly is unbolted from the car and lowered into the jig and rolled out from under the car. The torque tube is removed and the drive shaft and pinion gear are pulled out of the banjo while the rear axle assembly is still in the jig. The drive shaft is taken over to a work bench where the drive shaft is removed from the pinion assembly and the Mitchell stub shaft installed. The reworked pinion assembly is installed back in the banjo, the overdrive attached, and the jig is rolled back under the car and reinstalled. The rear axle assembly is not completely disassembled for this task. The roll around jig is truely versatile and is used quite often. Tom Endy |
|
|
|
 |
«
Previous Thread
|
Next Thread
»
 Linear Mode

|
|

| Sponsored Links (Register now to hide all advertisements) |
|
|
All times are GMT -5. The time now is 09:12 AM.